Unity 6 introduced a bunch of new features when it comes to performance optimization. Today we will take a look at GPU Resident Drawer which can reduce rendering workload on CPU. The setup in this post is done using Universal Render Pipeline but it is applicable also to High Definition Render Pipeline.
What is GPU Resident Drawer
GPU Resident Drawer is Unity’s internal rendering system which automatically uses the BatchRendererGroup API to draw GameObjects with GPU instancing. The result is reduced draw calls and freed CPU processing time.
It is best suited for large complex scenes with many objects like a large number of environment objects.
Ok, and BatchRendererGroup is?
BatchRendererGroup is a technique which makes it possible to efficiently render a large number of objects via instanced draw calls. It is done using draw commands, containing all information required to create an instanced draw call, e.g. batchID, meshID or materialID. With GPU Resident Drawer you do not have to worry about technicalities of BRG API, because Unity will do all the rendering magic for you.
How to make it work
In order to make GPU Resident Drawer work, you have to meet following requirements:
- Set proper settings in Unity
- Make a GameObject compatible with GPU Resident Drawer
GPU Resident Drawer requires following settings:
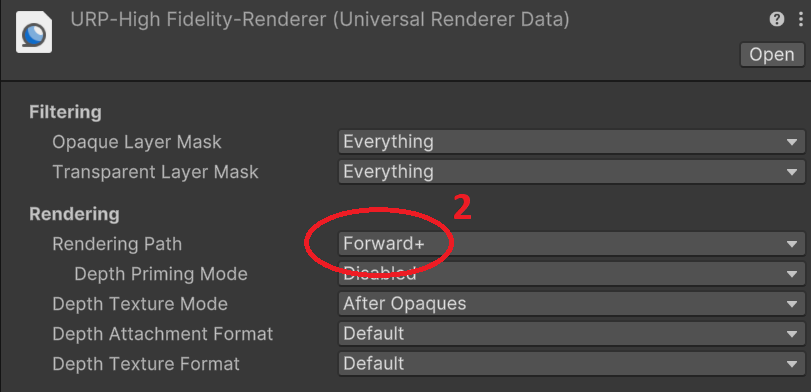
- The Forward+ rendering path
- Graphics APIs and platforms that support compute shaders , except OpenGL ES
- GameObjects that have a Mesh Renderer component
To enable the GPU Resident Drawer follow these steps:
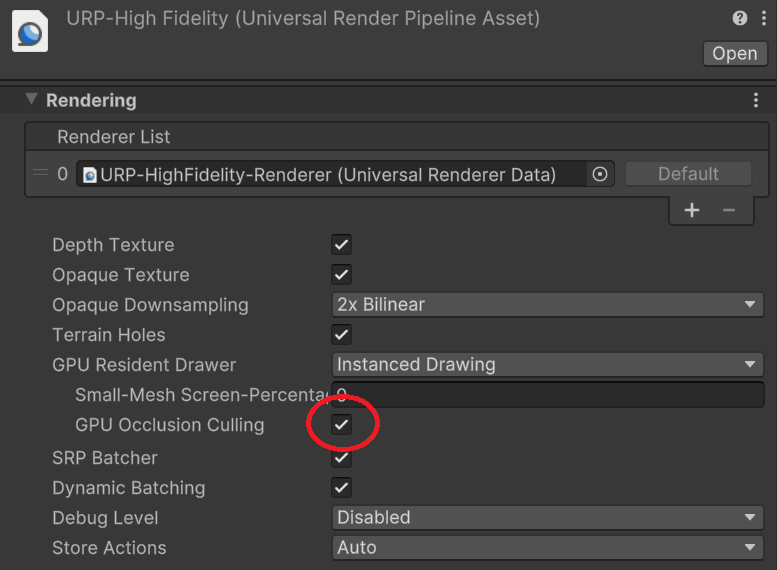
- Go to Project Settings > Graphics, then in the Shader Stripping section set BatchRendererGroup Variants to Keep All.

- Double-click the renderer in the Renderer List to open the Universal Renderer, then set Rendering Path to Forward+.
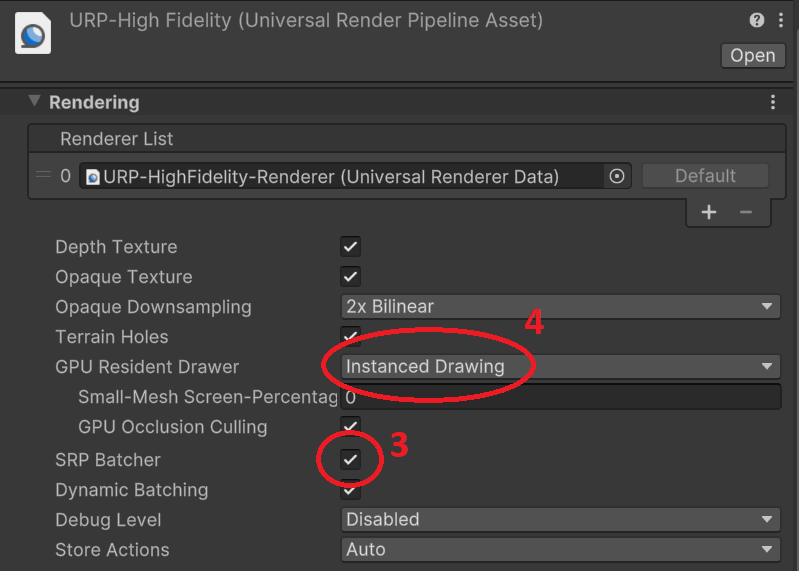
- Go to the active URP Asset and enable SRP Batcher.
- Set GPU Resident Drawer to Instanced Drawing.
To make GameObject compatible with the GPU Resident Drawer, check if:
- It has a Mesh Renderer component.
- In the Mesh Renderer component, Light Probes is not set to Use Proxy Volume.
- It uses only static global illumination, not real time global illumination.
- It uses a shader that supports DOTS instancing.
- It doesn’t move position after one camera finishes rendering and before another camera starts rendering.
- It doesn’t use the MaterialPropertyBlock API.
- It doesn’t have a script that uses a per-instance callback, for example OnRenderObject.
You can also exclude a GameObject from the GPU Resident Drawer by adding a Disallow GPU Driven Rendering component to it.

Also – according to Unity – these settings may speed up GPU Resident Drawer, but are not required for it to work:
- Go to Project Settings > Player, then in the Other Settings section disable Static Batching.
- Go to Window > Panels > Lighting, then in the Lightmapping Settings section enable Fixed Lightmap Size and disable Use Mipmap Limits.
Feel free to experiment with it.
And that’s it – you are good to go!
Final results
Let’s take a look at how many draw calls we were able to reduce.
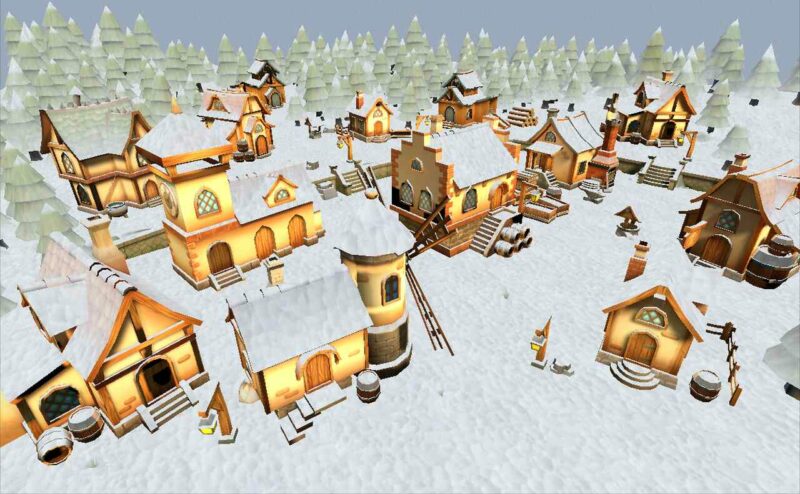
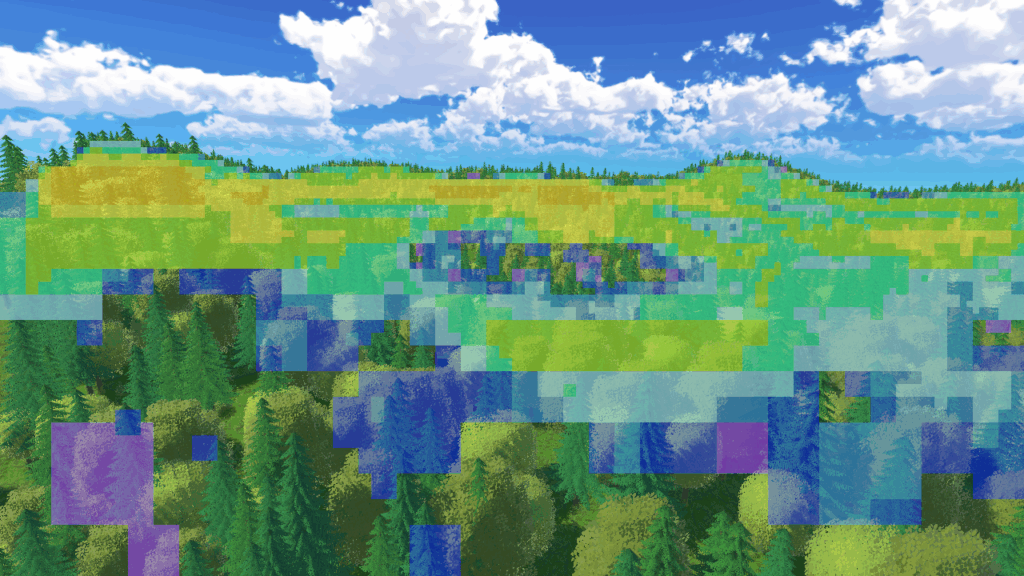
We have prepared a test scene with over 35 000 objects representing various types of foliage – trees, grass and bushes. Here’s how it looks.
We have performed tests on a PC platform with GPU Resident Drawer enabled and disabled. All tests have been performed in 1920×1080 resolution.
Below are results with GPU Resident Drawer disabled.
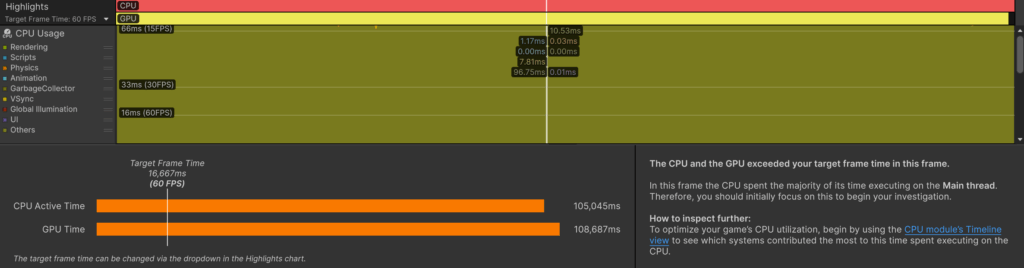
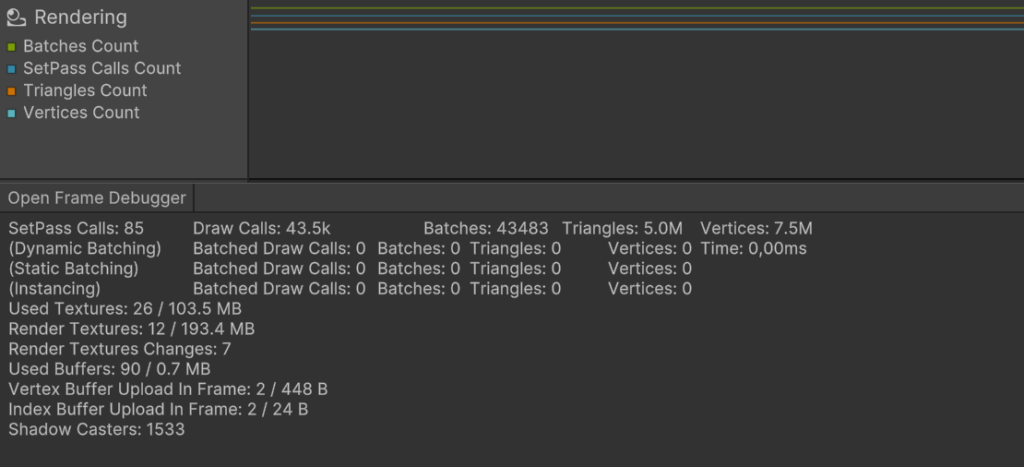
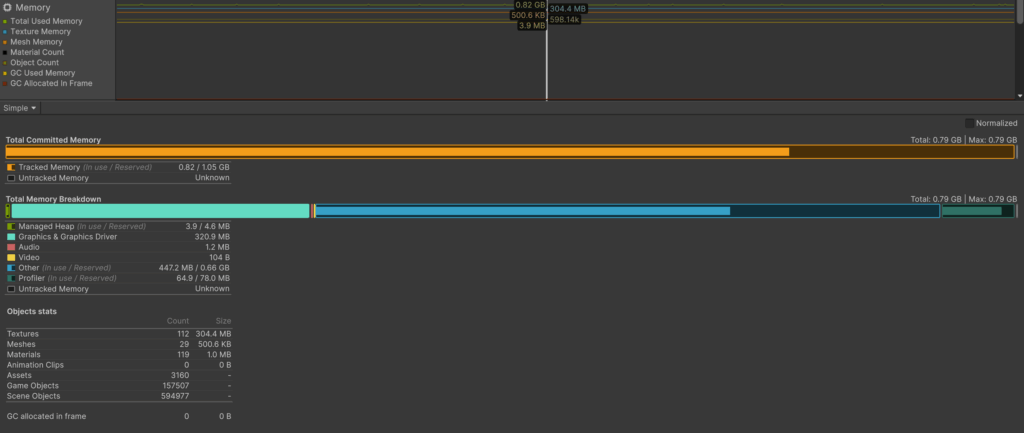
As you can see, we are not even close to our target frame rate which is 60 FPS (16,667 ms). We are performing 43.5k draw calls with 43 483 batches and rendering 5 million triangles. We are also allocating 0.82GB of memory.
Below are results with GPU Resident Drawer enabled.
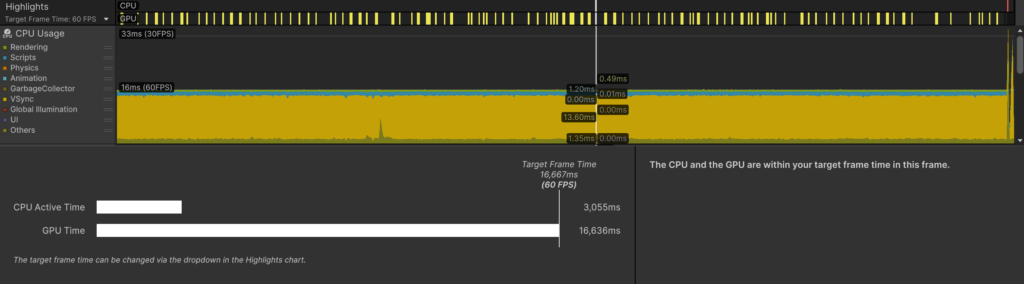
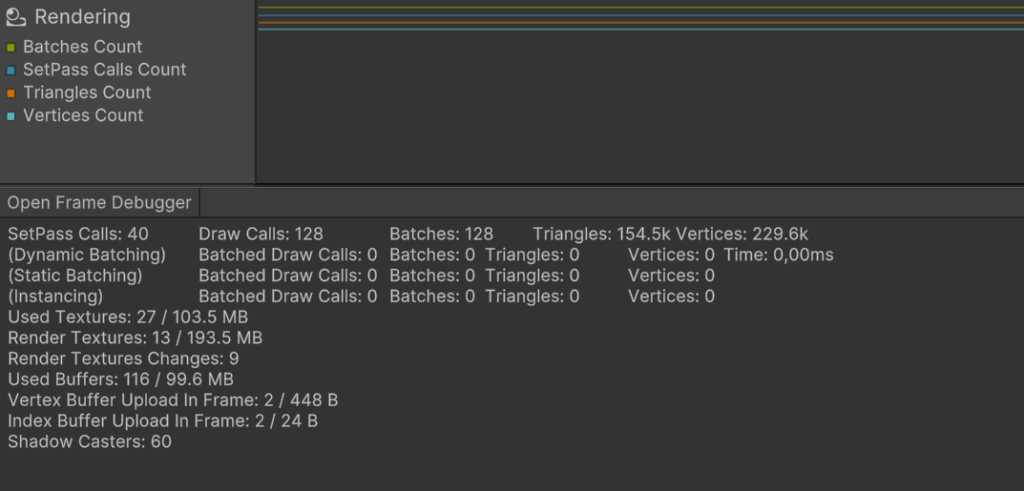
CPU and GPU times drastically dropped. The GPU is taking over 16 ms to process a frame but most of the time it’s idle and waiting for the target frame rate. Draw calls and batches were reduced to 128. The CPU is no longer bottled with too many draw calls and is able to quickly pass them to the GPU.
That said, we can observe that the performance improvement is huge.
Are there any drawbacks?
There is some cost of using GPU Resident Drawer.
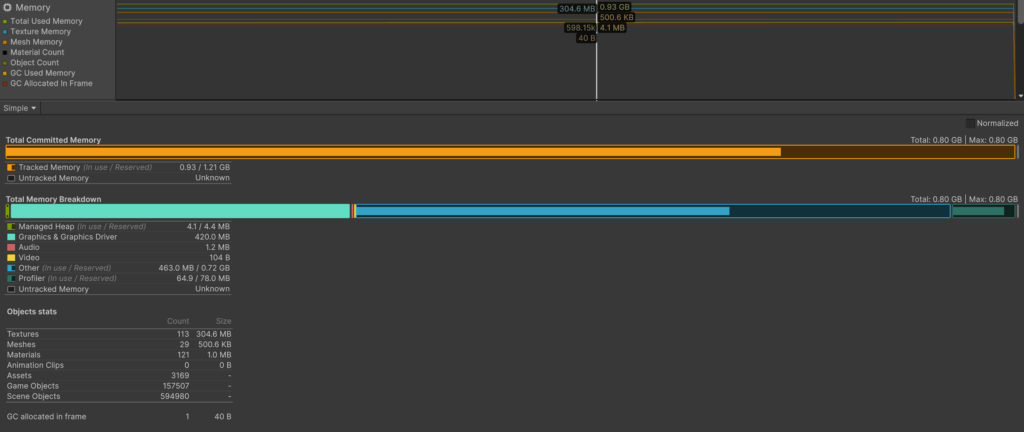
First of all there is an increase in memory usage – in our case it was about 100 MB which you can see on profiler extracts above.
Second, and what Unity is stating, is that the build times are longer with GPU Resident Drawer. So keep that in mind if you’re planning to use this feature.
We have not noticed any difference in time of entering the Play Mode in the Editor.
Bonus: GPU Occlusion Culling
You probably noticed how much the amount of rendering geometry has drastically dropped. This is a credit of GPU Occlusion Culling – another game-changing feature introduced in Unity 6.
The option to enable it shows in URP Asset right after enabling GPU Resident Drawer.
What it does is it uses a depth buffer from the previous frame to check if a particular instance of geometry is occluded by other objects. This results in fast and accurate occlusion culling made entirely on GPU.
You can actually enable debug mode of this feature to see how it works. To do that go to Window -> Analysis -> Rendering Debugger. Then select a GPU Resident Drawer tab and check Occlusion Test Overlay checkbox.
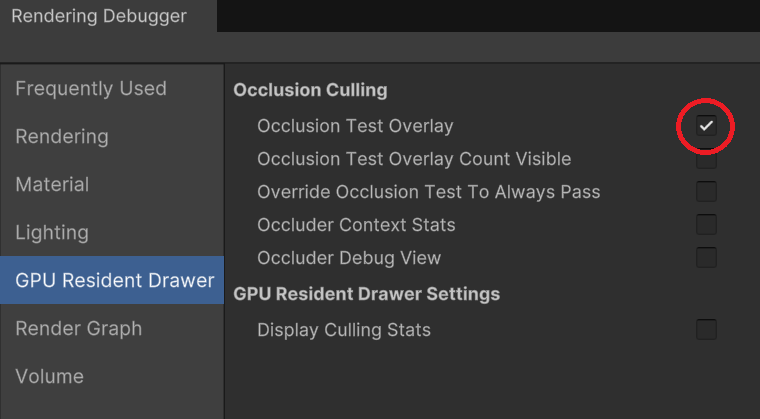
Now the Scene and Game View will show you which geometry is being culled by GPU Occlusion Culling. The more warmer areas the more geometry is being culled.
Summary
GPU Resident Drawer alongside GPU Occlusion Culling can significantly improve performance of your project in just a few clicks. Do not hesitate to test it yourself!