Have you ever needed to wait a few seconds before executing an action or spread an operation over multiple frames? Or maybe you wanted to wait for another operation to complete before calling a specific method? I bet you used coroutines – they’re easy to go with and comfortable to use. However, while they’re built into Unity and very convenient, they come with hidden drawbacks that can hinder performance and complicate debugging. In this post, we’ll dive into why coroutines aren’t always the best tool for the job and explore three modern alternatives: Async/Await, UniTask, and DOTween.
What are coroutines?
Coroutines in Unity are methods that yield control back to the engine, pausing execution until a condition is met (e.g., a timer elapses or the next frame arrives). They let you write code that seems to run asynchronously. For instance, we can wait some time before doing something:
private IEnumerator DelayedAction()
{
    yield return new WaitForSeconds(2);
    Debug.Log("2 seconds later...");
}
We can also spread an operation over multiple frames:
private IEnumerator MoveOverTime(Transform obj, Vector3 target, float duration)
{
    float elapsed = 0;
    Vector3 start = obj.position;
    while (elapsed < duration)
    {
         obj.position = Vector3.Lerp(start, target, elapsed / duration);
         elapsed += Time.deltaTime;
         yield return null; // Wait for the next frame
    }
    obj.position = target;
}
They are easy to understand, simple to use, and seem to work asynchronously. So, what is the problem? Well, their magic under the hood isn’t without a cost.
Why coroutines are problematic?
1. Not Truly Asynchronous
Coroutines are not really asynchronous operations. Instead of running on separate threads, they operate entirely on Unity’s main thread. Multiple coroutines run in a sequence.
Why is that a problem? This means that if there’s a frame drop or performance hiccup, every active coroutine is affected – though that is less problematic. A bigger issue is that any expensive computation in the coroutine may degrade game performance, such as causing frame drops.
In contrast, true asynchronous operations (e.g., using async/await) can run on different threads or be scheduled in ways that don’t tie them to the frame rate. While they still affect the game’s performance, since they use the same processor and other resources, they can be paused so the Unity thread can continue processing. For coroutines, they have to finish running until the yield statement.
2. No Return Values
You cannot directly obtain results from coroutines. This limitation makes it difficult to pass results between different parts of your code. You either need to use a shared field to store the output or pass callbacks in coroutine arguments. It is much more cumbersome than simply calling a method and using the returned value, and it increases code complexity. And it gets even worse with nested coroutines.
3. Impact on Performance
Every frame, Unity must check and resume active coroutines. With a large number of coroutines, this bookkeeping can introduce significant overhead. When combined with other heavy tasks on the main thread, performance may noticeably degrade – especially in fast-paced or VR games where smooth frame rates are crucial.
On top of that, every invocation of a coroutine method creates an IEnumerator object. Over time, numerous allocations accumulate, putting pressure on the garbage collector. When the GC runs, it may cause sudden frame drops due to the memory cleanup. So you have to deal with both spikes and a passive decrease in performance.
4. Hard to Debug and Control
Coroutines lack robust error handling. Exceptions within them can go unnoticed because you don’t wait for them to be executed when you call them. You can handle exceptions inside the coroutine, but not outside of it.
private void Test()
{
    try
    {
        StartCoroutine(TestCoroutine());
    }
    catch (Exception)
    {
        Debug.Log("Caught"); //This won't catch even the instant exception
    }
}

private IEnumerator TestCoroutine()
{
    throw new Exception("Instant exception");
    yield return null;
}
When you call a coroutine within another coroutine (nested coroutines), you can’t yield it in a try/catch clause due to the compiler restrictions mentioned here. It means that coroutines should not ignore passed exceptions upstream, which removes a useful error-handling mechanism.
Another issue is that coroutines don’t preserve call stacks. It may be hard to trace the origin of the exception. There is also no built-in way to inspect currently running coroutines, which makes real-time debugging or profiling difficult.
5. Engine-Bound
Coroutines are a part of Unity’s engine, which means that they at least require Unity as a dependency. So if you’re building a reusable library or plugin, or want to share code across platforms, coroutines won’t be portable. It is an issue for multiplayer games that use a dedicated server, because you want to reuse the code between the client and server while keeping the server lightweight (so without any additional dependencies).
So what are alternatives?
1. Async/Await
Async/await is a great C# language feature that reduces boilerplate and headaches of standard asynchronous code. It lets you write it in a sequential style as if it were synchronous. Under the hood, the compiler transforms your method into a state machine that handles pausing and resuming execution, often offloading work to background threads (for I/O-bound tasks).
When you await a task (for example, Task.Delay), the compiler generates code that, after reaching the await, returns control to the caller. Once the awaited operation completes, the remainder of the method is scheduled to run – typically on the captured synchronization context (like Unity’s main thread). You can read more on the synchronization context here. This approach avoids blocking the main thread while keeping your code straightforward.
Async/await is built into C# (from .NET 4.x onwards) and works out of the box in Unity if you’re using the appropriate scripting runtime version. You don’t need extra libraries. It is not engine-bound, so you can use it cross-platform. You may also be forced to use it when you use plugins that work outside of Unity. By definition, they can’t use coroutines, and async/await is a widely used feature.
Samples
To use async/await, you need to declare a method as async, and then you can use the await keyword to wait for an asynchronous operation to complete.
private async Task BasicDelayExample()
{
   // Waits asynchronously for 2 seconds.
   await Task.Delay(2000);
   Debug.Log("2 seconds later...");
}
Async/await is best to use when you want to offload the main thread as well as combine multiple asynchronous operations, like so:
using System;
using UnityEngine;
using System.Threading.Tasks;

public class AsyncOperationsHandler : MonoBehaviour
{
   private async void Start()
   {
       try
       {
           await PerformAsyncOperations();
       }
       catch (Exception e)
       {
           Debug.Log($"error : {e.Message}");
       }
   }

  private async Task PerformAsyncOperations()
  {
      // Await the completion of each operation
      await PerformAsyncOperation("Operation 1");
      await PerformAsyncOperation("Operation 2");
  }

  private async Task PerformAsyncOperation(string operationName)
  {
      Debug.Log($"Performing {operationName}...");

      // Simulate the time it takes to perform an operation
      await Task.Delay(3000); // 3 seconds

      Debug.Log($"{operationName} performed!");
  }
}
Note that you can catch exceptions when executing async operations using try-catch blocks.
Async/await is also a good choice when you want to ensure smooth gameplay during slow I/O operations or when performing heavy computation. Imaging fetching data from a server:
using System.Net.Http;
using System.Threading.Tasks;

private async Task<string> FetchDataFromServerAsync(string url)
{
   using HttpClient client = new HttpClient();
   // This call runs asynchronously without blocking the main thread.
   string result = await client.GetStringAsync(url);
   return result;
}
Other examples of use cases during game development could be to load configuration data, high scores, or game assets dynamically.
Cancelling Tasks
We learned how to run an operation asynchronously without coroutines, but that is only one feature. With coroutines, we can also stop them from outside – either by having a reference to the coroutine or by having a reference to the MonoBehaviour and stopping all of the coroutines. How can you do it with Tasks?
There is a pattern for that, and it relies on the CancellationTokens. CancellationToken is a simple struct that contains a property IsCancellationRequested. To stop the task, the caller raises the flag. The async method regularly checks the flag and stops when it detects it. The task can either finish without completing its job, as if it completed naturally, or, preferably, throw an OperationCanceledException. The exception here is preferable because it marks the task as Canceled rather than Completed, which is an important distinction. It affects how more advanced task operations, like chaining behave.
You can use CancellationToken like this:
private CancellationTokenSource cancellationSource = new CancellationTokenSource();

private async void Start()
{
    try
    {
        await DoStuffAsync(cancellationSource.Token);
    }
    catch (OperationCanceledException)
    {
        //DoStuffAsync was cancelled
    }
}

private void Update()
{
    if (ShouldStopTask())
    {
        //something happened and the task has to be cancelled
        cancellationSource.Cancel();
    }
}
DoStuffAsync could look like this. Just so you’re aware, you shouldn’t be afraid to check for cancellation in more than one place within the method. You should also use the ThrowIfCancellationRequested method to stop the task.
private async Task DoStuffAsync(CancellationToken cancellationToken)
{
    while (IsSlowOperationProcessed())
    {
        SlowOperationPart1();

        if (cancellationToken.IsCancellationRequested)
        {
            //when a task is cancelled in this particular state a cleanup is required
            CleanupAndRelease();
            cancellationToken.ThrowIfCancellationRequested();
        }

        SlowOperationPart2();

        if (cancellationToken.IsCancellationRequested)
        {
            //here there is no cleanup required
            cancellationToken.ThrowIfCancellationRequested();
        }
    }
}
You may often find that you don’t have to check the token yourself. You wait for the other async task to complete; that task is responsible for checking the token (assuming it supports the CancellationToken). You can pass your CancellationToken to another task like this:
private async Task PerformAsyncOperation(int durationMs, CancellationToken cancellationToken = default)
{
    await Task.Delay(durationMs, cancellationToken);
}
Benefits
Compared to coroutines, this approach might seem more tedious to use; however, it has many advantages. First, it gives the task the ability to respond to cancellation. It can release claimed resources in a controlled manner and ensure that, after the task is done, the data remains consistent and not in some weird state. Such behavior is not supported for coroutines.
You can also reuse the same token for multiple async methods and cancel them all. With coroutines, you can cancel multiple, but only when they are attached to the same MonoBehaviour. With tasks, you can have separate groups within a single MonoBehaviour or a group spanning across multiple MonoBehaviours and still be able to cancel the whole group with a single call.
CancellationTokens in Unity
Coroutines are managed by Unity and are tied to the MonoBehaviour. When it is destroyed, all of the coroutines that were bound to it are stopped. When a game is quit, Unity stops all coroutines. It would be nice to be able to tie task lifetimes to the MonoBehaviour or the game.
Unity exposes two important fields for that: Application.exitCancellationToken and MonoBehaviour.destroyCancellationToken. The first one is raised when the application is closed (or when playmode in editor is finished). The second one is raised when the object is destroyed.
Tasks issues
Task API is not frame-dependent. It means that if you call Task.Delay, you might not synchronize with the frame start/end. Also calling Task.Yield does not guarantee waiting until the next frame. Moreover, the async/await operation will still perform even if you set Time.timeScale to 0. Being able to tie the execution to the frames is crucial for simulating visual elements; otherwise, the movement will be erratic, as it sometimes moves multiple times between frames and sometimes doesn’t move at all.
Another issue is with allocations. Behind your back, the compiler creates a Task every time an await is used. When executing a few loops that move an object and then wait, this allocation cost can quickly add up. It might cause unnecessary spikes due to the Garbage Collector clean ups.
Solution – the Awaitable
Unity introduced the Awaitable system alongside Unity 2023.1 to address the aforementioned issues. It is basically a custom Unity type that can be awaited and used as an async return. So now instead of
await Task.Delay(1000); // 3 secondsyou can call
await Awaitable.EndOfFrameAsync(); // Resume execution on the end of the frame
await Awaitable.NextFrameAsync(); // Resume execution on the next frame
await Awaitable.FixedUpdateAsync(); // Resume execution on the next fixed update frame
await Awaitable.WaitForSecondsAsync(3); // Resume execution after 3 seconds (affected by Time.timeScale)
Under the hood, Unity uses pooling on instances of the `Awaitable` class. It is important to keep in mind that it is not safe to await the same Awaitable multiple times in the same method. In general, it is best if you don’t use a local variable for the Awaitable at all, and instead, you await the returned object directly.
Some Unity API methods can only be called from Unity’s main thread, while heavy computation should be performed on a background thread. With Awaitables, you can also easily switch context from the Unity main thread to the background thread using Awaitable.MainThreadAsync() and Awaitable.BackgroundThreadAsync(). You should not overuse it, because every thread switch incurs a delay.
Using it outside of the Unity
Raw async/await is a C# feature, so it is portable and works outside of Unity. As for Awaitables, since they depend on the Unity frame loop, they have a strong dependency on Unity. So if you want to write code that works both inside and outside Unity, you need to be careful with how you use it. However, it is less of an issue than with the coroutines.
First of all, with coroutines, the whole feature requires Unity; here, it is only an optional extension of async/await. Which means you can use async/await freely and, by deploying an abstraction layer, use Awaitable in Unity and in other similarly working solutions outside of Unity.
    private async Task DoSomethingAsync()
    {
        //do something
        await WaitForNextFrameAsync();
        //do something more
    }

    private async Task WaitForNextFrameAsync()
    {
#if UNITY
        await Awaitable.NextFrameAsync();
#else
        await InternalSolution.WaitForNextFrameAsync();
#endif
    }
Moreover, it so happens that the part of the code that is usually heavily tied to the frame is visuals – e.g., smooth animation of movement. It is also the part that is less likely to be used outside of Unity. On the other hand, a library for communication with an external service doesn’t require frame synchronization and is more likely to be reused. Still, it is something you should plan for if you intend to write a piece of code that will work outside Unity.
2. UniTask
UniTask is an asynchronous library. It is developed by Cysharp and is available here. It offers a similar programming model to async/await but is extensively optimized to reduce garbage collection and improve performance in Unity. Unlike the standard Task in C#, which allocates memory on the heap and triggers unnecessary Garbage Collection, UniTask uses struct-based tasks to reduce allocation costs greatly. This significantly reduces performance overhead and eliminates unnecessary GC-induced spikes.
UniTask wraps asynchronous operations in a lightweight structure that integrates with Unity’s frame update loop. It utilizes Unity’s native timing (via Time.deltaTime) to schedule continuations, making it particularly well-suited for game development where performance is crucial. It is easy to set up and import a UniTask package via a Git or package manager.
A simple delay using UniTask looks very similar to the built-in async/await:
using Cysharp.Threading.Tasks;


private async UniTask BasicDelayExample(CancellationToken cancellationToken = default)
{
    await UniTask.Delay(2000, cancellationToken: cancellationToken); // Asynchronously wait for 2 seconds.
    Debug.Log("2 seconds later...");
}
Here’s how you might move an object smoothly over time using UniTask:
private async UniTask MoveObjectAsync(Transform obj, Vector3 target, float duration, CancellationToken cancellationToken = default)
{
    float elapsed = 0;
    Vector3 start = obj.position;
    while (elapsed < duration)
    {
        // Lerp the position based on the elapsed time.
        obj.position = Vector3.Lerp(start, target, elapsed / duration);
        elapsed += Time.deltaTime;
        await UniTask.Yield(cancellationToken); // Wait until the next frame.
    }
    obj.position = target;
}
You can also return type as struct UniTask<T>, for example to get async web request:
private async UniTask<string> GetTextAsync(UnityWebRequest req, CancellationToken cancellationToken = default)
{
    var op = await req.SendWebRequest().WithCancellation(cancellationToken);
    return op.downloadHandler.text;
}
Async conversion
Unity provides many methods that support asynchronous operations, they use coroutines, async/await, Awaitables, or AsyncOperations, but they don’t support UniTask. Luckily for us, UniTask has many extension methods to convert various types to UniTask. There are 2 extension method groups – WithCancellation and ToUniTask/AsUniTask. The first one is simpler, and the second one provides more options.
So if you use addressables and want to convert AsyncOperationHandle to UniTask to support cancellation tokens, you can call it like this:

Debugging
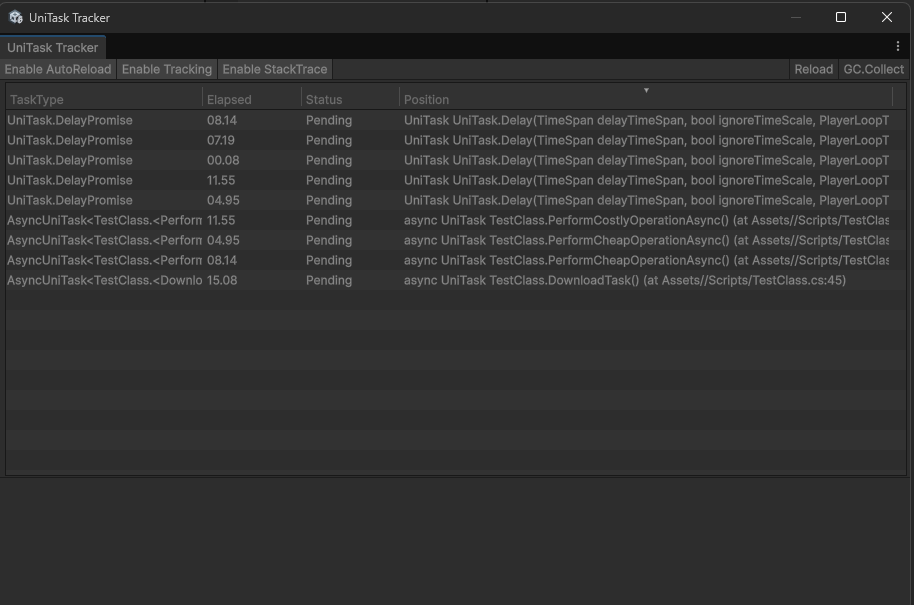
One of the advantages of UniTasks is that it lets you track existing UniTasks, which is great for debugging. It can help you track unintentional behaviors, leaks, and deadlocks, or find tasks that take longer than they should.
Frame dependency
UniTask integrates seamlessly with Unity’s runtime loop. For example, you can control whether the timescale affects the delay or not:
await UniTask.Delay(2000, DelayType.DeltaTime); // Affected by Time.timeScale
await UniTask.Delay(2000, DelayType.UnscaledDeltaTime); // Ignores Time.timeScale
You can also use UniTask.Yield() or await UniTask.NextFrame() to ensure that execution resumes on the next frame while keeping the main thread non-blocking. You can also use this:
await UniTask.WaitForEndOfFrame();
await UniTask.WaitForFixedUpdate();
UniTask outside of the Unity
You can use UniTasks outside of Unity, which is great when you have a project that shares code with something that is run without Unity. There is, however, one catch that shouldn’t be hard to deduce after reading the Awaitable paragraph: the Unity frame dependency is not available. Again, while it is an inconvenience, there are workarounds.
3. DOTween
DOTween is a tweening engine for Unity that simplifies animations, transitions, and time-based value interpolations. Tweening is the process of interpolating between values over time. While DOTween is not well-suited to handle general asynchronous tasks, it excels at managing complex animation sequences with minimal code.
DOTween maintains an internal list of active tweens and leverages object pooling to reduce memory allocations. When you create a tween, DOTween calculates the interpolation values based on elapsed time and easing functions. This engine is designed to run efficiently on the main thread while handling simultaneous animations and complex sequencing without a significant performance hit.
DOTween is available on Unity Asset Store.
Before you start using it, you have to initialize DOTween in your game’s startup code like so:
using DG.Tweening;

private void Awake()
{
   DOTween.Init();
}
You can create a basic Tween to do something with some object, e.g. Transform, Text, Image etc.
private void BasicDOTweenMove(Transform obj, Vector3 target, float duration)
{
   // Moves the object to the target position over the specified duration using linear easing.
   obj.DOMove(target, duration).SetEase(Ease.Linear);
}
You can also create sequences of tweens to create more complex effects:
private void AdvancedDOTweenSequence(Transform obj)
{
   // Create a new sequence
   Sequence sequence = DOTween.Sequence();

   // Move right over 1 second
   sequence.Append(obj.DOMoveX(5, 1));

   // At the same time, scale up over 1 second
   sequence.Join(obj.DOScale(new Vector3(2, 2, 2), 1));

   // Then rotate 180 degrees over 1 second
   sequence.Append(obj.DORotate(new Vector3(0, 180, 0), 1));

   // Wait for 1 second before the final movement
   sequence.AppendInterval(1);

   // Finally, move back to the original X position over 1 second
   sequence.Append(obj.DOMoveX(0, 1));

   // Play the sequence
   sequence.Play();
}
DOTween is a perfect choice where smooth transitions and detailed control over motion are required, e.g. for moves, scales, rotations, and color transitions of any object.
Performance impact
Let’s test the performance impact of using Coroutines, Async/Await, and UniTask.
First, let’s measure the impact of starting the process. We start the timer right before calling the method and measure the time after it. We start the asynchronous method but don’t wait for it to finish. Since it is hard to accurately measure the impact of a single invocation, we have to call it multiple times in a loop for the delay to be noticeable.
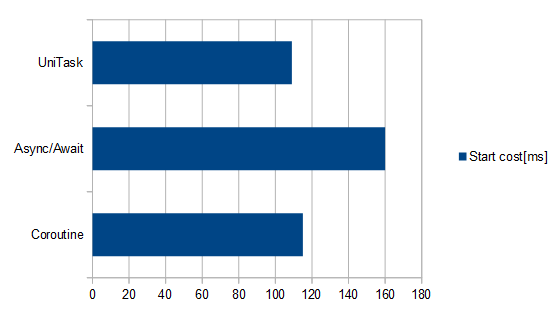
We can see that UniTasks and Coroutines are taking less time to create compared to the async/await, with UniTask being slightly ahead.
While the previous test provided some data, the delay in starting the task is usually not that significant. More important would be to know which method running in the background performs better. Let’s check it then. As before, we have to run multiple instances.
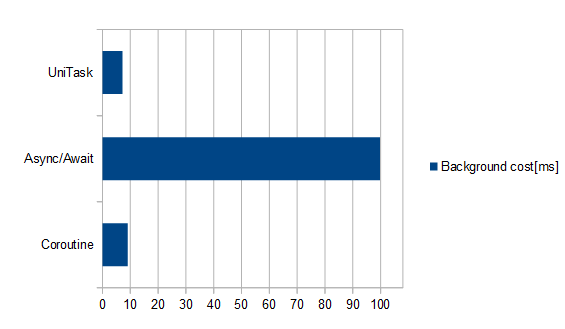
What we can see here is that tasks are very expensive to run when compared to UniTask and Coroutine. The reason for that will be shown in the next paragraph. Among the other methods tested, the UniTask comes ahead again.
Memory performance
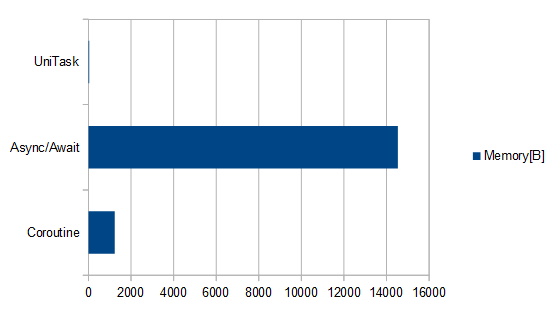
Here you can see the biggest disadvantage of Async/Await and the biggest advantage of UniTask. The Task approach is very neat, but due to using the task objects, every await creates a soon-to-be trash for Garbage Collector to clean up. UniTask was created to fix this issue, and it shows here. It is a clear winner when you want to reduce memory allocations.
This is also the direct reason for the poor performance of tasks in the previous test – GC is also run in the background and affects the game.
Are there any advantages of Coroutines?
The answer is yes – but it depends on the use case.
A valuable feature of coroutines is that they are simple to use and understand. They are bound to the MonoBehaviour lifecycle by default. It means that they are automatically stopped when the MonoBehaviour is destroyed. This is often desirable in Unity-based logic, such as when, e.g., an enemy dies, and you want to stop its effects or actions. On the other hand, in standard Task or UniTask, you must manually handle cancellation using a CancellationToken to prevent memory leaks or unwanted operations after the object is destroyed. There is a destroyCancellationToken you can use for that, but as with any tool, you need to remember to use it; otherwise, it won’t work.
Therefore, coroutines are very handy when it comes to quick prototyping without worrying much about performance or the quality of the code. If you want a quick solution to your problem and to debug some things, coroutines might be a great option. However, when you’re about to implement a complex system with a lot of asynchronous operations going on, and you worry about performance, cancellation, or portability of the code, you should dive into Async/Await or, even better, UniTask.
Asynchronous code awaits!
Remember that there is no rule-it-all tool suitable for every scenario. It’s a good idea to study every option and pick the one that best suits your needs.
If you still do not know what to choose, here is small cheatsheet:
- Coroutines: Not truly asynchronous, but they are very quick to implement. Great for prototypes.
- Async/Await: Provides true asynchronous execution and excellent error handling, ideal for I/O-bound tasks and complex game logic. Default solution for many asynchronous supporting tools that are not made with Unity in mind.
- UniTask: A Unity-optimized async library that minimizes allocations and integrates seamlessly with the game loop, perfect for performance-critical operations.
- DOTween: A powerful tweening engine that simplifies animations and sequences while maintaining high performance and low overhead.
By adopting these modern techniques, you’ll write cleaner, more maintainable code and unlock better performance for your Unity projects.
As for our recommendations, we recommend to use DoTween for animations and UniTask where possible.