Ready to build your first multiplayer game, but not sure how to begin? In this article, you’ll learn how to set up a Unity project using Photon Fusion 2, explore network topologies, and grasp the basics needed to confidently start your multiplayer journey. Whether you’re completely new to multiplayer or just looking for clear, step-by-step guidance. Let’s dive in and get your multiplayer game up and running!
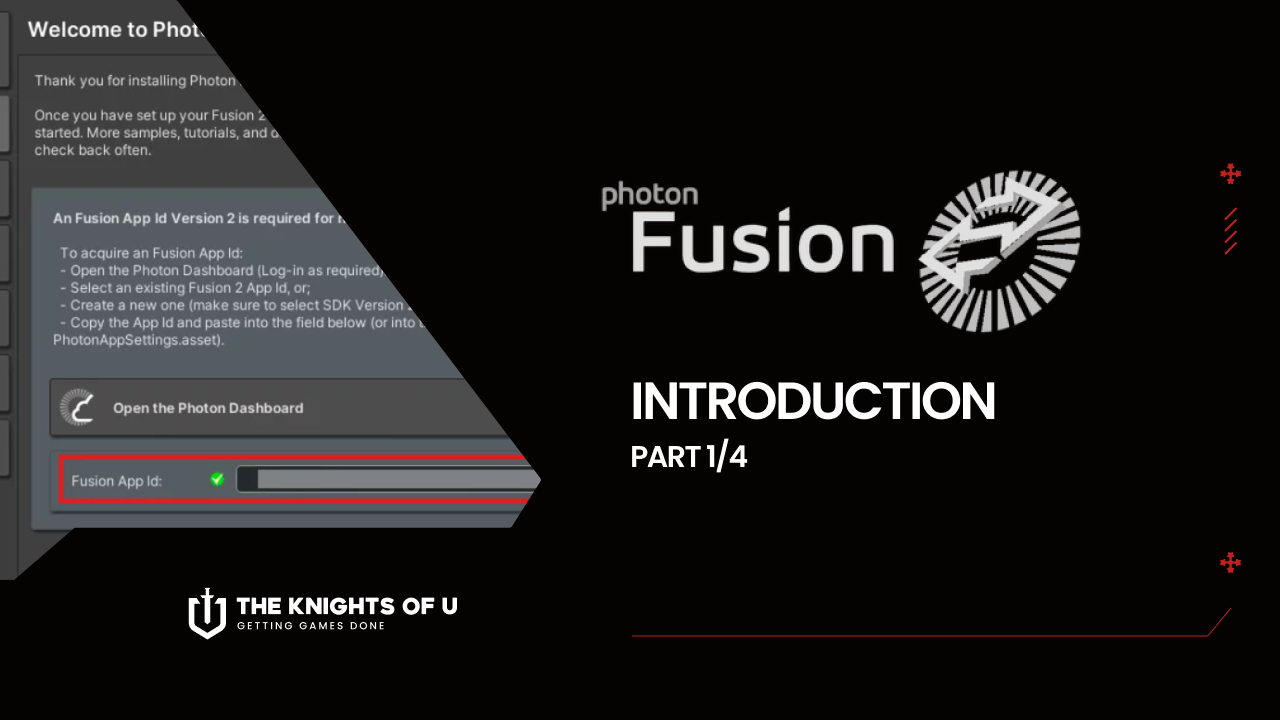
Introduction
In this series of posts, I’ll guide you step-by-step through setting up your project with Photon Fusion 2, creating and managing sessions, and synchronising objects and variables across your scenes. You’ll learn the basics of matchmaking and private sessions. You’ll see how Fusion manages scene loading and spawning objects, configure and call your first RPCs, and become familiar with key concepts such as State Authority and Input Authority.
For this guide, we’ll focus exclusively on the Host-Client architecture, where one player (the Host) acts as the game server. We will also discuss other Fusion architectures.
In this first post, we’ll talk about what Photon Fusion 2 is, when and why you’d want to use it, and highlight its pros and cons. I’ll walk you through setting up your first Fusion 2 project and integrating it with Unity. Afterwards, we’ll touch on the Network Topologies supported by Fusion 2 and briefly discuss their main characteristics.
Photon Fusion 2
Photon Fusion 2 is a high-level, high-performance solution designed to add multiplayer functionality to Unity games. It’s built with simplicity in mind and doesn’t require extensive low-level networking knowledge to start. Fusion 2 focuses heavily on synchronising game state, employing a variety of techniques you’ll explore in depth throughout this series.
Additionally, Fusion 2 supports advanced networking features such as Lag Compensation, Rollback, and Area of Interest. It seamlessly handles various network topologies.
Fusion 2 integrates smoothly with third-party hosting solutions like Unity Game Services and Unity Multiplay. It also provides built-in basic matchmaking capabilities, but doesn’t include typical backend services like player accounts, leaderboards, databases, or cloud code execution.
This makes Fusion 2 ideal for rapid prototyping, gameplay testing, and multiplayer development for both small and large projects. However, it’s important to remember that Fusion 2 integrates closely with your game’s logic, which can complicate transitioning to another networking solution later.
Photon Fusion 2 offers a highly developer-friendly experience, complete with detailed documentation and numerous sample projects, helping you understand and incorporate best practices directly into your game.
Photon Fusion 2 Pre-Requirements
At the time of writing this post, the latest Photon Fusion 2 SDK is 2.0.12 Stable Build 1861, released March 19, 2026. The minimum Unity version required for Photon Fusion 2 is 2021.3.45/2022.3.x/6.0.x or newer.
In the Project Setup chapter, you’ll learn how to create a new Photon Fusion 2 project and set up all the packages you’ll need to start working. Everything covered in this post is based on free solutions – you’ll need to create a Photon account, but it’s completely free.
Check out the latest Photon Fusion 2 release and release notes here.
Photon Fusion 2 Project Setup
Photon Dashboard
To start your adventure with Fusion 2, you’ll first need a Photon Engine account to set up a dedicated project for your game. If you don’t have an account yet, click this link and create one. If you already have one, head over to the Photon Dashboard and set up your first Fusion 2 application to get started!
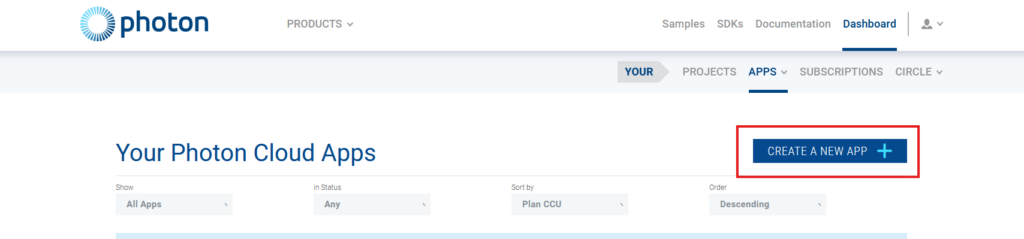
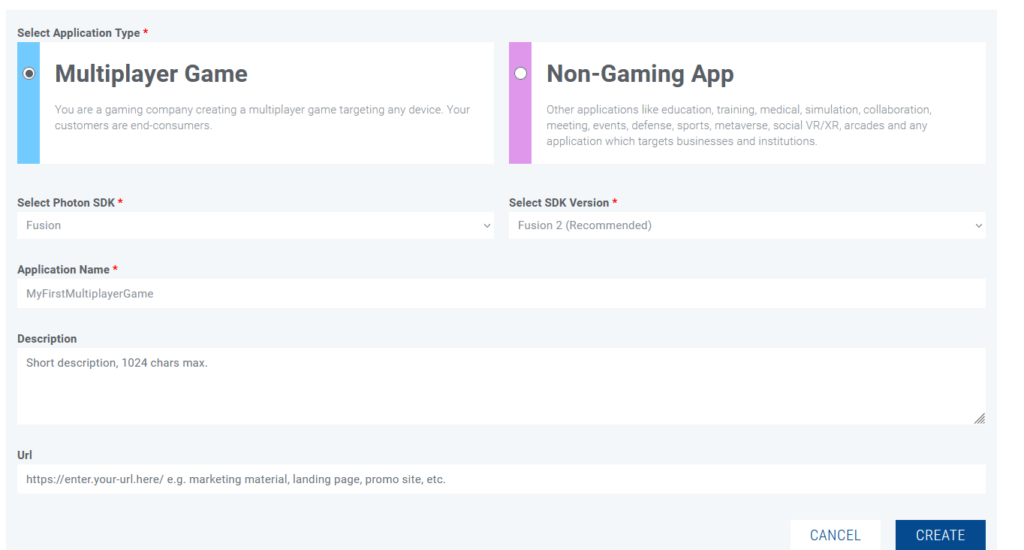
Next, click CREATE A NEW APP to create your new application. Fill out the brief form by selecting the recommended Fusion SDK version 2, give your application a name, optionally provide a description and a website link, then click CREATE.
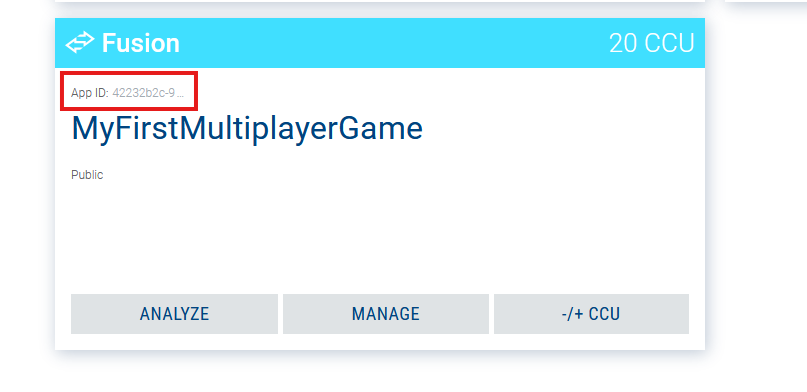
Your application will appear in the Applications / Public Cloud section. Right now, the most important detail for you is your application’s App ID, which you can copy by clicking on the App ID field on your app’s tile. Your app is currently on the free plan, with a limit of 20 CCU (Concurrently Connected Users). You can read more about CCU and Photon subscriptions here, but we won’t dive deeper into those topics in this post.
Unity Project
We’re now ready to create a new Unity project and integrate the Fusion 2 SDK. Download the latest Fusion 2.unitypackage from this link, and import it into Unity via the Assets → Import Package → Custom Package menu. After a successful import, you should see the Photon Fusion 2 Hub, your main management panel. If it doesn’t pop up automatically, you can always find it in the top menu at Tools → Fusion → Fusion Hub.
The Photon Fusion 2 Hub lets you manage the plugin’s configuration. Under the Fusion 2 Setup tab, you’ll find scriptable objects for configuring detailed connection and data-transfer settings. Photon’s default settings are usually good enough for most scenarios, but if you’re curious about advanced options, you can explore them in the documentation here.
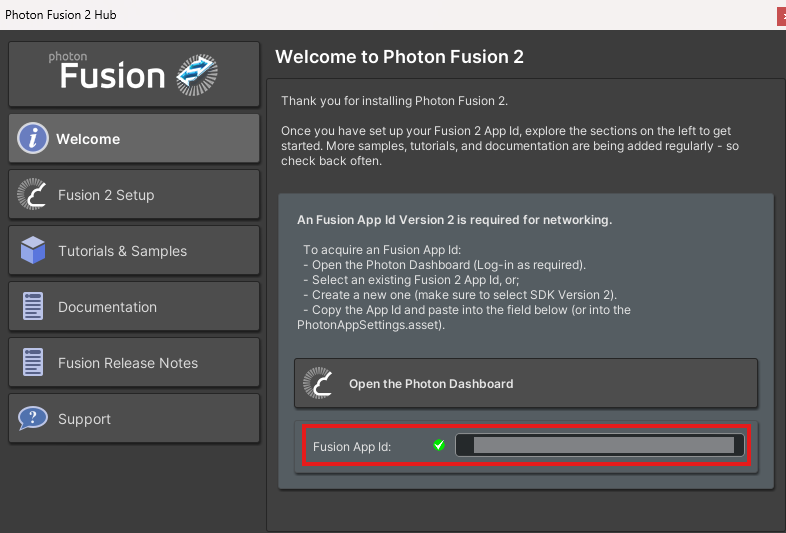
At this point, paste the App ID generated earlier from the Dashboard into the appropriate field. If the App ID you’ve pasted is valid, the icon will switch from red to green. Now you’re fully set up and ready to dive into Fusion 2!
Your project setup is now complete. Before we jump into the technical details and start implementing, let’s go over the network topologies available in Fusion 2. It’s important to understand these concepts because choosing the right approach is critical for your project. Making the wrong choice here might become very expensive to correct later on.
Supported Network Topologies
You’re ready to create your first multiplayer game – exciting, right? But remember, you have some important decisions to make first, including choosing the right Network Topology. Let’s go through the three network topologies in Photon Fusion 2, highlight their pros and cons, and help you pick the right one for your project.
You may ask – what is a network topology? It is simply an organised structure of elements that can communicate with each other over the network. It can describe their physical arrangement and, what is more important to us here, it can also describe the hierarchy of those elements, their responsibilities, and the way they communicate with each other. You may have also seen the term Network Architecture. While not exactly the same, it is quite similar. Here, I use the term Network Topology to avoid confusion with the Photon Fusion 2 documentation.
In this series of posts, we won’t dive deeply into basic networking concepts like communication protocols, connection setup, NAT, IP, or data serialisation. As mentioned earlier, Photon Fusion 2 is a high-level solution designed to give you a reliable and efficient framework. You can focus on developing game features instead of dealing with low-level networking details.
When thinking about multiplayer games, the first word that probably comes to mind is “Server”. That’s good – Servers are critical to multiplayer systems, though not always strictly necessary. For simplicity’s sake, when we say “Server” here, we mean a Game Server.
Dedicated Server
The first topology we’ll cover is the Dedicated Server. This is usually what players imagine when thinking about multiplayer and “connecting to a server”. A Dedicated Server is a physical machine or a cloud-hosted virtual machine running your Game Session. Players – known as Clients – connect to this server to join the game. While this topology is powerful and comprehensive, its major downside is the relatively high maintenance cost.
The basic concept behind this topology is that the entire game runs securely on the Dedicated Server, while Clients send inputs to control their actions in the game. The Server holds State Authority, meaning it exclusively manages game-state changes, data synchronisation, and object updates. Clients have Input Authority – they can request the Server to execute actions like moving characters, picking up items, driving vehicles, or firing weapons, but cannot modify the game state. They can only change the local state, but none of the other players will be affected by it.
Dedicated servers are usually managed and paid for by the developer/publisher. They can also be hosted by the players themselves if the game supports it. This transfers the cost of maintenance to users and gives them more freedom, like the possibility to mod the game. The disadvantage is that you need to be an advanced player to be able to set up the server correctly.
Pros:
- Full Server Authority: The server fully controls the game state, significantly reducing cheating and malicious activity.
- High Stability: Server hosting from reputable providers is reliable and comes with solid technical support.
- Easy Scalability: Easily scales up to handle more players and sessions if your game becomes popular.
- Independent of Client Hardware Performance: Gameplay performance and quality don’t depend on player hardware.
- Simple Game Management: Easy deployment of server updates without always needing client-side updates, making balancing and testing easier.
- Regional Hosting: Hosting servers across multiple regions helps reduce latency and evenly distribute traffic.
- Wide range of games supported: Server can run even when there is no player currently connected, which can support gameplay that may not be possible otherwise.
Cons:
- High Costs: Dedicated server hosting is usually expensive and might not be available for smaller projects.
- Technical Complexity: Requires more expertise for proper configuration and management.
Host-Client
If a Dedicated Server is too costly or impractical for your project, you should consider the Host-Client topology. In this setup, one player (typically the first one) serves as the Host, acting simultaneously as both the Server and a Client. Usually, this player initiates the session, creates a game, and waits for or invites other players to join.
The Host holds full State Authority, giving them considerable control and potentially enabling them to cheat. Other Clients have only Input Authority, similar to Clients in a Dedicated Server scenario. This topology is best suited for smaller-scale projects with short sessions involving a few players. Keep in mind that if the Host disconnects or crashes, the session will be terminated immediately unless Host Migration is implemented.
A significant advantage of the Host-Client model is its simplicity. It enables rapid prototyping and iteration. It’s easy to set up, doesn’t require advanced hosting services or additional server infrastructure.
What may come as a surprise is that an additional server, called a relay server, may still be required. While the exact reasons for that are out of the scope of this blog, it turns out that it is not that simple to establish a direct connection between two players. If you are interested, you can read more by searching for the NAT traversal problem. All you need to know is that you don’t have to worry about such a server; Photon Fusion 2 does it for you.
Pros:
- Low Operational Costs: No dedicated server needed, drastically reducing costs.
- Ease of Implementation: Quick to set up, ideal for rapid development.
- Suitable for Non-competitive Games: Excellent for sessions with friends, co-op or casual multiplayer experiences.
Cons:
- Potential Cheating: Host has significant control, allowing him to easily cheat.
- Poor for Mobile Games: Host device limitations and mobile network throughput can negatively affect performance for all clients.
- Unequal Latency: Host experiences zero lag compared to Clients. It gives him an advantage that could be considered unfair.
- Limited Scalability: Performance is tied directly to the host’s hardware and can’t handle as many players or as complex simulation as a dedicated server.
When designing your game, you’ll likely have to choose whether it supports single-player, multiplayer, or both. Initially, this decision may seem straightforward since your game’s concept usually dictates whether it supports solo play or multiple players competing or cooperating. However, upon closer inspection, many games benefit significantly from offering both modes.
For instance, you might want a strong narrative focus best suited to single-player, or you might include a tutorial that guides players through game mechanics step-by-step. Another consideration is player base size – if your game is new and still growing, multiplayer matchmaking may suffer, discouraging players with long wait times. Offering a single-player alternative can help address this issue.
The Host-Client topology readily supports single-player modes. Fusion 2 is built in such a way that it’s simple to start a single-player session without an internet connection. From a developer’s point of view, this single-player session functions almost identically to a multiplayer session hosted by a player, just without additional clients joining.
Shared
The Shared topology is a decentralised networking model where no single player acts as a Host. Instead, each player has State Authority over the objects they create. By default, a player owns and controls any objects they spawn.
One of the core features of this model is the ability to dynamically transfer State Authority, though only the current authority holder can initiate the transfer. The system also introduces a special role called the SharedModeMasterClient – typically the first player to join a session. This player receives State Authority over all scene objects present at the start (unless reassigned), manages scene loading across all clients, and can despawn objects not owned by anyone. It might seem similar to a host, but here this player has fewer privileges and responsibilities.
In Shared mode, inputs are applied instantly and locally, and only the resulting changes are synchronised. This results in zero input lag and a responsive player experience, but at the cost of reduced predictability when both players interact. Additionally, this topology is highly resilient. By default, if one player disconnects, it doesn’t affect the rest of the session (though some games may not be able to continue due to their design). There’s no central failure point as with Host or Dedicated Server models.
Another strength of the Shared mode is load balancing. By reassigning State Authority, developers can ensure that weaker devices simulate fewer objects, while more capable machines handle more.
However, the biggest trade-off is security. This topology is extremely vulnerable to cheating. Any player with authority over an object can modify it without any restriction. As such, it is only recommended for non-competitive games, preferably those played with friends or in trusted environments.
Pros:
- Low cost: No dedicated server required.
- Zero input lag: Input is applied instantly on the local machine.
- Quick setup: Easy to prototype multiplayer functionality.
- Flexible authority management: State Authority can be transferred dynamically.
- Fault-tolerant: No single point of failure.
- For casual games: Ideal for casual, co-op games and internal development/testing.
Cons:
- Higher network traffic: Especially in sessions with many players.
- Completely insecure: Easy for any player to cheat.
- Not for competitive games: Due to the cheating, it is unsuitable for competitive environments.
Photon Fusion 2 Topologies – how to choose the correct one?
By now, you understand the essentials of different Photon Fusion 2 topologies. You’ve also learned how crucial choosing the right topology is, and why carefully weighing your decision early can save you significant effort and costs down the road. The later you make changes, the higher the costs. To help guide your decision-making, consider these important questions:
- What gameplay modes will your game support?
- Is your game competitive?
- Is preventing cheating a top priority for your game?
- Does your game require a continuously simulated world that operates independently of player presence?
- Is your game performance-intensive on player devices or on the network throughput?
- Can you handle the complexities and costs associated with running a Dedicated Server?
- Do you want players to be able to host their own dedicated servers?
Keep these key considerations in mind as you plan your game’s architecture. Consider structuring your core gameplay logic to easily support both multiplayer and single-player modes. Photon Fusion 2 offers built-in support for designing logic that’s reusable across multiple game modes.
Summary and What’s Next?
In this first article of the series, you’ve learned what Photon Fusion 2 is all about, created your Photon account, and set up your project in the Photon Dashboard and Unity. You’re now equipped with essential knowledge about available network topologies and ready to start building!
In the next article, we’ll explore how to create sessions and connect players using the Host-Client topology.
Continue reading: Photon Fusion 2 – Sessions Management – Part 2/4.