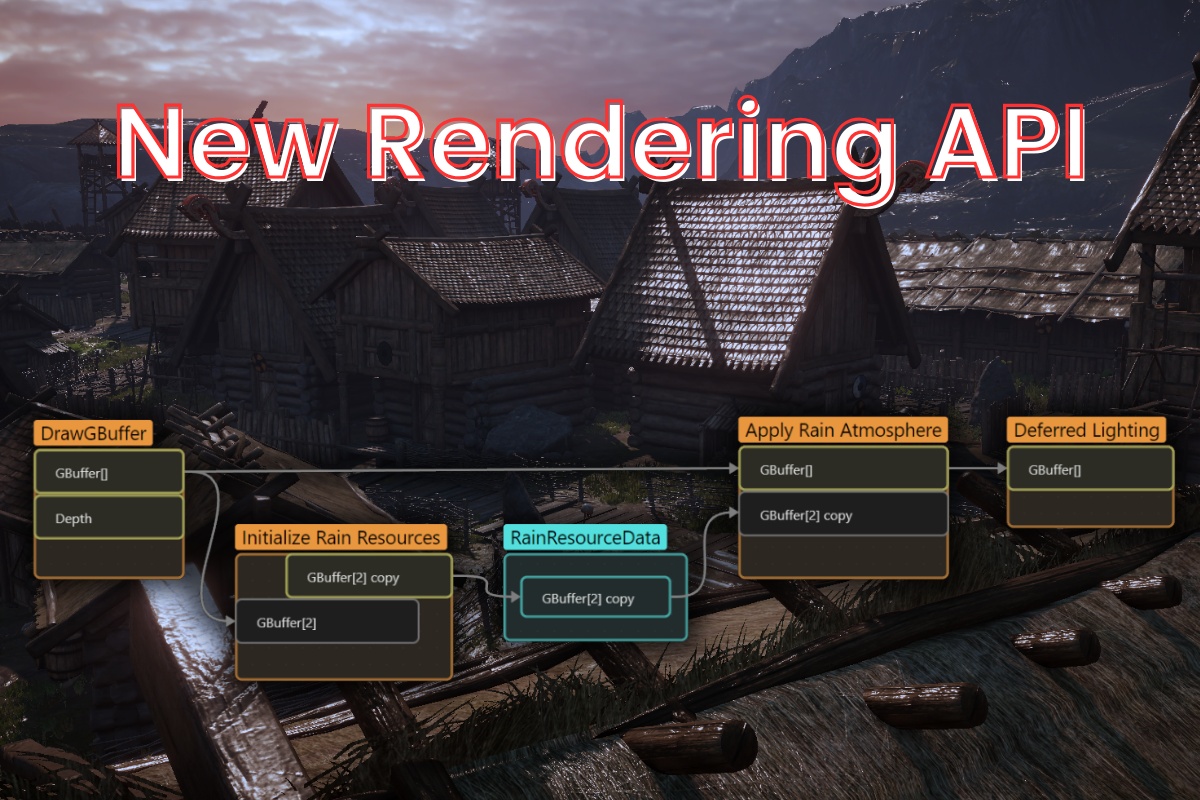
Render Graph is a new rendering API available from Unity 6.0. In Unity 6.1, it is the only way of extending URP with custom rendering features. In this article, I will cover the basics of Render Graph API.
Despite the name, Render Graph isn’t a node-based visual editor – it’s a programming interface. Its name originated from how it stores the data about the render pipeline. This new programming API works by implementing custom rendering “nodes” and adding them to the Render Graph.
Why Unity needed Render Graph in the first place.
Before Render Graph came in, I used ScriptableRenderPasses in URP, where I implemented most of the rendering logic imperatively using various methods. While this approach gave us programmers a lot of freedom, it completely broke down at scale. Larger projects became fragile and hard to debug. There was no organized way to store references to the GPU resources, which resulted in a tremendous mess when we needed to access many resources used by URP or different rendering features, the maintenance cost was high. While URP source code and different rendering features started to grow, no uniform way of managing resources became the most significant source of code spaghettification. Do you need an access to the ColorBuffer? Fine – override ScriptableRendererFeature.SetupRenderPasses(...) and get it there. Do you need to access a GBuffer? I hope you like System.Reflection and internal hacks.
Since Vulkan and DirectX12, a programmer is responsible for allocating and managing GPU memory using the graphics API. There is a lot of planning, pipeline state caching, and resource reusing. Render Graph API makes this much easier to handle as it introduces declarative scheduling, automatic resource lifetime management and GPU-aware optimizations, like pass culling and tile-based rendering.
Render Graph Caveats
When the Render Graph becomes strong in larger projects, it has some caveats:
- Steep learning curve – the previous model was more imperative and less restricted, while the new one is more declarative and requires the developer to better understand rendering concepts like pass culling and resource management.
- Debugging complexity – The graph is compiled and optimized under the hood. It is harder to debug rendering issues, often it is just a guessing nightmare with manual checking of all the dependencies. Render Graph lacks the basic debugging tools. We have Render Graph Viewer, but it helps only when everything already works fine.
- For simpler effects, it is boilerplate-heavy and may be unintuitive. Blitting and drawing a single mesh now requires four levels of ceremony.
- Performance implications – Pass merging and tile-based rendering are great, but declarative scheduling makes fine-tuned control harder.
How to use Render Graph?
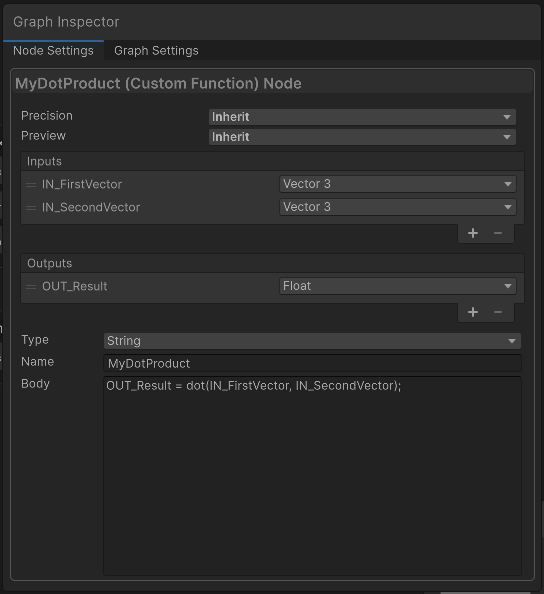
Programming with RenderGraph API requires us to create custom rendering nodes, called Passes and add them into a Render Graph. To familiarize yourself with the concept, I analyzed how I create a custom node using visual tools like Shader Graph. In case of creating a Custom Function node in the Shader graph, I need to:
- Create the node
- Define inputs.
- Define outputs.
- Define a function that creates outputs from the inputs.
- Connect the node somewhere in the graph – find the resources I want to use.
When programming with Render Graph API, all those steps are done using the C# code in the ScriptableRenderPass. In the next section, I will describe how to do that.
How I implemented my first render graph node!
I will implement a basic render feature to draw a mesh into a screen using a material. The setup for the ScriptableRendererFeature and pass is identical to the old URP system — nothing new.
using UnityEngine;
using UnityEngine.Rendering.Universal;
using UnityEngine.Rendering.RenderGraphModule;
using UnityEngine.Rendering;

// This class is responsible for injecting the render feature into the URP renderer.
public class RenderIntoColorBufferFeature : ScriptableRendererFeature
{
    // Mesh and material that will be used for rendering.
    public Mesh mesh;
    public Material material;

    // This pass will handle the rendering logic
    private RenderIntoColorBufferPass pass;

    public override void Create()
    {
	    // Create passes in this method
        pass = new RenderIntoColorBufferPass();
    }

    public override void AddRenderPasses(ScriptableRenderer renderer, ref RenderingData renderingData)
    {
        bool isGameOrSceneCamera = renderingData.cameraData.cameraType == CameraType.Game || renderingData.cameraData.cameraType == CameraType.SceneView;
        bool hasValidResources = mesh != null && material != null;
        if (isGameOrSceneCamera && hasValidResources)
        {
            // Update resources in our pass
            pass.mesh = mesh;
            pass.material = material;

            // And add pass to the renderer
            renderer.EnqueuePass(pass);
        }
    }
}

// This class handles the rendering logic. Here we should build new nodes and insert them into RenderGraph.
public class RenderIntoColorBufferPass : ScriptableRenderPass
{
    public Mesh mesh;
    public Material material;

    public override void RecordRenderGraph(RenderGraph renderGraph, ContextContainer frameData)
    {
	    // In this method we will create a custom render graph node that renders a single mesh.
	    ...
    }
}
I added the feature to the URP renderer in the inspector. I used a random mesh from the project and a new material with unlit shader.
The interesting part starts in RecordRenderGraph(), where I will use the new API to create and connect a Render Graph node.
Step 1 – Create a node
I used renderGraph.AddRasterRenderPass method to create a node – this gives me a builder object and a data block. RenderGraph supports several pass types – I am using raster here to output geometry to a target texture.
I also needed to create a custom class, PassData, that holds data used by the CommandBuffer during the rendering.
I used a Dispose() method to finish node creation.
public override void RecordRenderGraph(RenderGraph renderGraph, ContextContainer frameData)
{
	// Create a new pass (node) in the graph. Note that this method creates a builder and a PassData objects for us.
	IRasterRenderGraphBuilder rasterPassBuilder = renderGraph.AddRasterRenderPass(nameof(RenderIntoColorBufferPass), out PassData passData);

	// Finish pass creation
	rasterPassBuilder.Dispose();
}

// Here, we need to store all the necessary resources during the rendering (resources used by the CommandBuffer).
public class PassData
{
}
Steps 2 and 3 – Define inputs and outputs
I defined inputs by passing the resources to our PassData object. Here, I needed to store all references that are used by a CommandBuffer API during the rendering.
public override void RecordRenderGraph(RenderGraph renderGraph, ContextContainer frameData)
{
	IRasterRenderGraphBuilder rasterPassBuilder = renderGraph.AddRasterRenderPass(nameof(RenderIntoColorBufferPass), out PassData passData);

	// Assign the resources
	passData.mesh = mesh;
	passData.material = material;

	rasterPassBuilder.Dispose();
}

public class PassData
{
	//we will use a mesh and a material during the rendering.
	public Mesh mesh;
	public Material material;
}
Now, I needed to define the render target, but how can I get the reference to the color target texture – content of the screen? I can access shared GPU resources using the frameData.Get<T>() API. I requested URP resources (UniversalResourceData) to get the activeColorTexture. This is the target texture I want to render into, so I saved the reference.
I must also tell the render graph node that I want to render the triangles into the color texture. This is done using the rasterPassBuilder.SetRenderAttachment. I also noticed that nodes can render only into one set of render targets. You can’t change the targets (attachments) during the rendering!
public override void RecordRenderGraph(RenderGraph renderGraph, ContextContainer frameData)
{
	// Gather all needed references using the frameData.Get API.
	UniversalResourceData urpResources = frameData.Get<UniversalResourceData>();
	TextureHandle colorTarget = urpResources.activeColorTexture;

	IRasterRenderGraphBuilder rasterPassBuilder = renderGraph.AddRasterRenderPass(nameof(RenderIntoColorBufferPass), out PassData passData);

	// Set the render target
	rasterPassBuilder.SetRenderAttachment(colorTarget, 0, AccessFlags.Write);

	passData.mesh = mesh;
	passData.material = material;

	rasterPassBuilder.Dispose();
}
Step 4 – Define the render function
Then, I implemented the actual rendering – defined a render function using the rasterPassBuilder.SetRenderFunc() method. The way I must wrote this line of code is quite weird, as Unity required me to write an explicit lambda expression here. No shortcuts allowed.
Making RenderFunction static forced me to keep everything inside PassData – and I think that’s a good thing.
In this method, I don’t set any render targets and I don’t create any CommandBuffers, I jump right into the drawing using the RasterCommandBuffer in context.cmd.
public override void RecordRenderGraph(RenderGraph renderGraph, ContextContainer frameData)
{
	UniversalResourceData urpResources = frameData.Get<UniversalResourceData>();
	TextureHandle colorTarget = urpResources.activeColorTexture;

	IRasterRenderGraphBuilder rasterPassBuilder = renderGraph.AddRasterRenderPass(nameof(RenderIntoColorBufferPass), out PassData passData);

	rasterPassBuilder.SetRenderAttachment(colorTarget, 0, AccessFlags.Write);

	passData.mesh = mesh;
	passData.material = material;

	// Define a rendering function for the node.
	rasterPassBuilder.SetRenderFunc((PassData passData, RasterGraphContext context) => RenderFunction(passData, context));

	rasterPassBuilder.Dispose();
}

// This is a render function for our node.
private static void RenderFunction(PassData passData, RasterGraphContext context)
{
	// Here we implement our rendering logic.

	// Notice that we use a RasterCommandBuffer, not a CommandBuffer. It contains only a subset of CommandBuffer methods.
	RasterCommandBuffer cmd = context.cmd;

	// We use this RasterCommandBuffer to render a mesh. In this method, we can use only resources from the passData object.
	cmd.DrawMesh(passData.mesh, Matrix4x4.identity, passData.material);
}
Step 5 – Connect the node to the graph
Render Graph will automatically connect the node to the graph based on the usage of the resources. But this is not too precise. In my case, I only used a color target from URP resources. I set renderPassEvent in the constructor – this ensures the pass connects at the right stage. Set renderPassEvent to AfterRenderingPostProcessing to ensure that the mesh will be rendered on the screen after postprocesses.
public class RenderIntoColorBufferPass : ScriptableRenderPass
{
public Mesh mesh;
public Material material;
public RenderIntoColorBufferPass()
{
//It is essential for the graph builder to build our pass after postprocesses are added to the graph.
this.renderPassEvent = RenderPassEvent.AfterRenderingPostProcessing;
}
public override void RecordRenderGraph(RenderGraph renderGraph, ContextContainer frameData)
{
UniversalResourceData urpResources = frameData.Get<UniversalResourceData>();
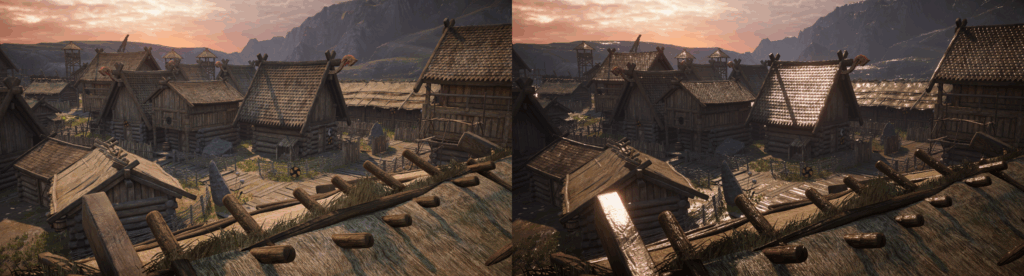
...You can see that the feature is working!
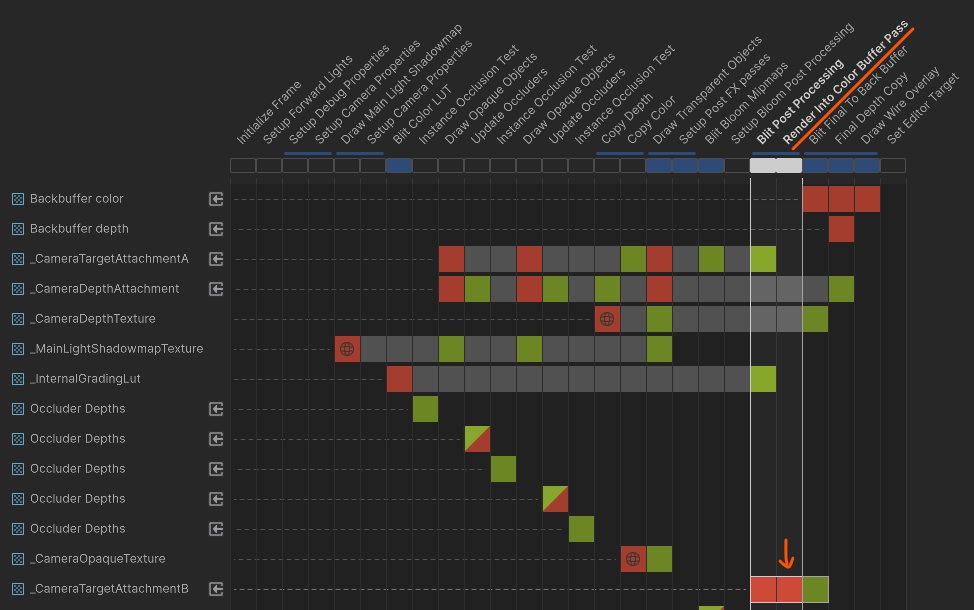
And in the Render Graph Viewer (Window/Analysis/Render Graph Viewer), you can see my “Render Into Color Buffer Pass”. It also uses _CameraTargetAttachmentB texture as a write-only target (red color).
Summary
- Render Graph API is a new way of render pipeline scripting in Unity.
- Render Graph works by appending custom rendering nodes to the graph using a C# API. It is not a visual editing tool.
- All rendering code is written in
ScriptableRenderPass.RecordRenderGraph(RenderGraph renderGraph, ContextContainer frameData) - To create a node in render graph, use
var builder = renderGraph.Add...Pass(). The method returns the node builder and a data block of custom type. - Add inputs and outputs to your node by using
builder.SetAttachment...andbuilder.Use...methods. Add all resources required in the render function to the data block. - To access or create resources shared between nodes by using
frameData.Get<>()orframeData.GetOrCreate<>()methods. - Create a render function and assign it to the node by using
builder.SetRenderFunc(...) - Finish node creation by calling
builder.Dispose().
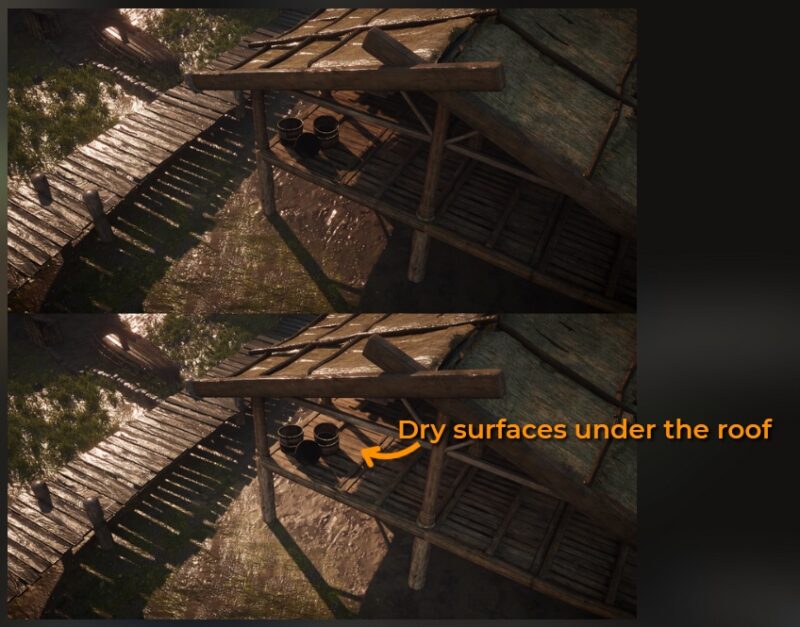
In the upcoming article, I will explain how to use a render graph to render custom content into URP GBuffer. I will alter the GBuffer contents to simulate some weather conditions – rain atmosphere effect:
About the author
Jan Mróz / Sir Johny – Graphics Programmer at The Knights of U. He specializes in rendering pipeline extensions and performance optimization across CPU, GPU, and memory. Sir Johny also leads tech-art initiatives that improve visual quality while cutting iteration time.
Learn from real production challenges and solutions at proceduralpixels.com, where Jan shares tools and insights developed to support studio pipelines and push visual quality efficiently.