What Are Unity Prefabs?
Prefabs are one of the most common GameObject management techniques in Unity. They allow you to save complete Unity GameObjects – including all of their components and all child GameObjects – as Prefab Assets alongside other assets such as textures, meshes, and scripts. Adding a Prefab to a Scene creates a Prefab Instance. Every change made to a Prefab Asset automatically propagates to all of its instances. This makes Prefabs a cornerstone of scalable Unity projects.
There are many ways Prefabs can simplify your Unity workflow, from allowing quick updates to all objects of the same type in a Scene, such as buildings or trees, to providing an easy way to spawn enemies and pickups. Prefabs are also a good way to handle player-character GameObjects across multiple levels and to simplify the management of recurring UI elements.
My Unity game works fine. Why use Prefabs?
There are three main direct advantages to including Prefabs in your Unity workflow:
- Reusability – We’ve already touched on the possibility of creating a single Prefab and easily placing and managing all of its Instances throughout your Scenes.
- Consistency – All instances across all Scenes in the project are automatically synchronized with the Prefab Asset.
- Smaller Scene files – Scenes store references to a single Prefab Asset instead of fully duplicating the entire GameObject hierarchy, reducing the size of Scene files.
These characteristics lead to a wider positive impact:
- Faster development and easier maintenance – There’s no need to apply the same changes to multiple objects of the same type manually.
- Better team collaboration – One developer can create a Prefab that the rest of the team can reuse.
- Reduced human error – Prefabs provide a single source of truth for multiple objects and limit repetitive, error-prone tasks.
Creating Prefabs Assets and Instances in Unity Editor
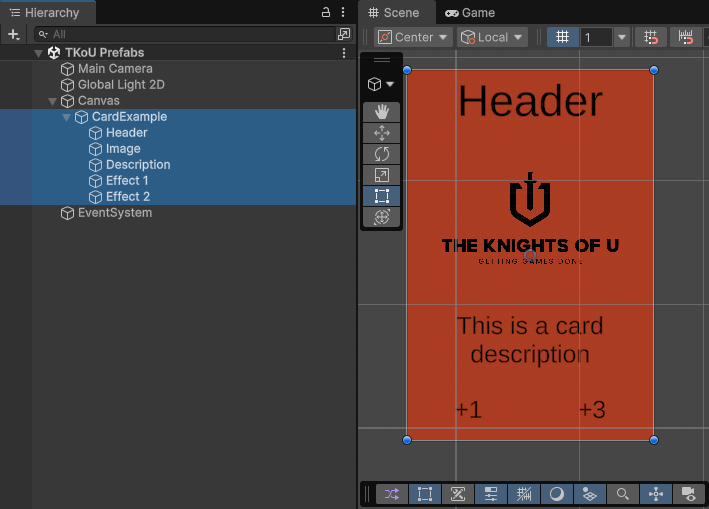
We’ll use the example of a simple card with a bare-bones object hierarchy to show how the Prefabs system works in practice.
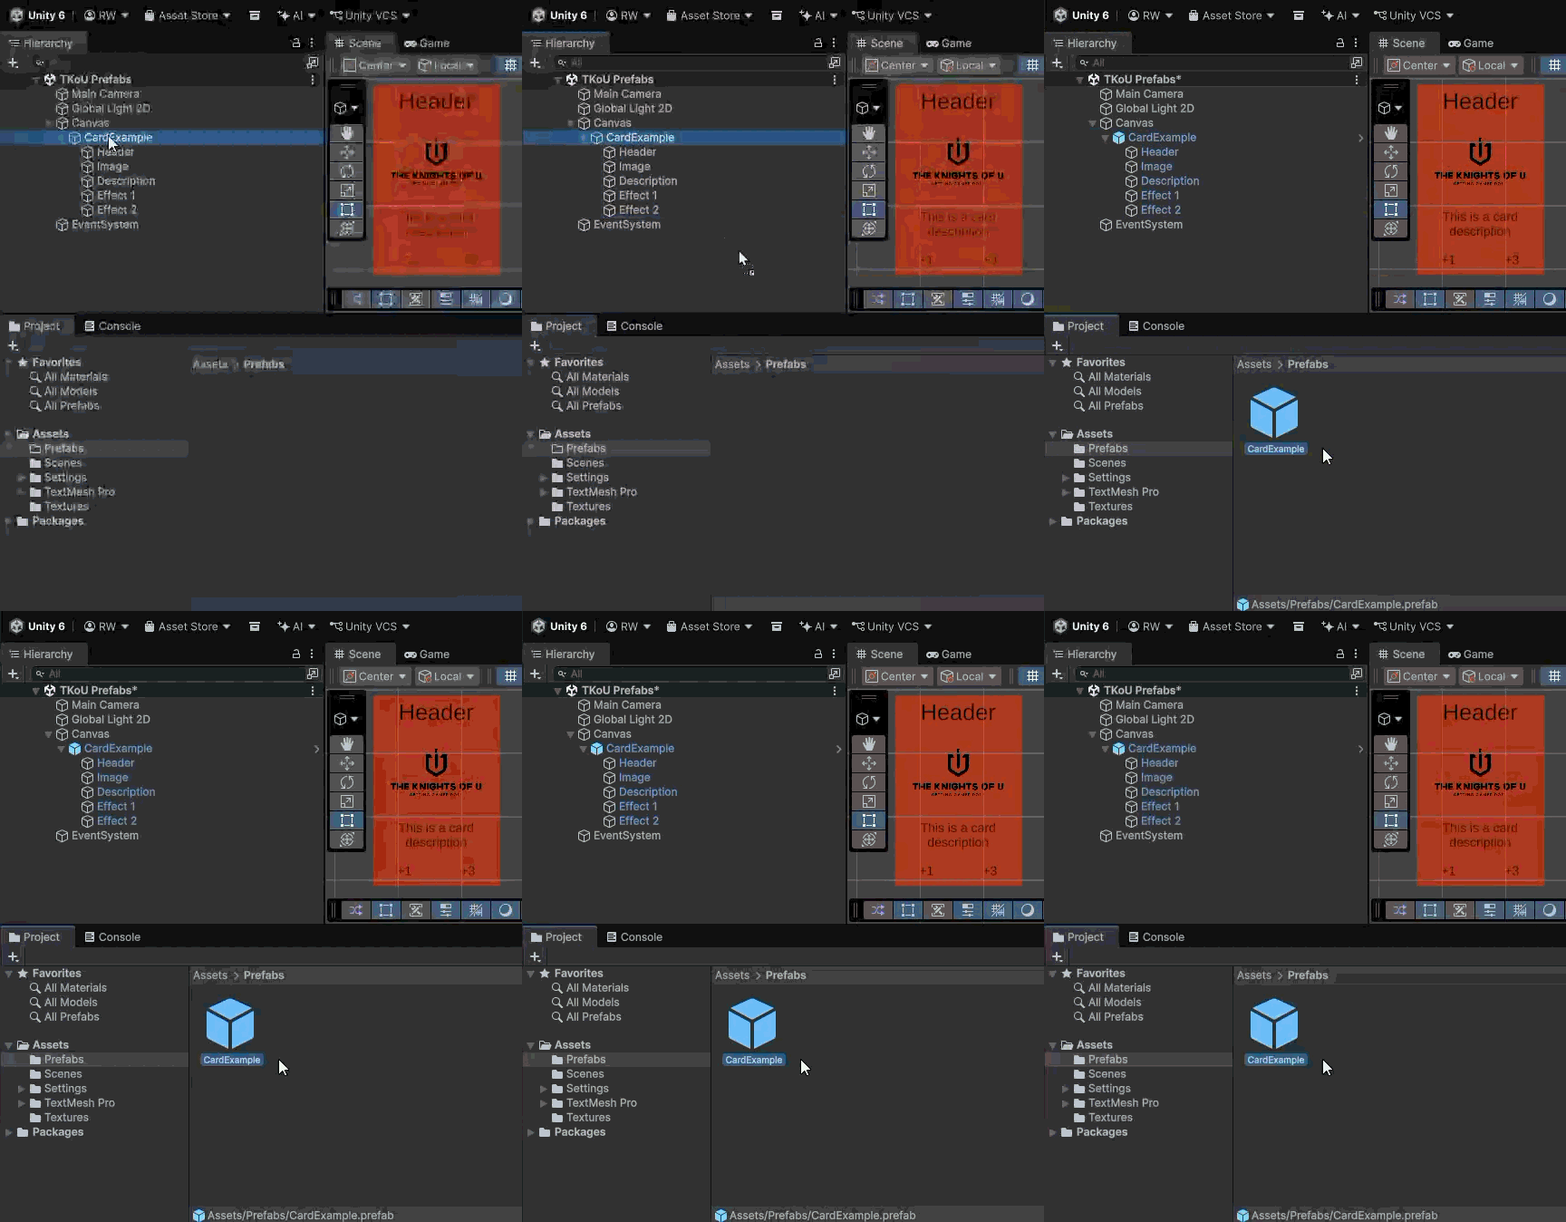
To create a Prefab Asset, drag a GameObject from the Hierarchy window into the destination folder in the Project window.
Notice that in the Hierarchy window, a solid blue icon represents a Prefab root. Blue text indicates a GameObject that is part of a Prefab.
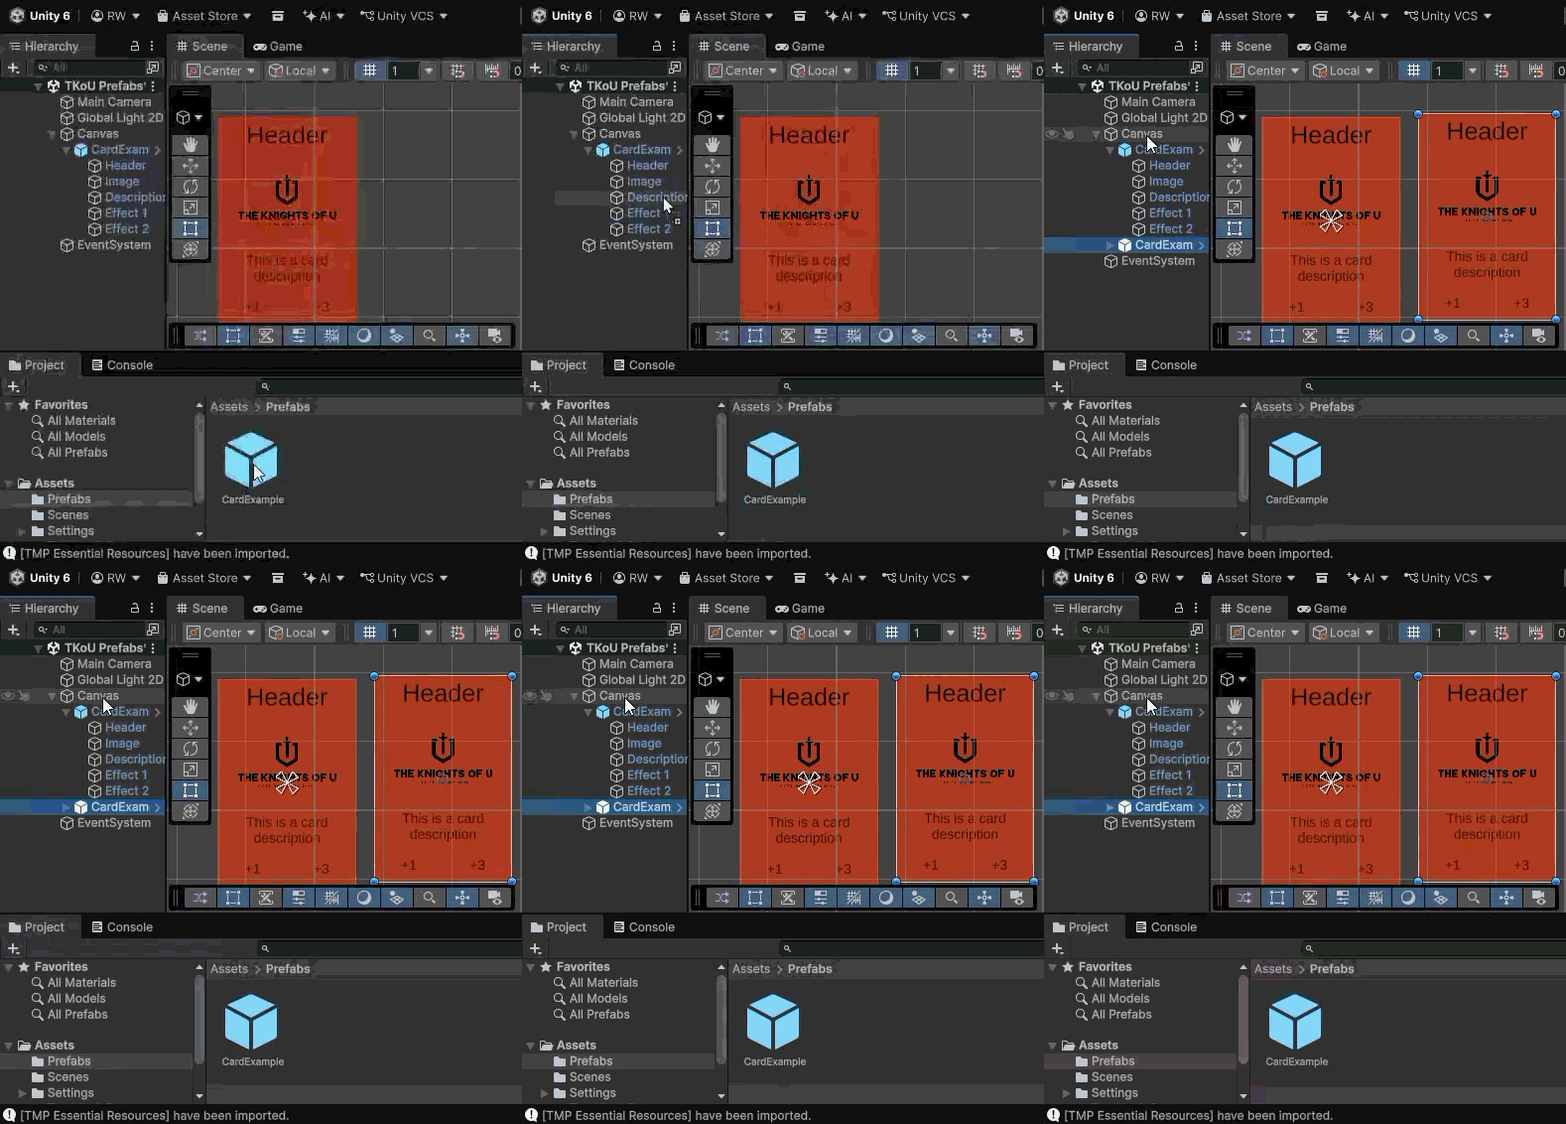
To create a Prefab Instance, drag the newly created Prefab Asset in the opposite direction – from the Project window back to the Hierarchy window.
Please remember to choose the right parent. In most cases, this helps keep your Scene organized, but some GameObjects require a specific type of parent. In our example, the UI objects only work if one of their parent GameObjects has a Canvas component.
Breaking and Reconnecting Prefab Links
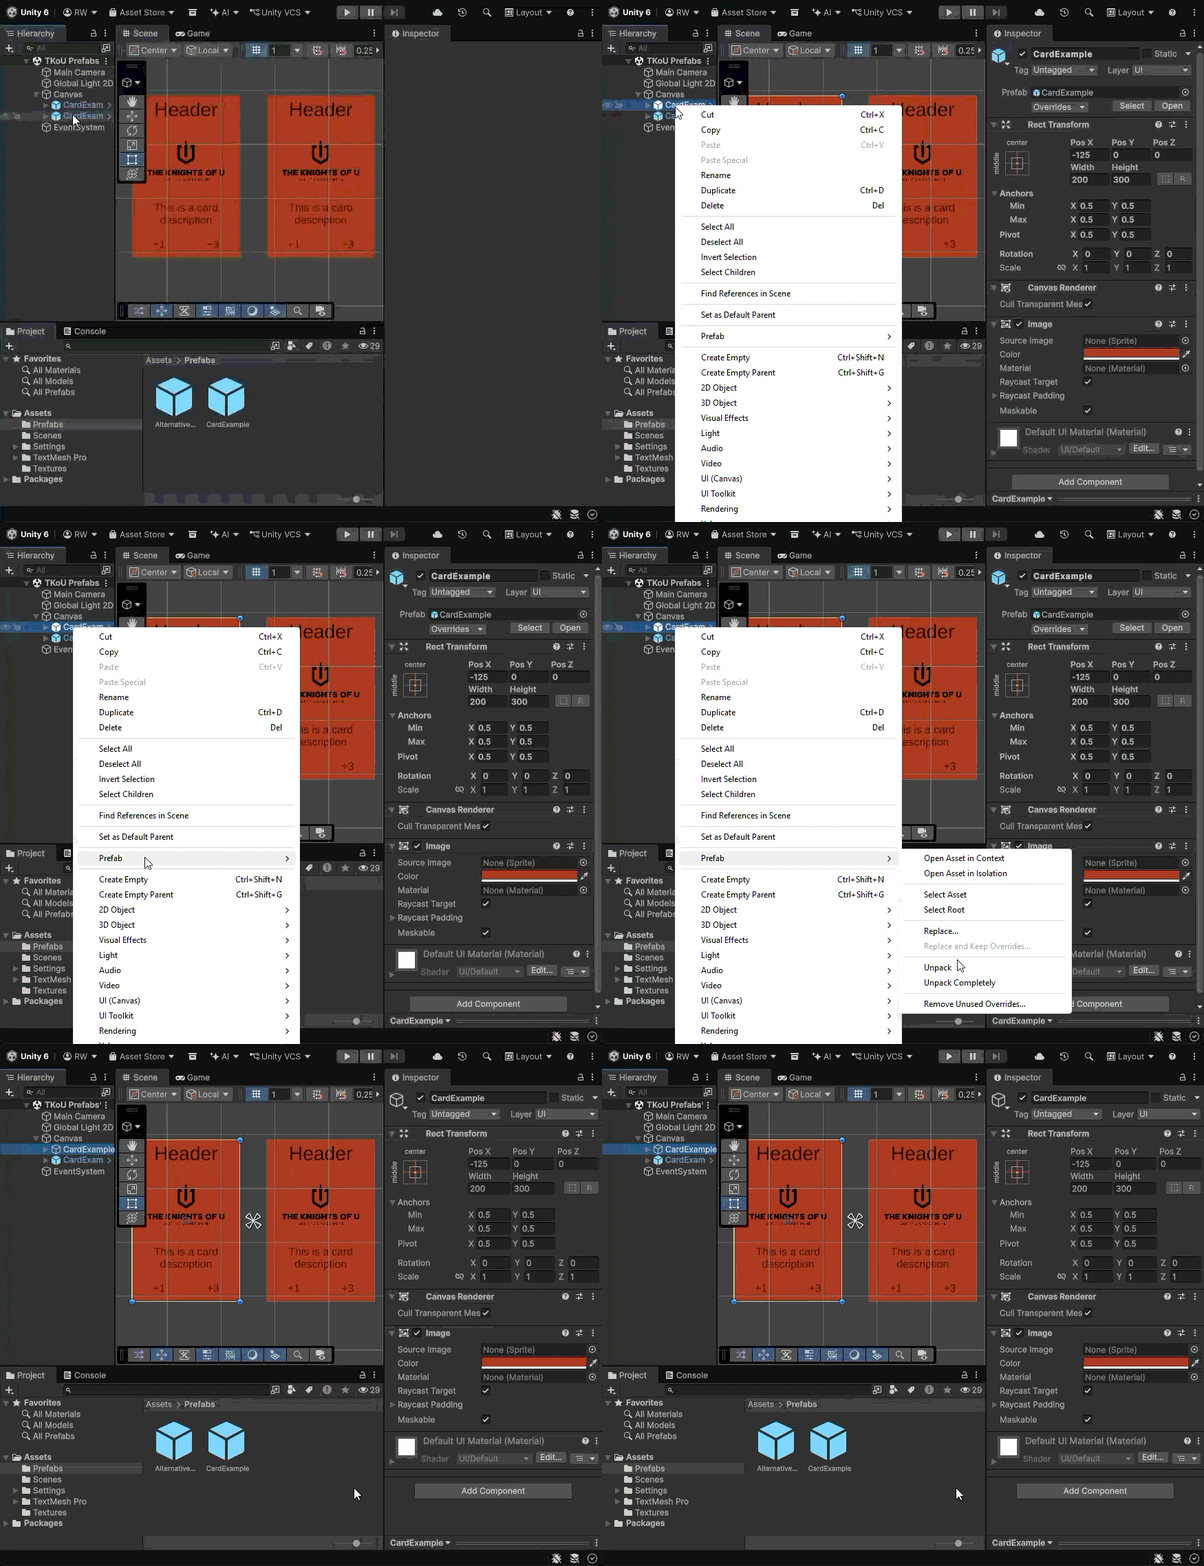
If a GameObject should no longer be a Prefab Instance, you can unlink it by r-clicking it in the Hierarchy window and selecting Prefab → Unpack. We’ll look at the Unpack Completely option later when discussing Nested Prefabs.
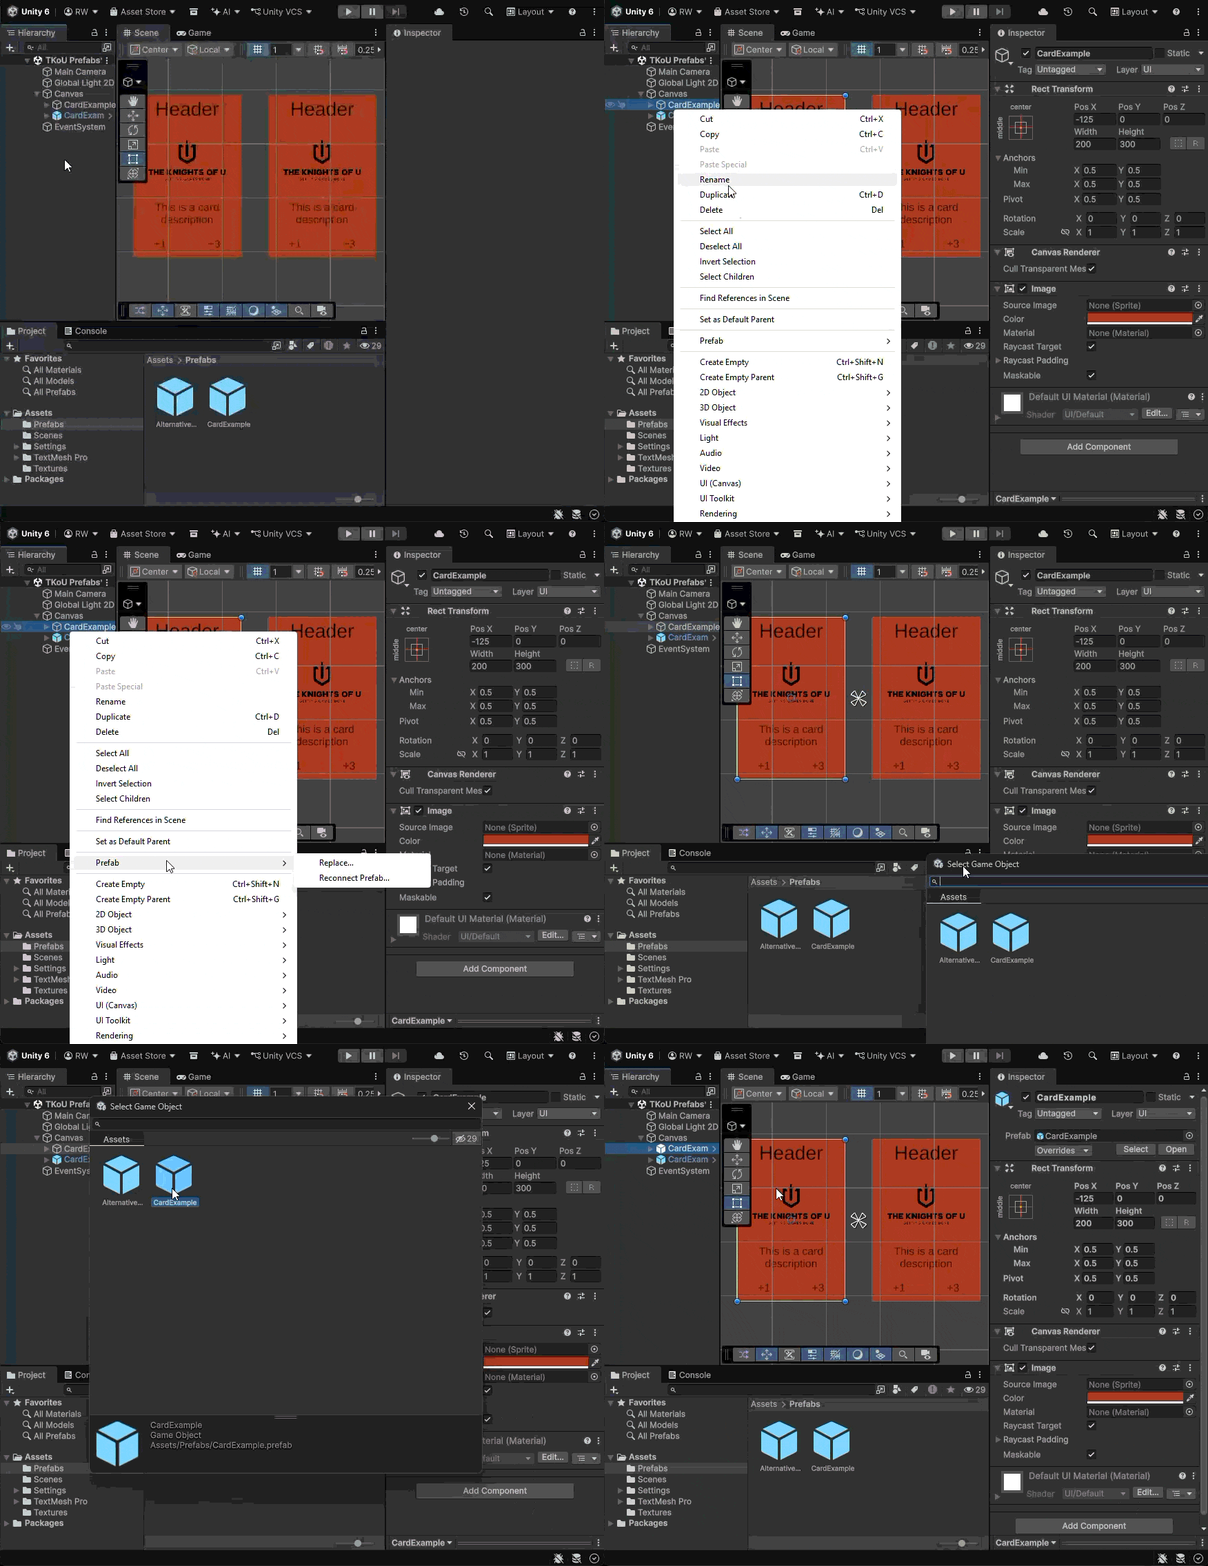
To restore a missing or broken Prefab link, select Reconnect Prefab from the same context menu.
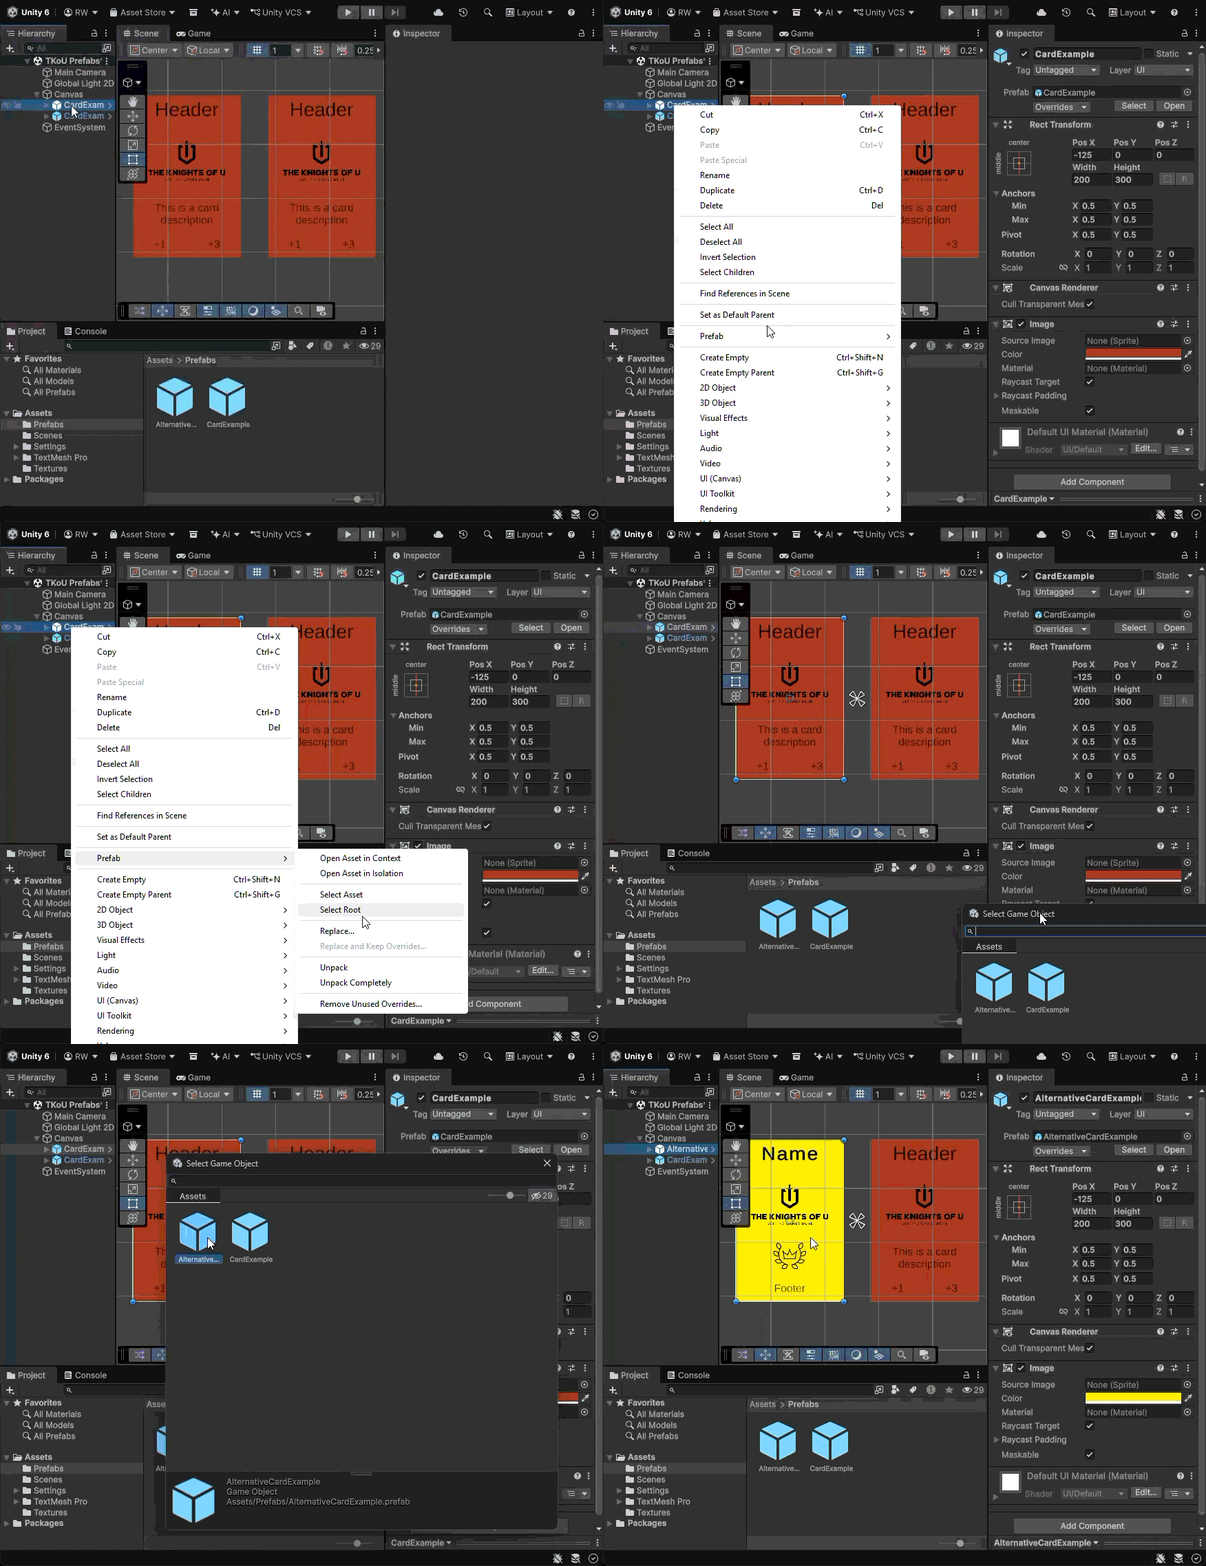
You can also replace the currently linked Prefab with another one.
It’s important to note that a GameObject can have only one Prefab link – it’s not possible to have two root Prefabs.
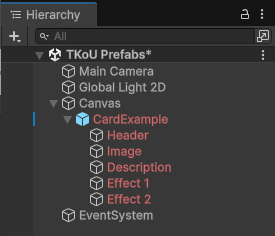
A red text highlight on a Prefab Instance that its linked Prefab Asset is missing.
The most common causes of broken links are a deleted Prefab Asset or a corrupted Scene. If the Prefab Asset is still present in the project, you can use Reconnect Prefab to restore the link.
Now that we’ve created Prefab Assets and Instances, we can look at how to modify them. There are two ways to edit a Prefab in Unity Editor.
Editing Unity Prefab Assets in Prefab Mode
Prefab Mode allows you to view and edit the contents of the Prefab Asset separately from GameObjects in a Scene. This mode provides a safe environment for modifying a Prefab without risking changes to a Scene by mistake.
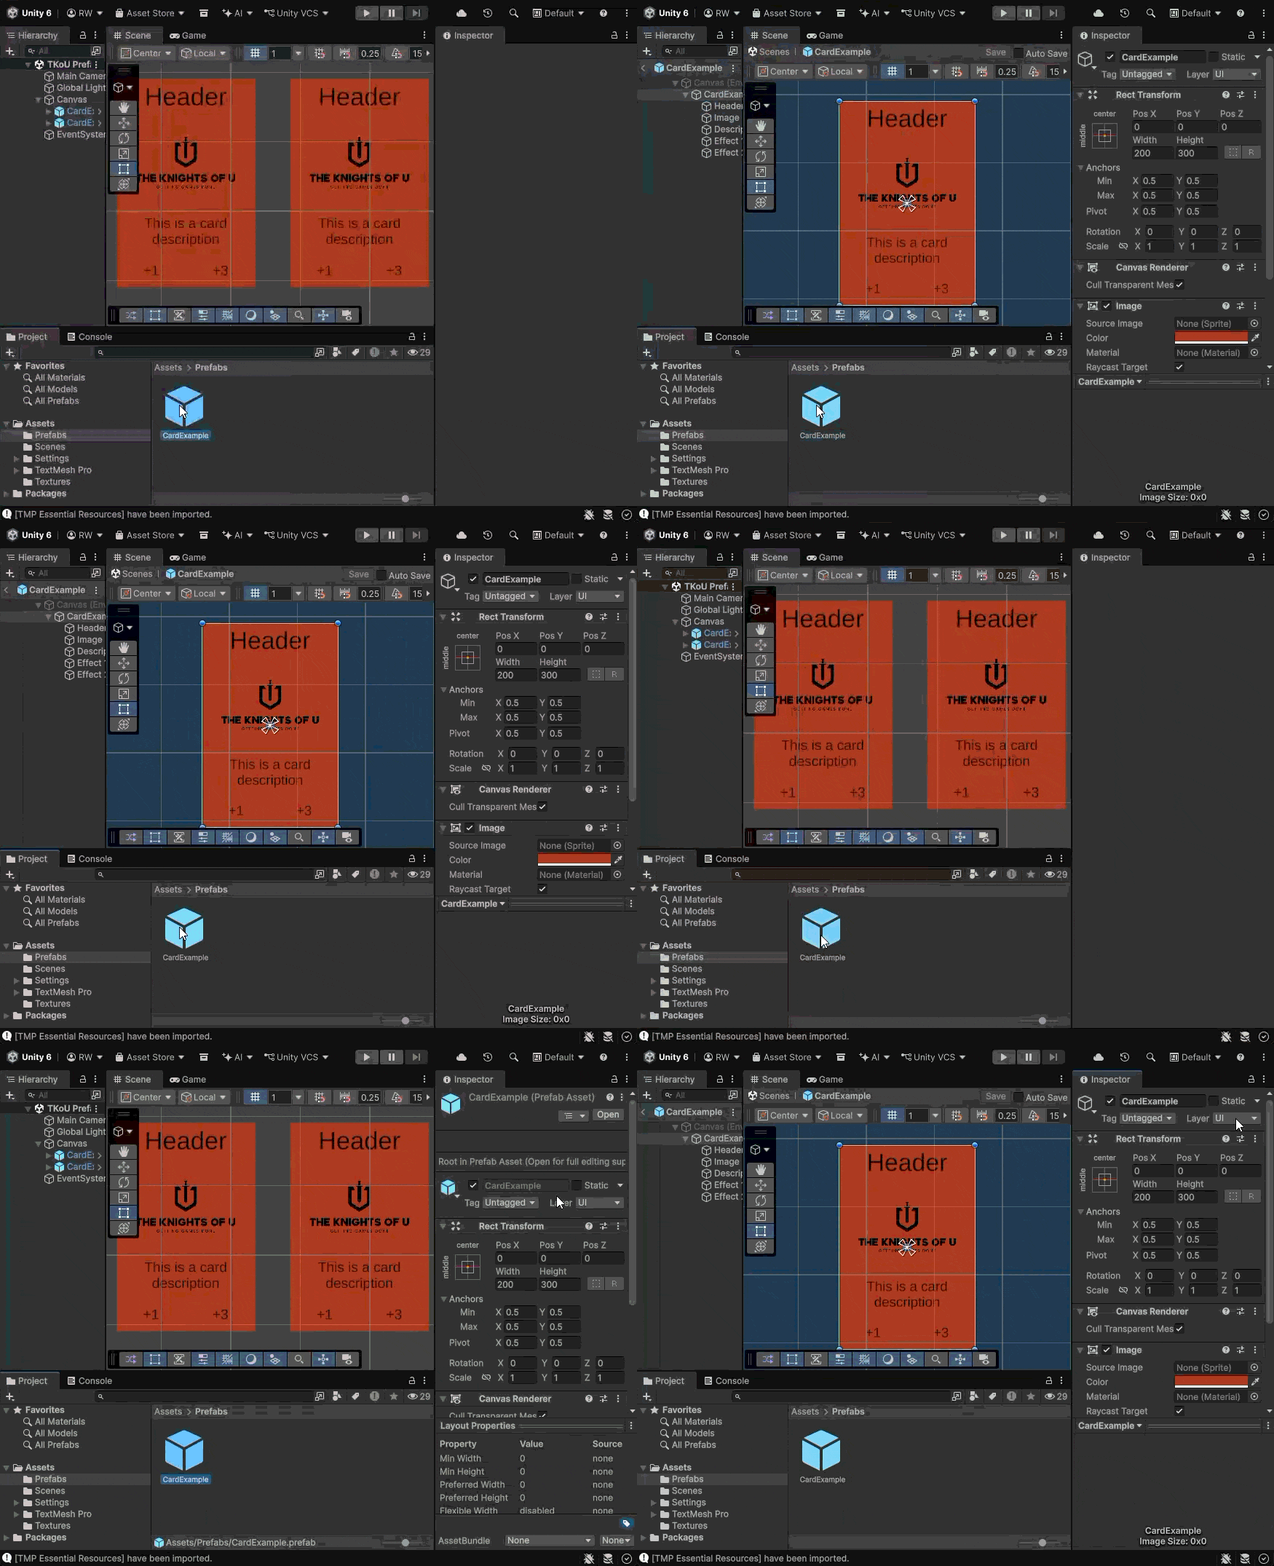
To open the Prefab Mode in isolation, either double-click a Prefab Asset in the Project window or select an Asset and click the Open button in the Inspector window.
You can use this option when you don’t need any distractions while working on your prefabs.
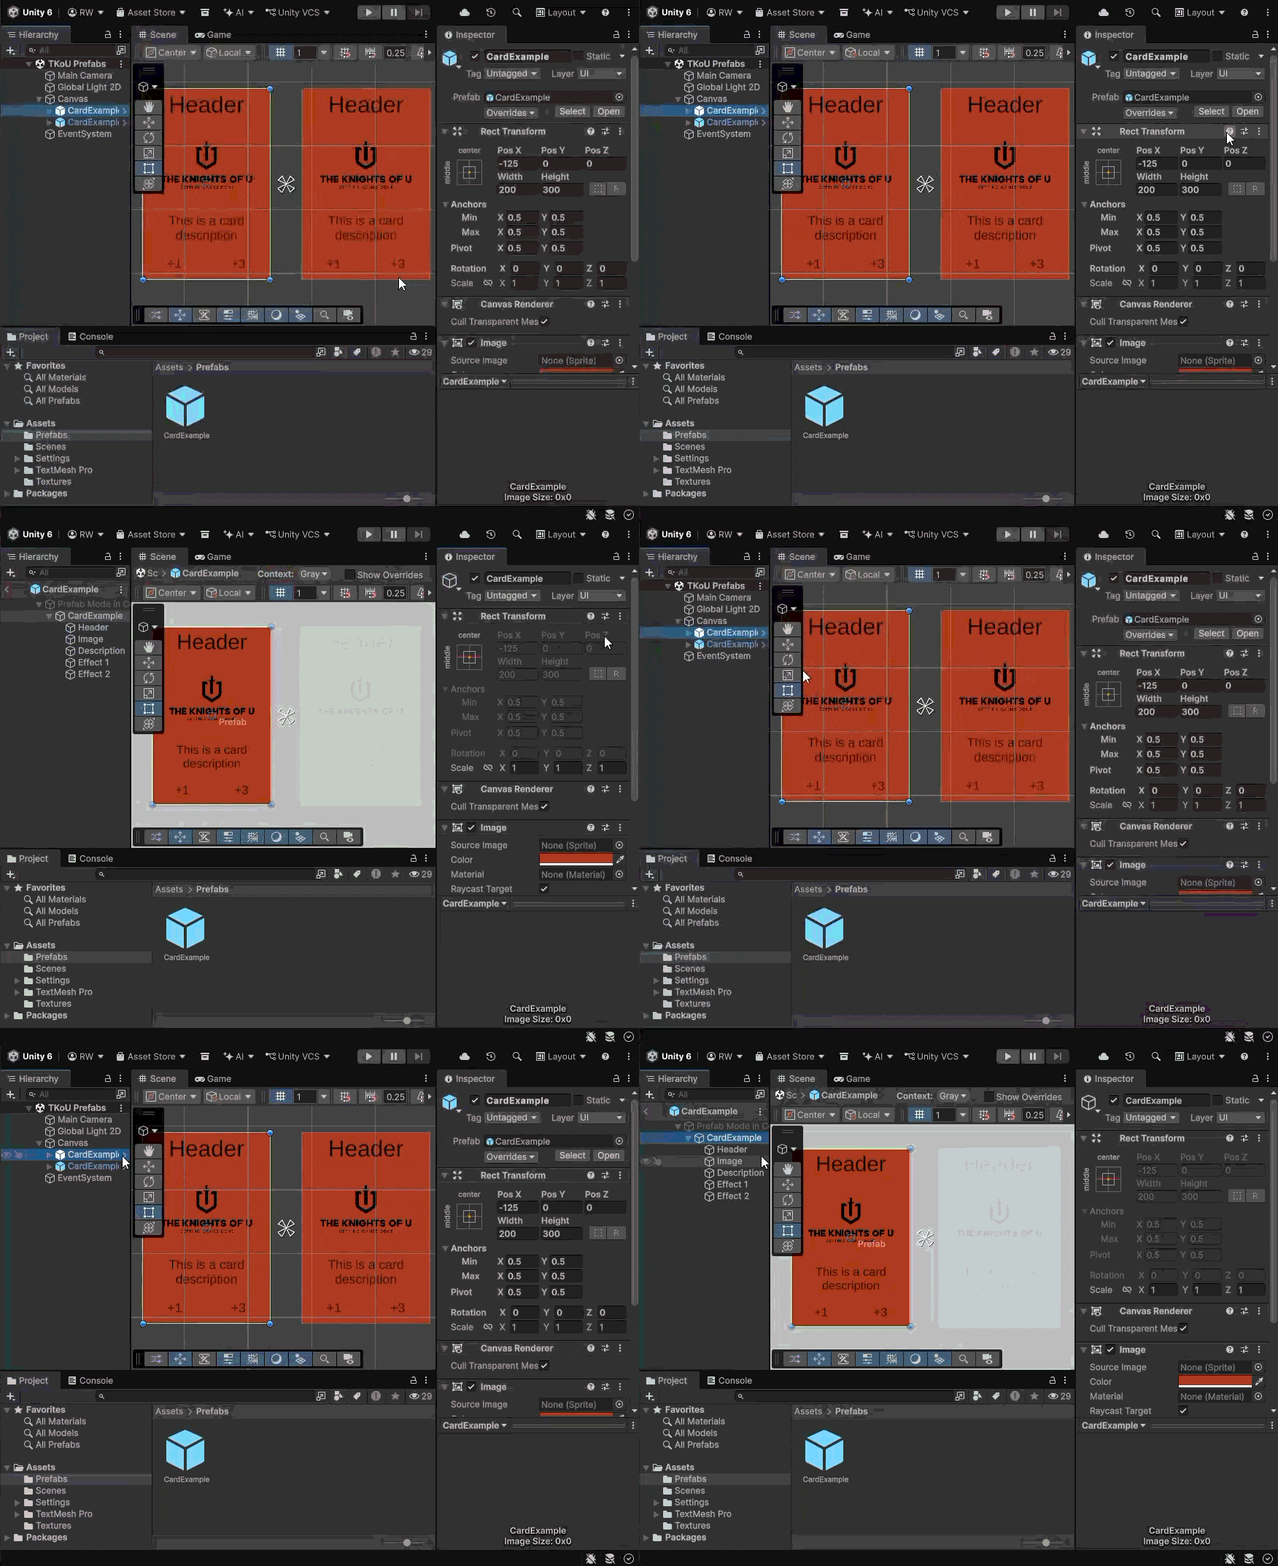
To open Prefab Mode in context, select a Prefab Instance in the Hierarchy window and either click the Open button in the Inspector window or use the arrow button next to the Prefab Instance in the Hierarchy.
Pressing P on the keyboard while a Prefab Instance is selected will also open Prefab Mode.
You can use this option when you want to understand better how changes made to a prefab look in its surroundings.
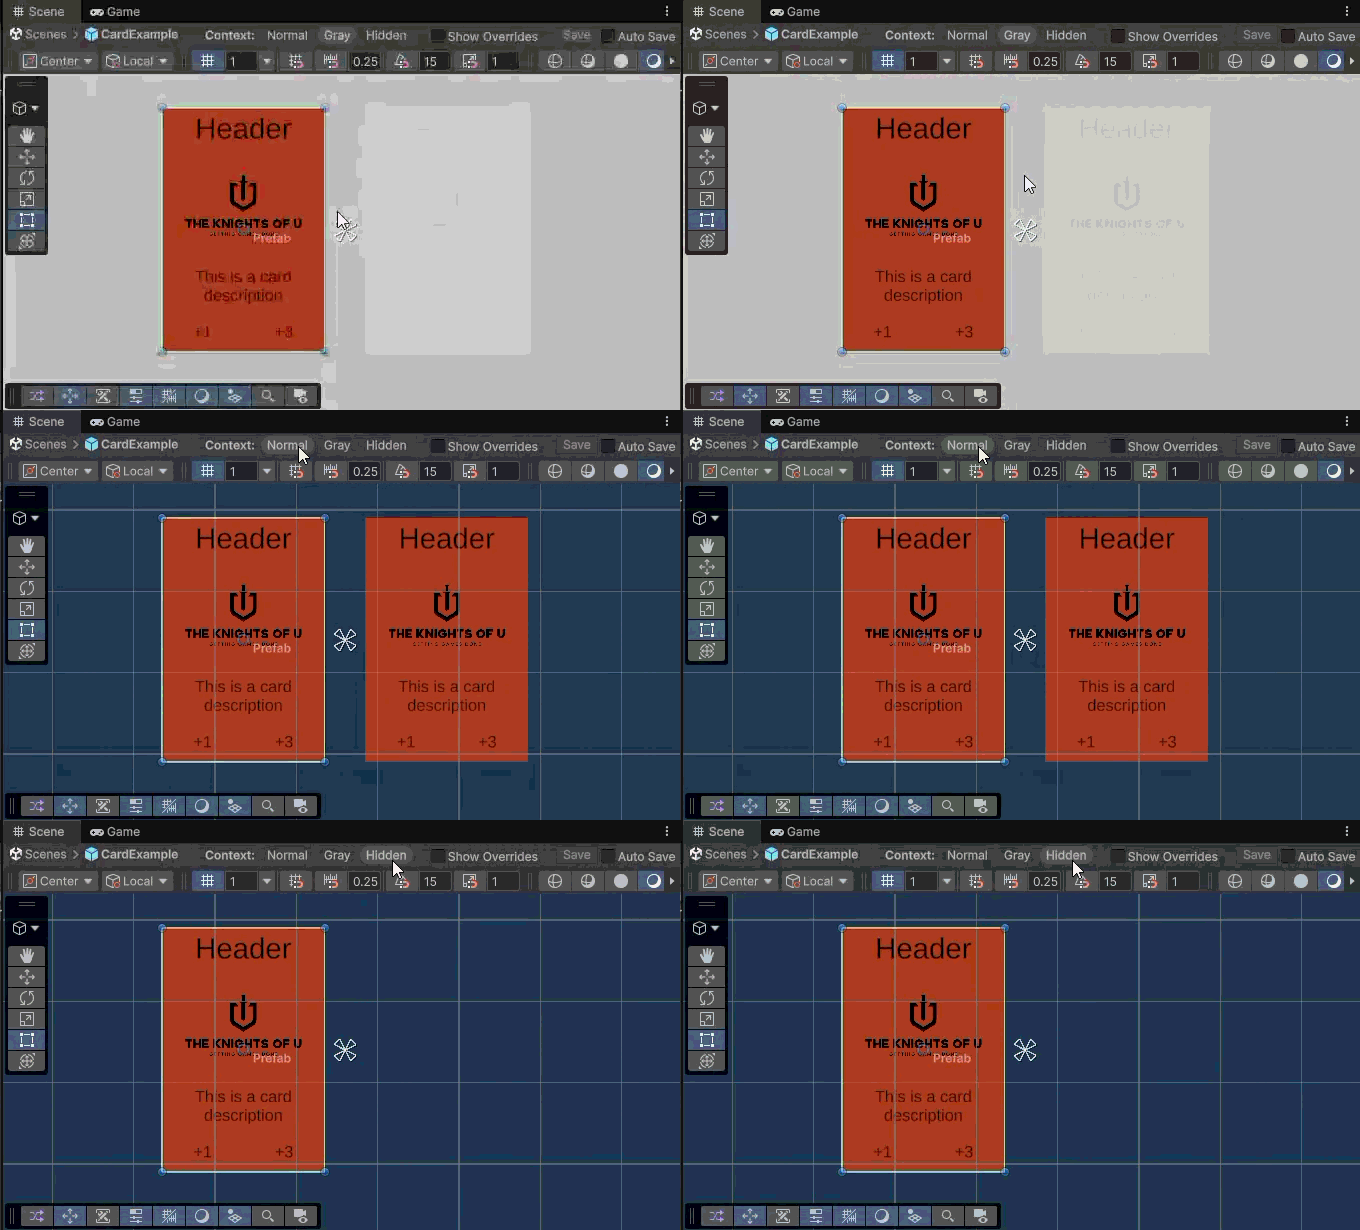
It’s possible to change the context type using the buttons available when Prefab Mode is open in context.
Normal presents the selected Prefab Instance exactly as it appears on the Scene.
Gray clearly highlights the selected Prefab Instance.
Hidden is an isolation-mode-like view.
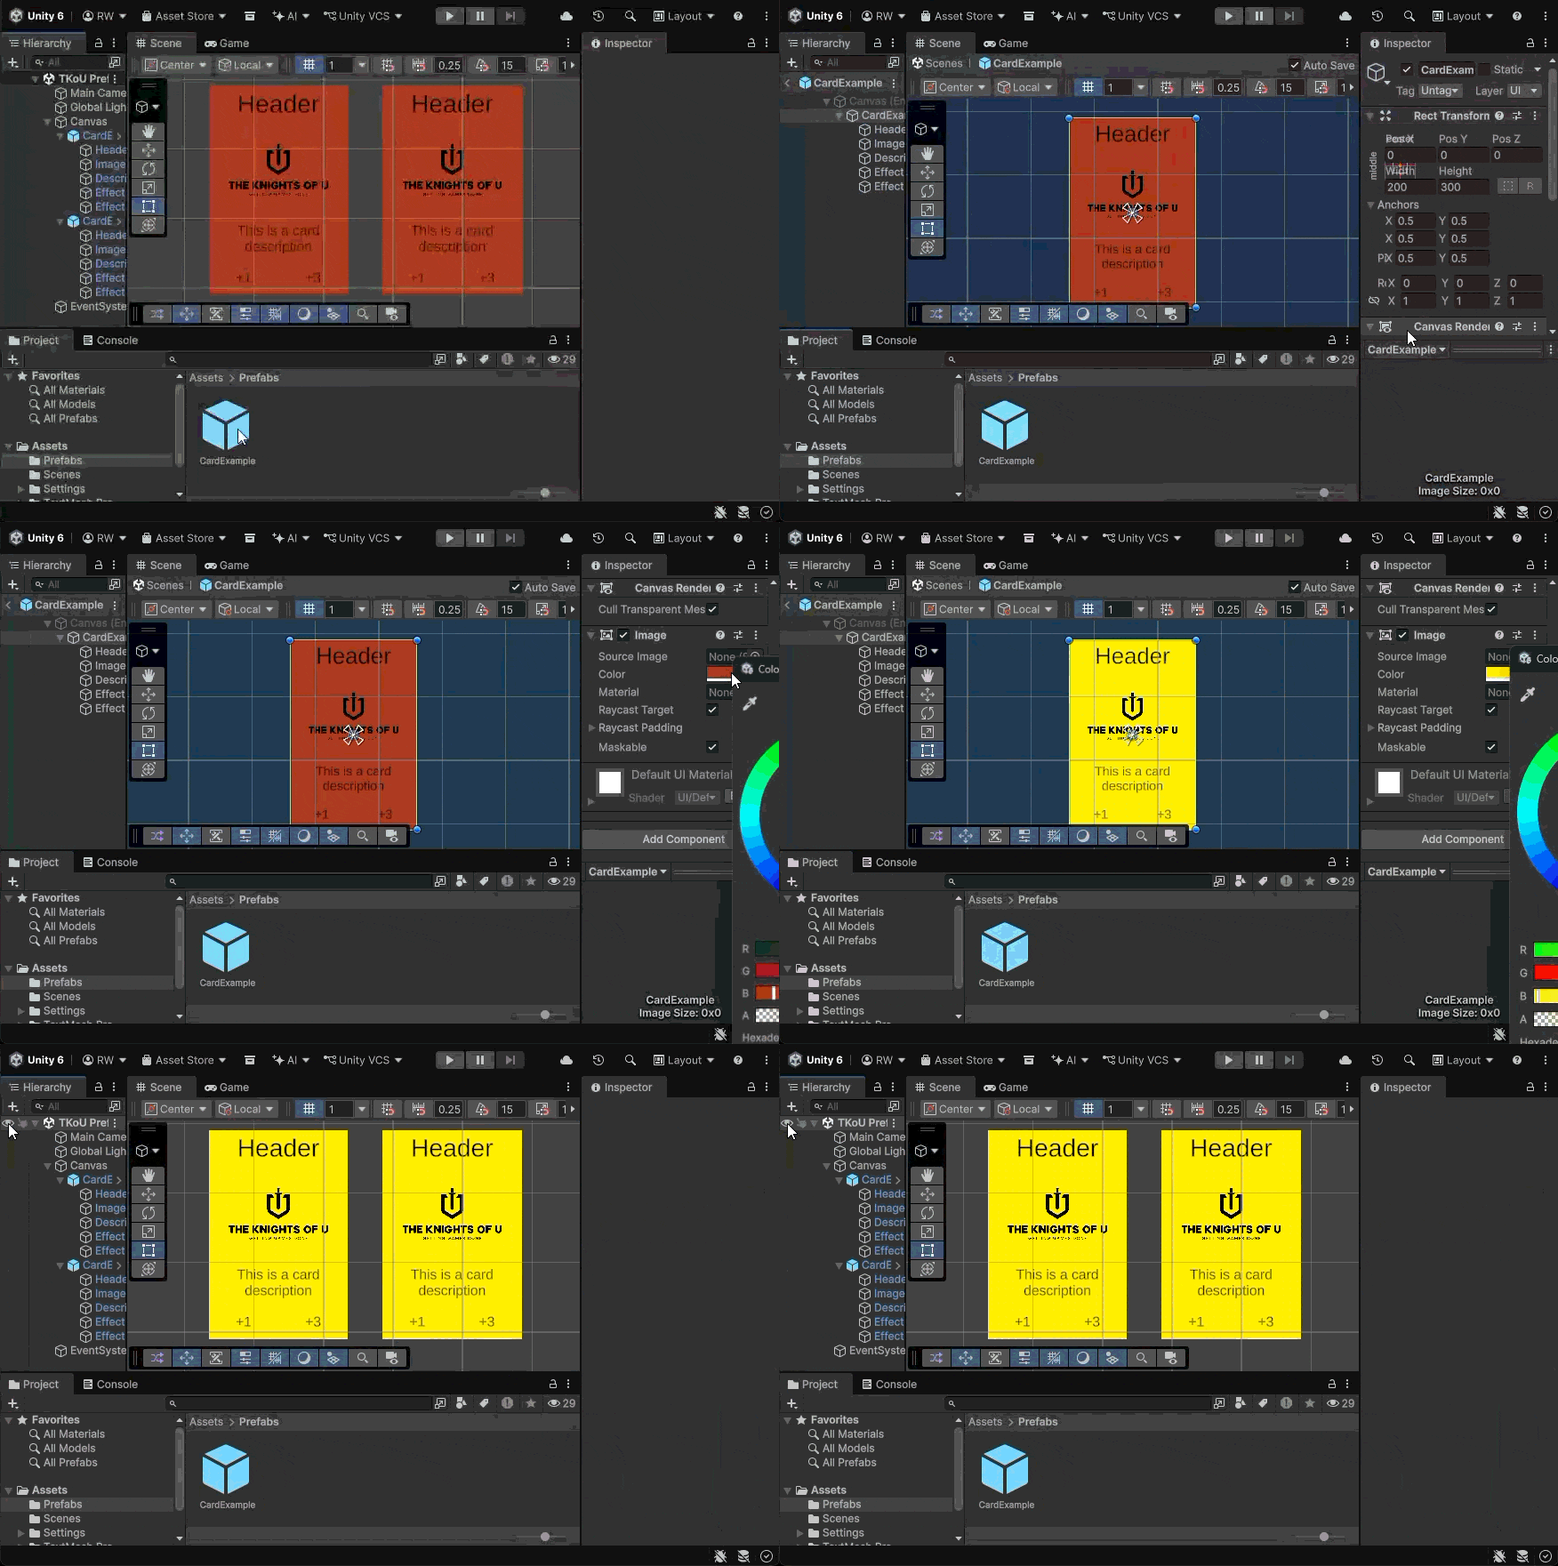
Any changes saved to a Prefab Asset while in Prefab Mode are automatically applied to all of its Prefab Instances.
Prefab Mode Settings

You may notice that the Auto Save checkbox is enabled by default when you first enter Prefab Mode.
Auto Save mode automatically saves the Asset after every change and applies those changes to all of the active Instances.
While this is very handy, the process can take a long time if there are many Instances of modified Prefabs active in the open Scene.
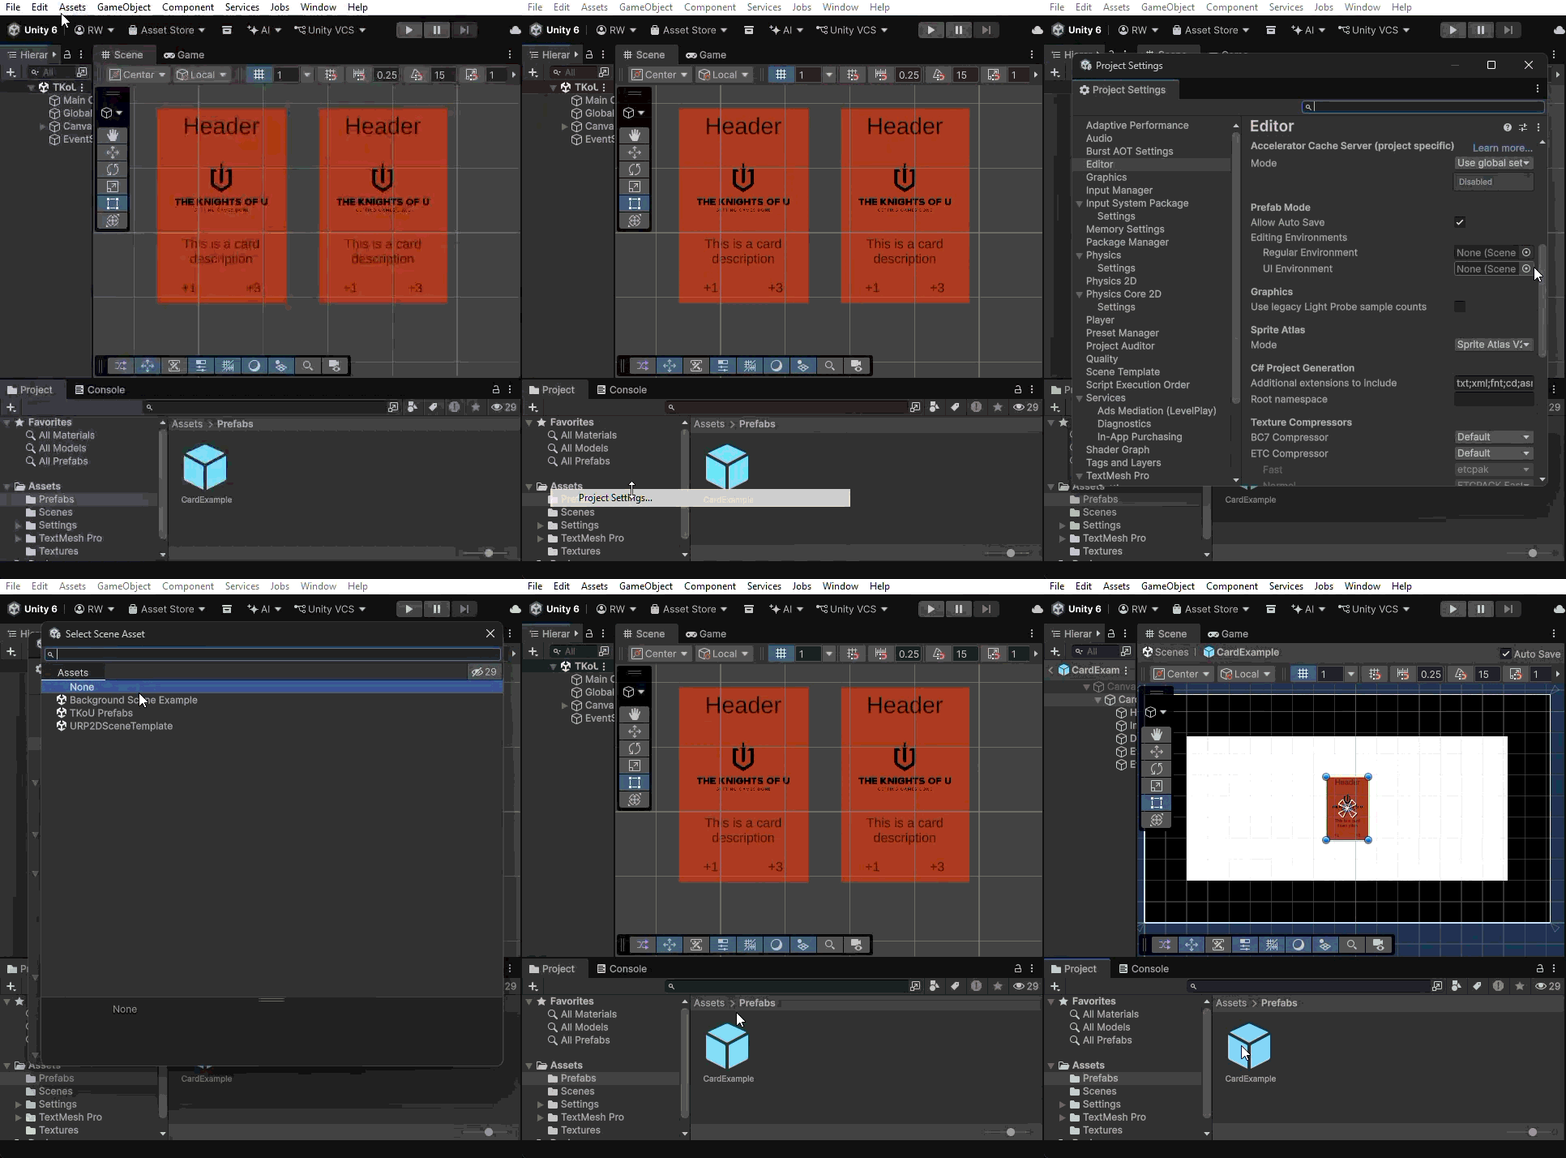
If you need a specific background or environment while editing your Prefabs, even in isolation mode, you can assign a Scene as an Editing Environment in Project Settings → Editor.
You can assign separate environments for regular GameObjects and, as in our case, Canvas UI objects.
Every Prefab with a regular Transform component uses Regular Environment, while every Prefab with a RectTransform component uses the UI Environment.
Modifying Unity Prefab Instances with Overrides
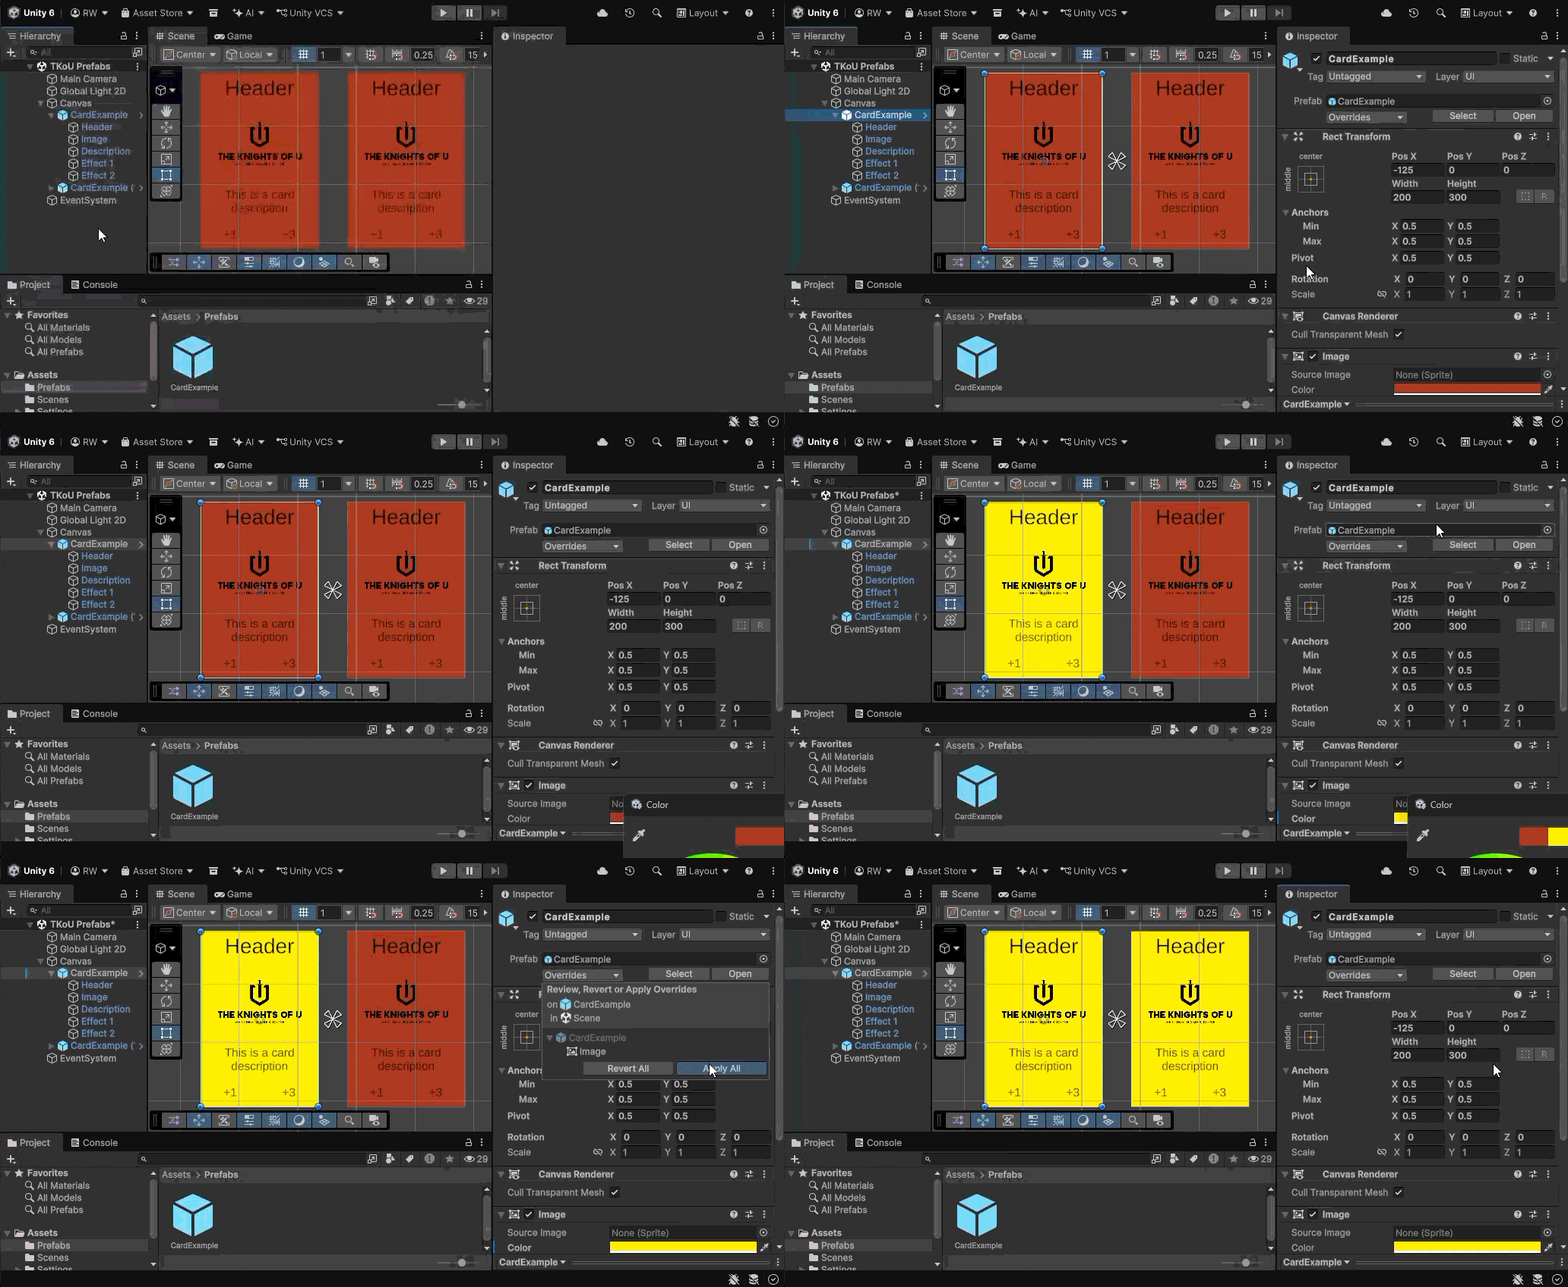
Editing Prefab Instances directly from a Scene is also possible.
After applying all desired changes, select Overrides → Apply All to save modifications to the Prefab Asset.
This may seem simple at first glance, but there’s a lot to unpack here!
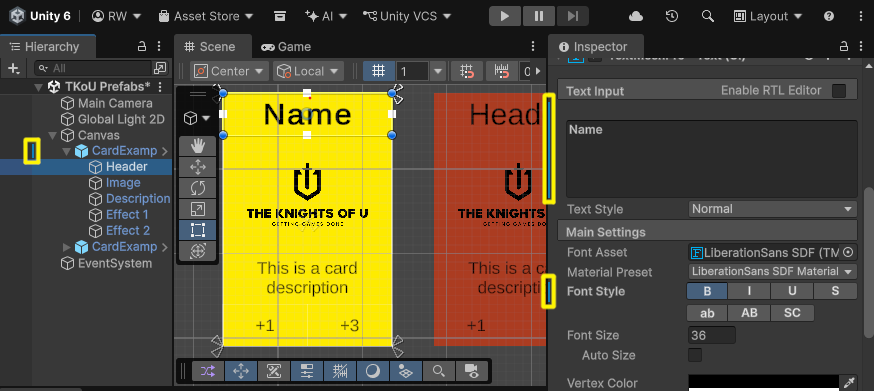
Modifying a Prefab Instance’s properties creates an override.
Overrides are local modifications that allow changes to a Prefab Instance without breaking its connection to the Prefab Asset.
A blue highlight indicates a property override in the Inspector window. The same highlight identifies Prefab Instances with overrides in the Hierarchy window.
Imagine that you have an enemy Prefab with a health component and want to use one of its Instances to as a miniboss. You can adjust the health value and enemy scale using property overrides.
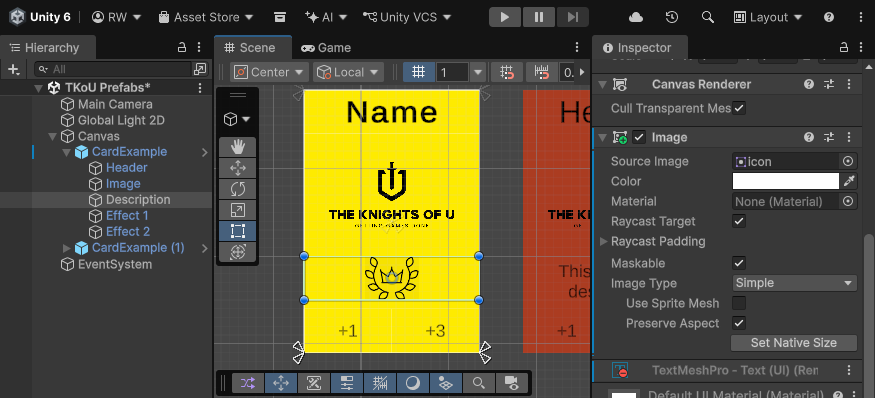
Adding or removing components from any of a Prefab Instance’s GameObjects also creates overrides.
As before, a blue highlight indicates these changes.
In our miniboss example, you can replace the 2D sprite enemy indicator with a 3D one.
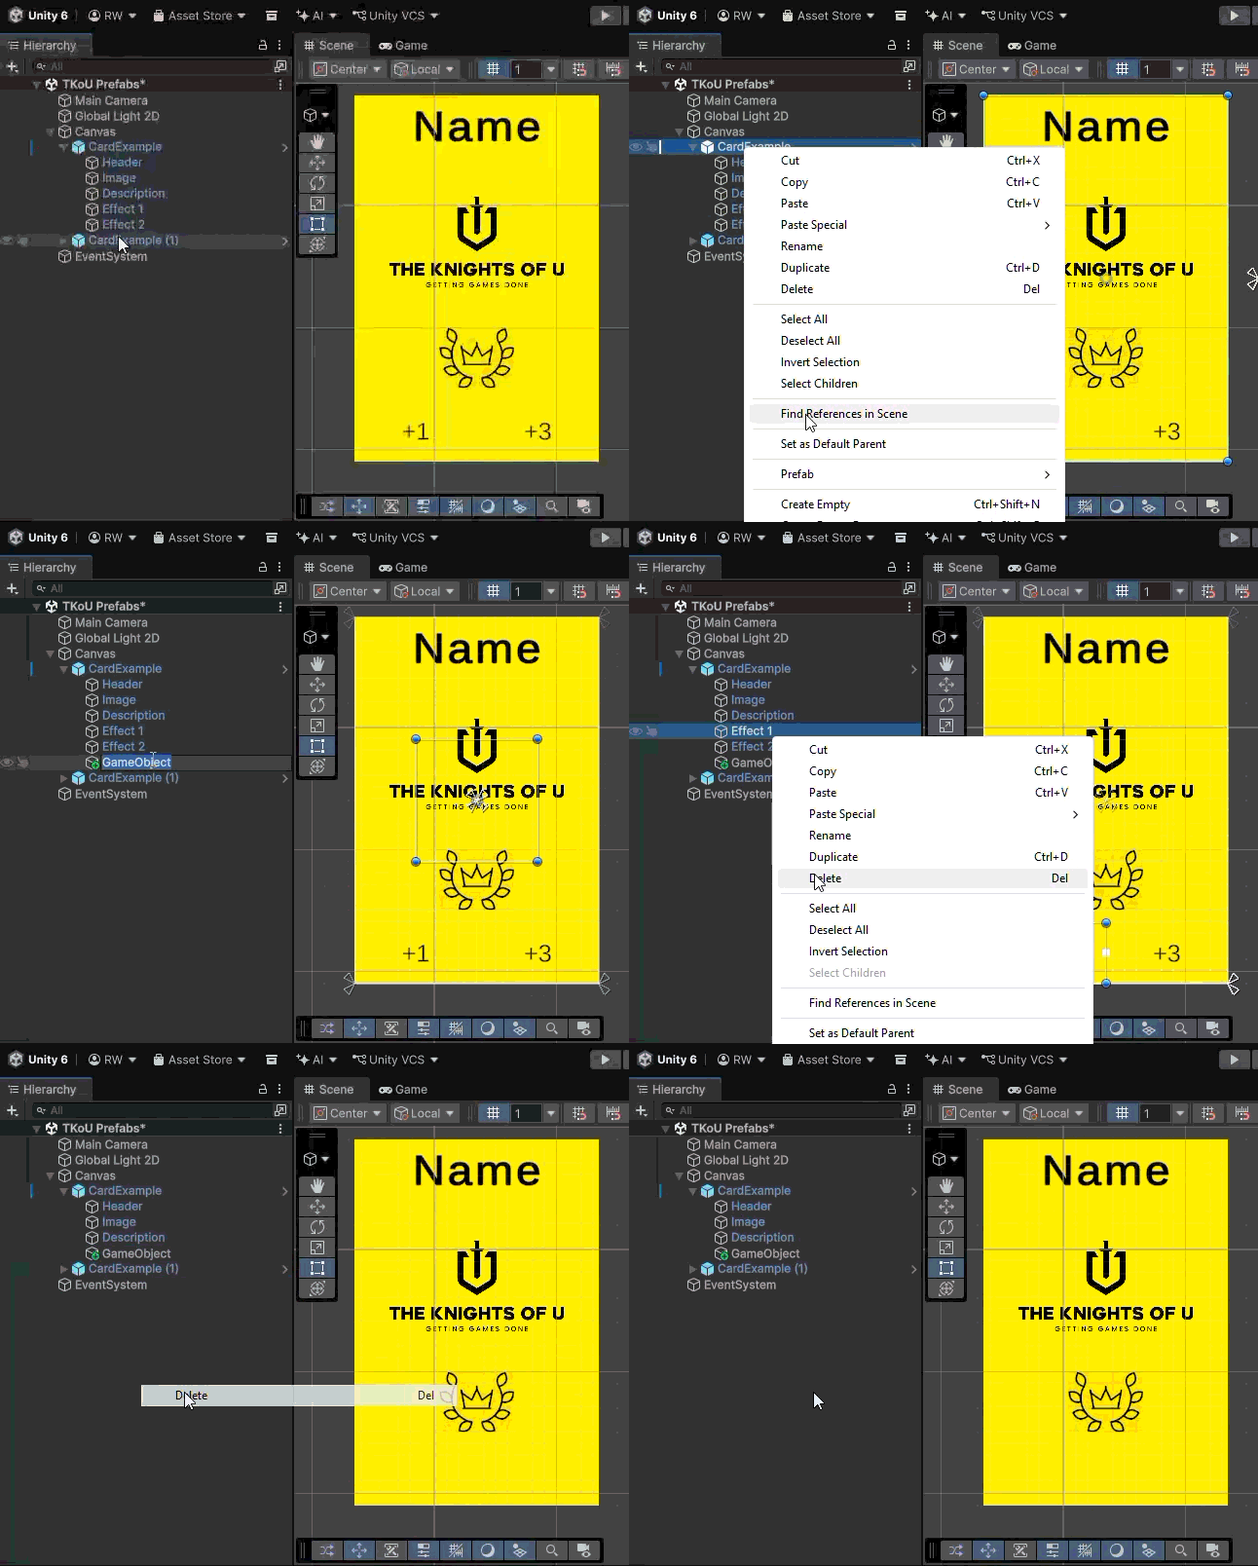
The final type of Prefab override is adding or removing entire GameObjects.
GameObjects added as overrides have a special icon with a small plus sign in the Hierarchy window.
You can use this approach to remove common particle effects and add special ones for our imaginary miniboss.
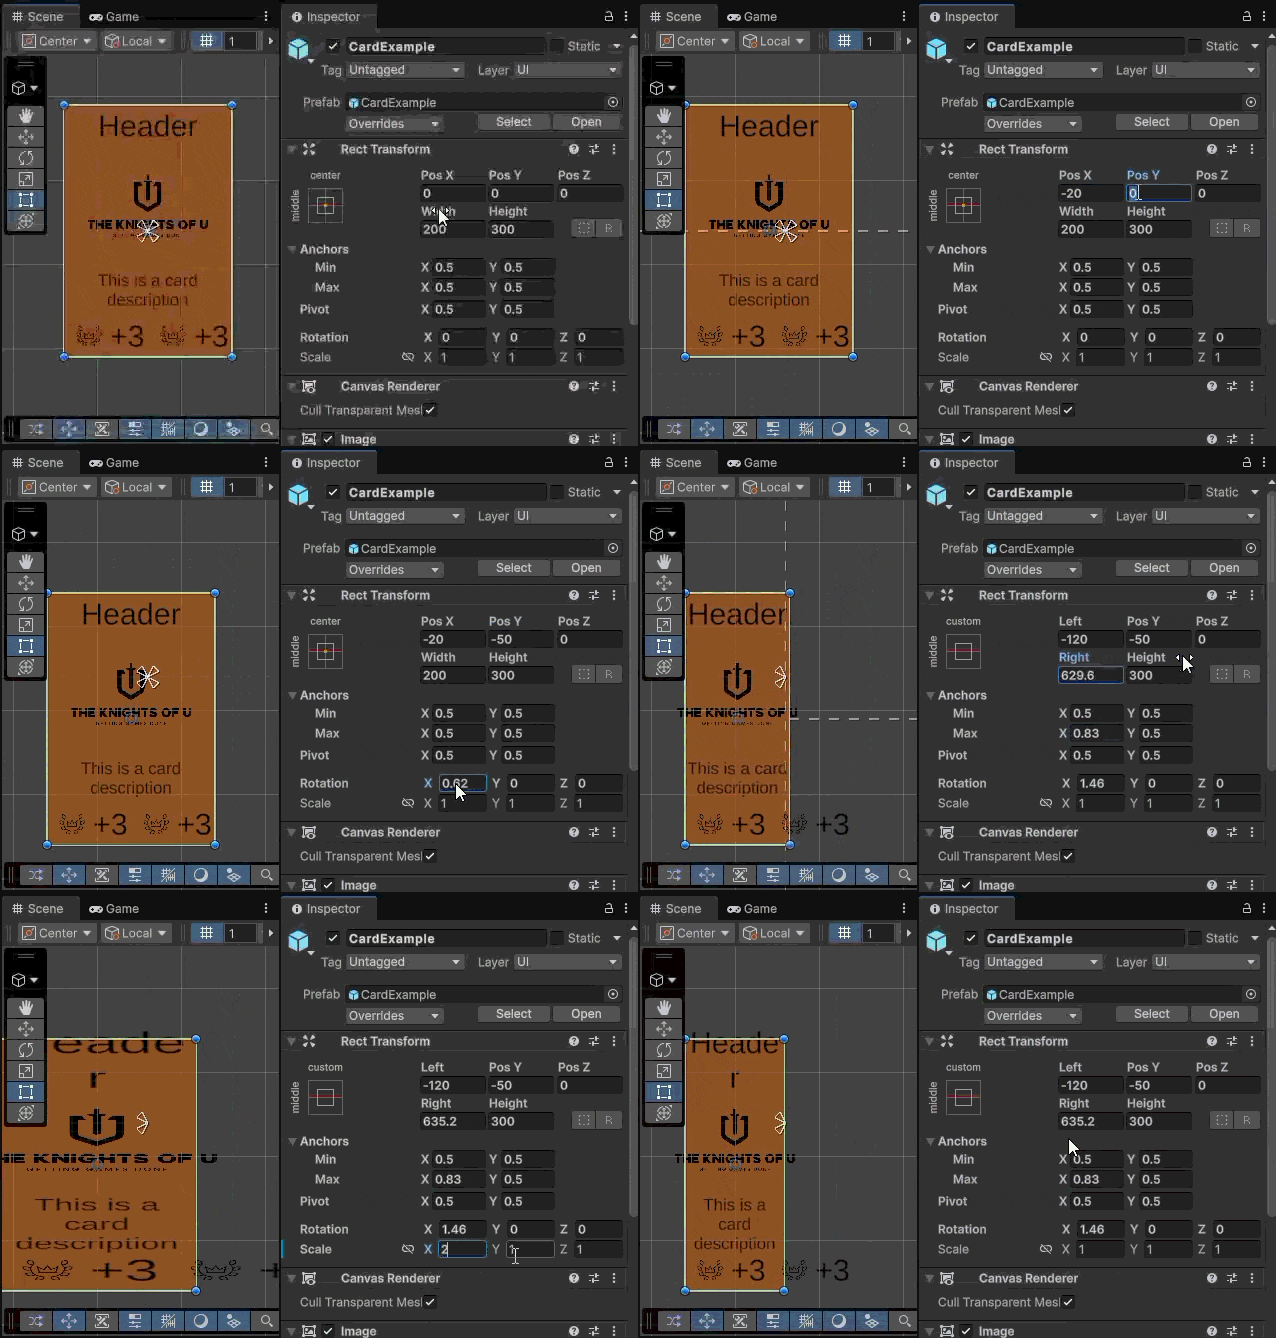
Position and rotation of the Prefab Instance are local, allowing each Instance to exist in a different location or orientation.
Because of that, Transform modifications other than scale are not considered overrides. So be careful when applying large Transform changes, especially when working with RectTransforms.
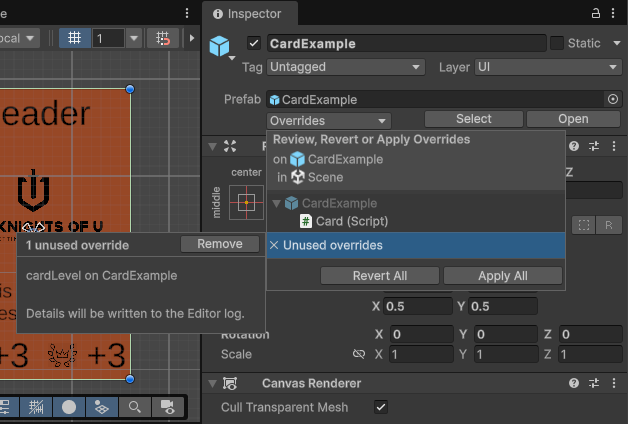
If a reference to an overridden element breaks for any reason, information about the broken overrides is available in the Overrides dropdown.
In the example, the name of a variable in a custom script was refactored from cardLevel to cardTier, leaving an Instance with an unused override.
Applying and Reverting Unity Prefab Overrides
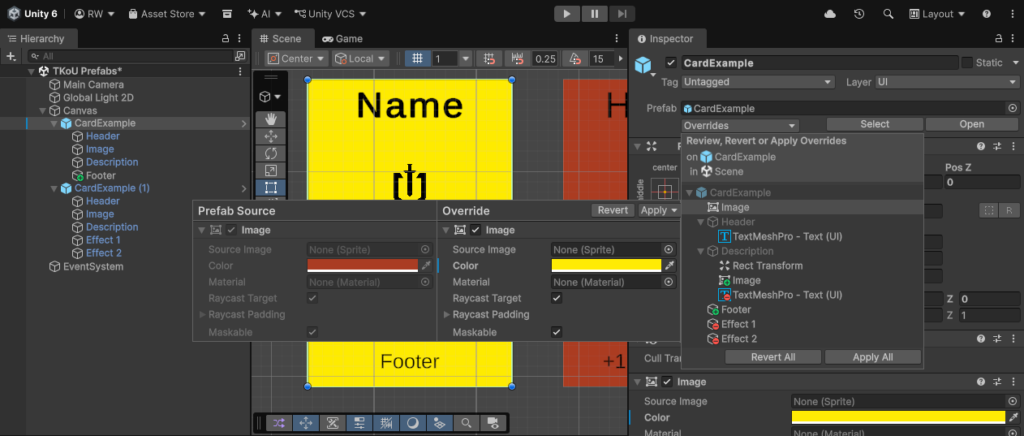
You can review all applied overrides by selecting the Overrides drop-down on the Prefab Instance Root.
This menu lets you review all modified GameObjects and Apply or Revert individual changes.
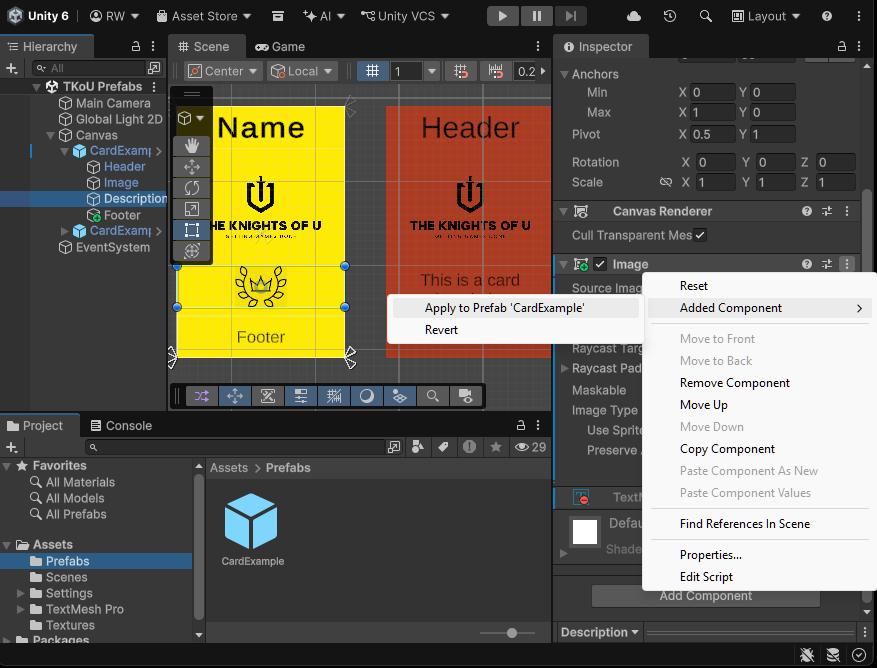
Every added, removed, or modified component can be Applied or Reverted using its component menu.
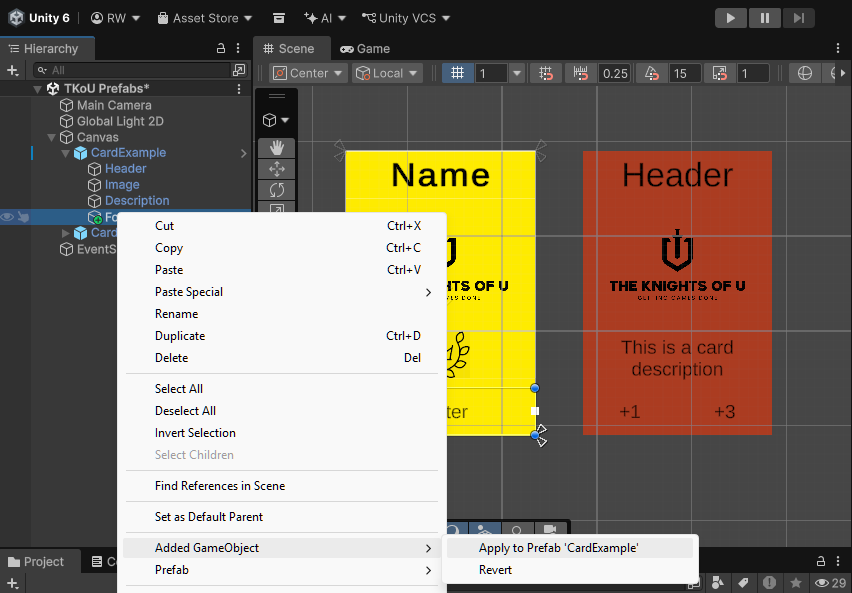
The same option is available for adding GameObjects via the right-click context menu.
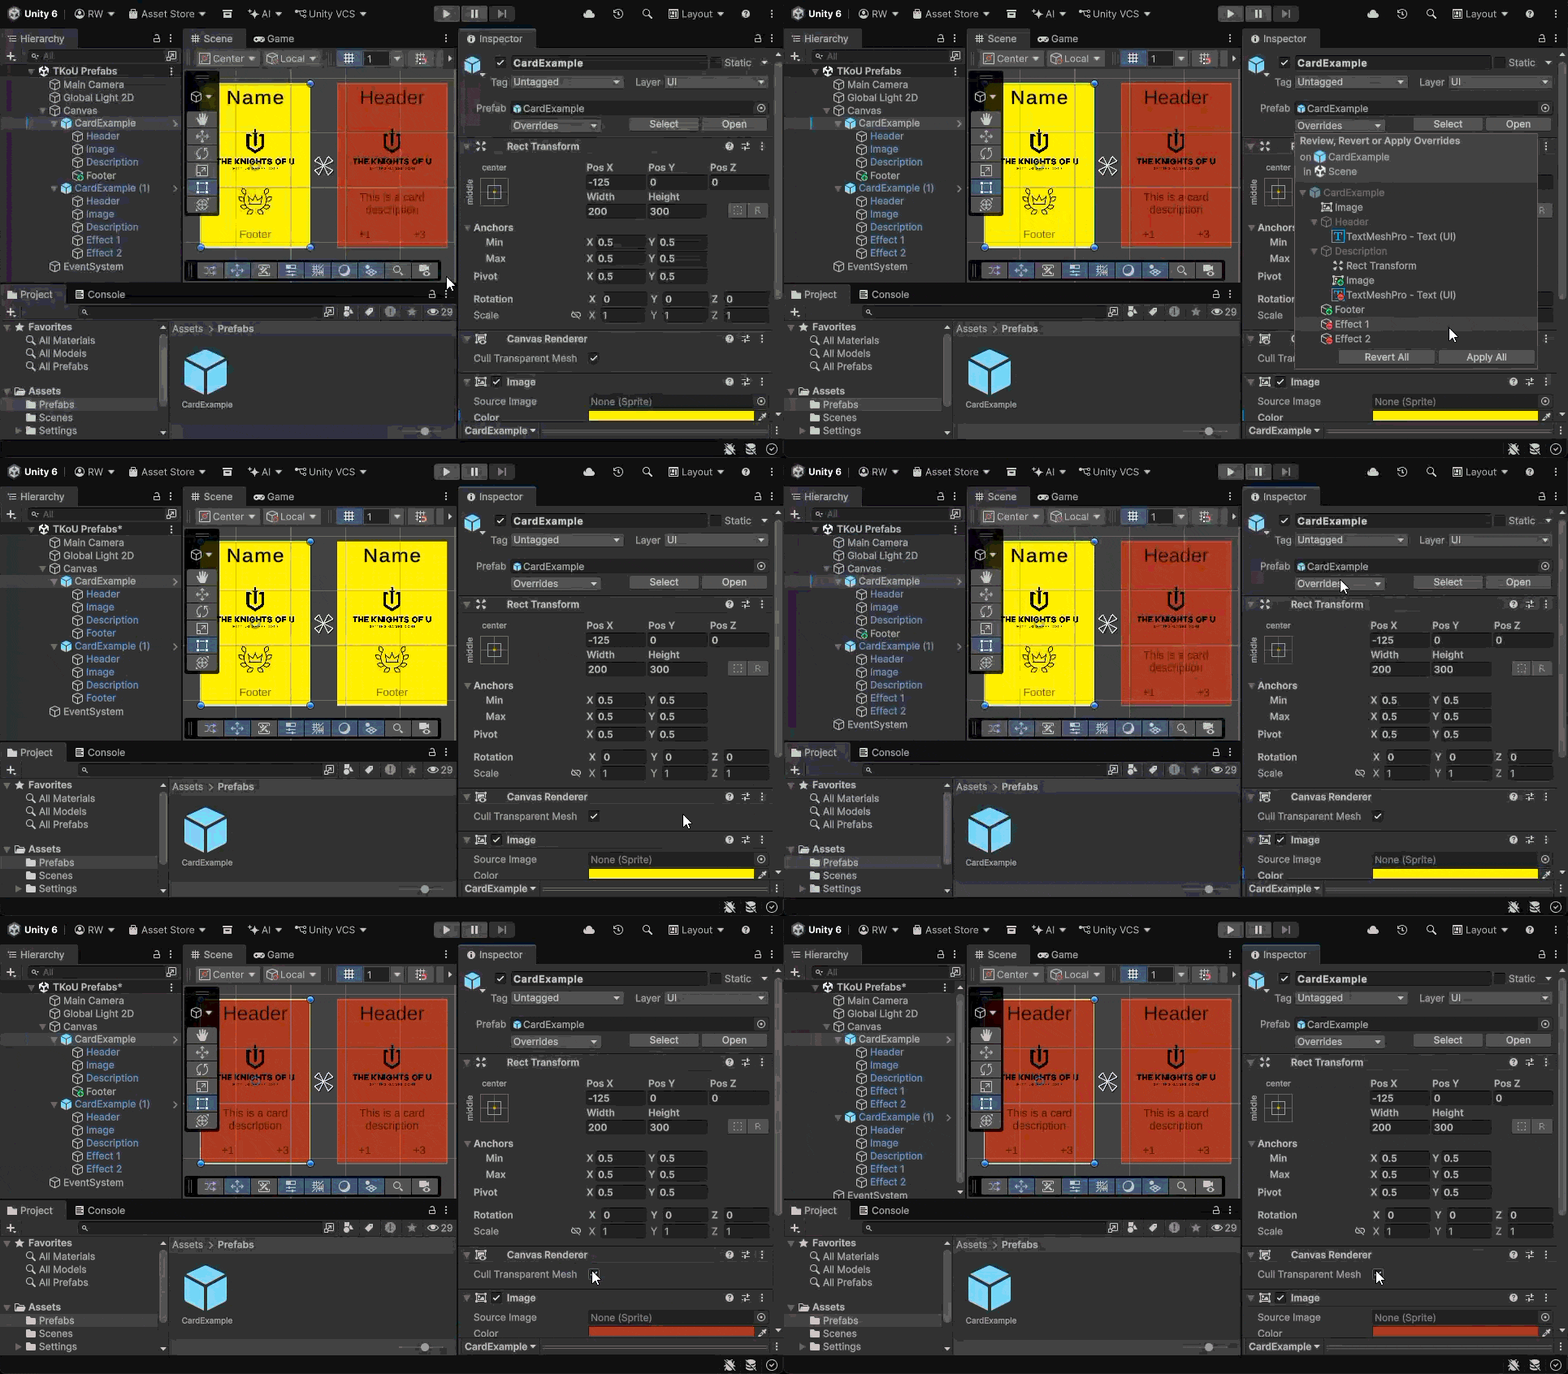
It’s also possible to Apply All overrides to a Prefab Asset, as we did earlier.
Using Revert All returns the Instance to the state stored in the Prefab Asset.
Unity Prefab Variants
Overrides are useful for making singular Instance modifications in a Scene. But what if there’s a need for slightly different versions of the same GameObject used throughout the project?
At first glance, creating a Duplicate Prefab and modifying it seems like a good solution. However, Duplicated Prefabs quickly become difficult to maintain because they no longer share any connection with the original Prefab Asset.
This is where Prefab Variants come in – a Unity Engine feature for creating a family of Prefabs thhelat share a common base while allowing each variant to define its own overrides. We’ll use simple Player and Event cards as an example.
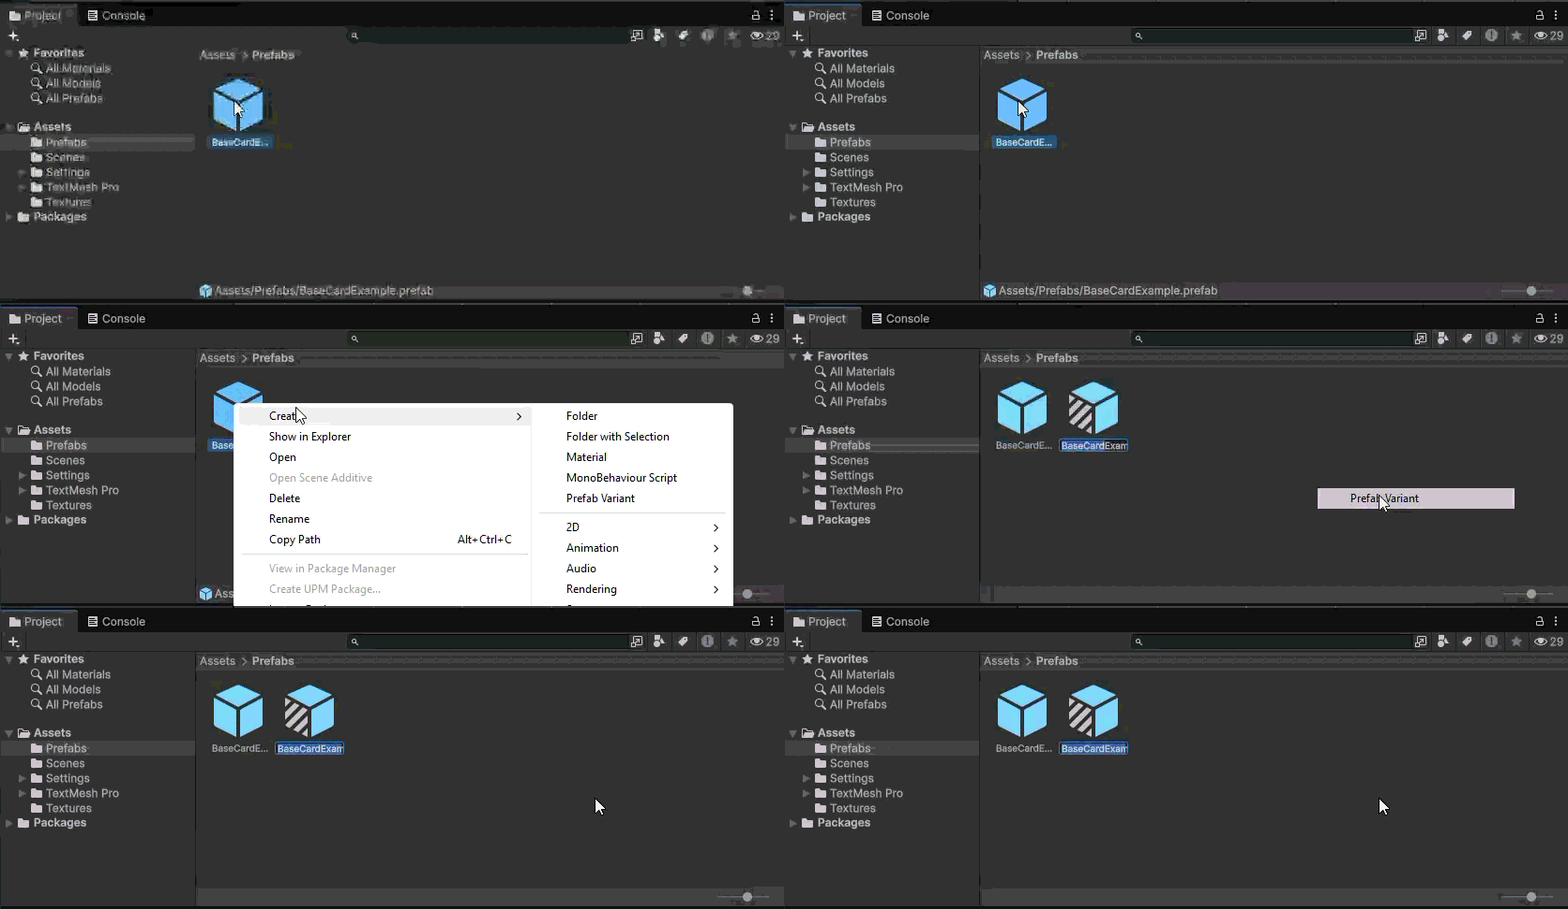
To create a Prefab Variant from the Project window, open the context menu on a Prefab Asset and select Create → Prefab Variant.
Modifying Prefab Variants works the same way as modifying any other Prefab.
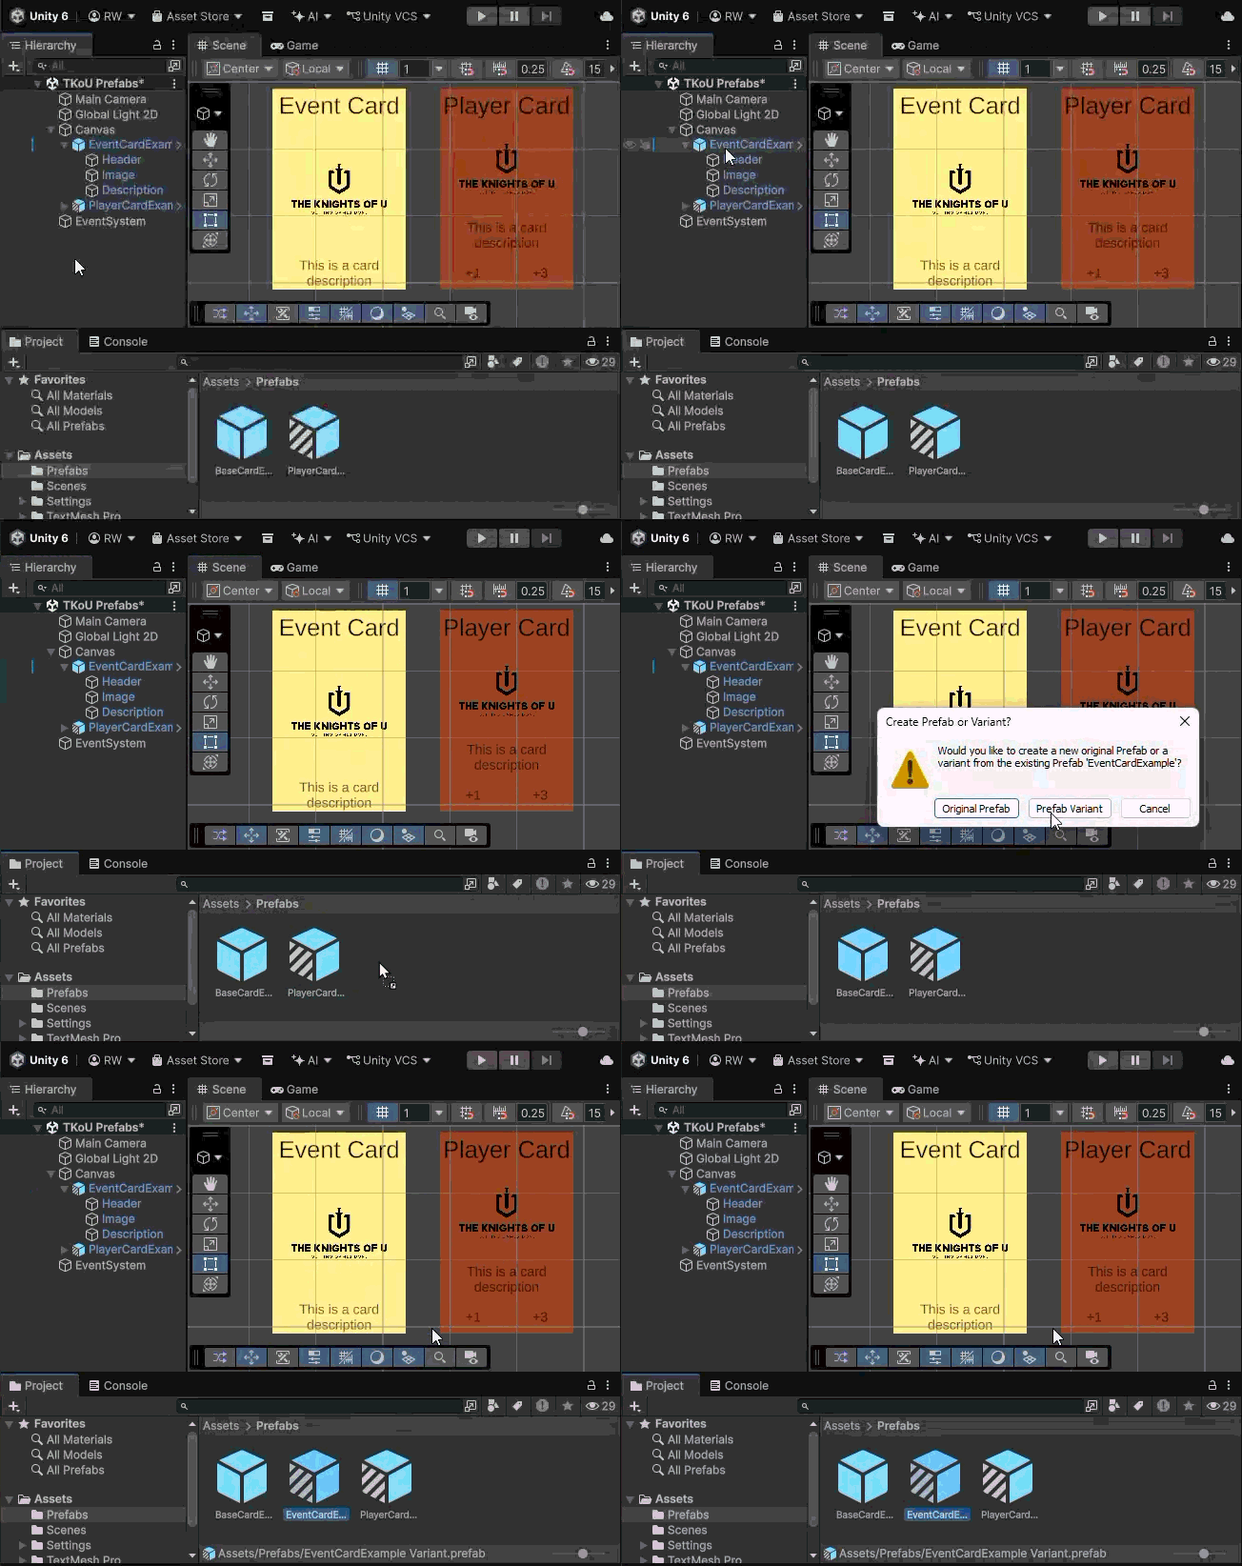
Similar to creating Prefab assets from non-Prefab GameObjects, Unity also allows you to create Prefab Variants by dragging and dropping a Prefab Instance from the Hierarchy window to the Project window. An additional prompt allows you to create a new on-variant Prefab Asset in the same way.
In this example, overrides were already present on the dragged Prefab Instance before creating the Variant.
A solid icon with stripes on one side indicates a prefab variant.
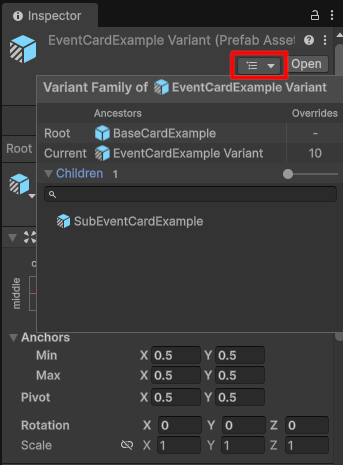
After creating variants, a special dropdown in the Inspector window allows you to check variant inheritance. It provides a list of all ancestors and all immediate children.
Ancestors are the Prefabs higher in the inheritance chain, while Children are Prefab Variants that inherit from the current Prefab.
Variant Overrides Propagation
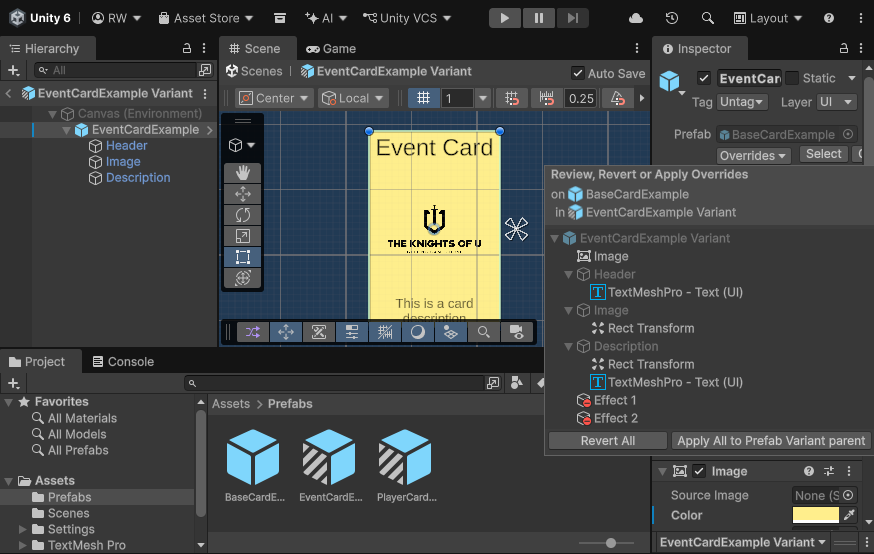
While internal Variant overrides don’t show in the Scene Hierarchy, they appear as standard overrides when editing a Variant in Edit Mode.
All previously discussed types of Override are also available for Prefab Variants. In other words, Variants can modify properties, add or remove components, and add or remove child GameObjects.
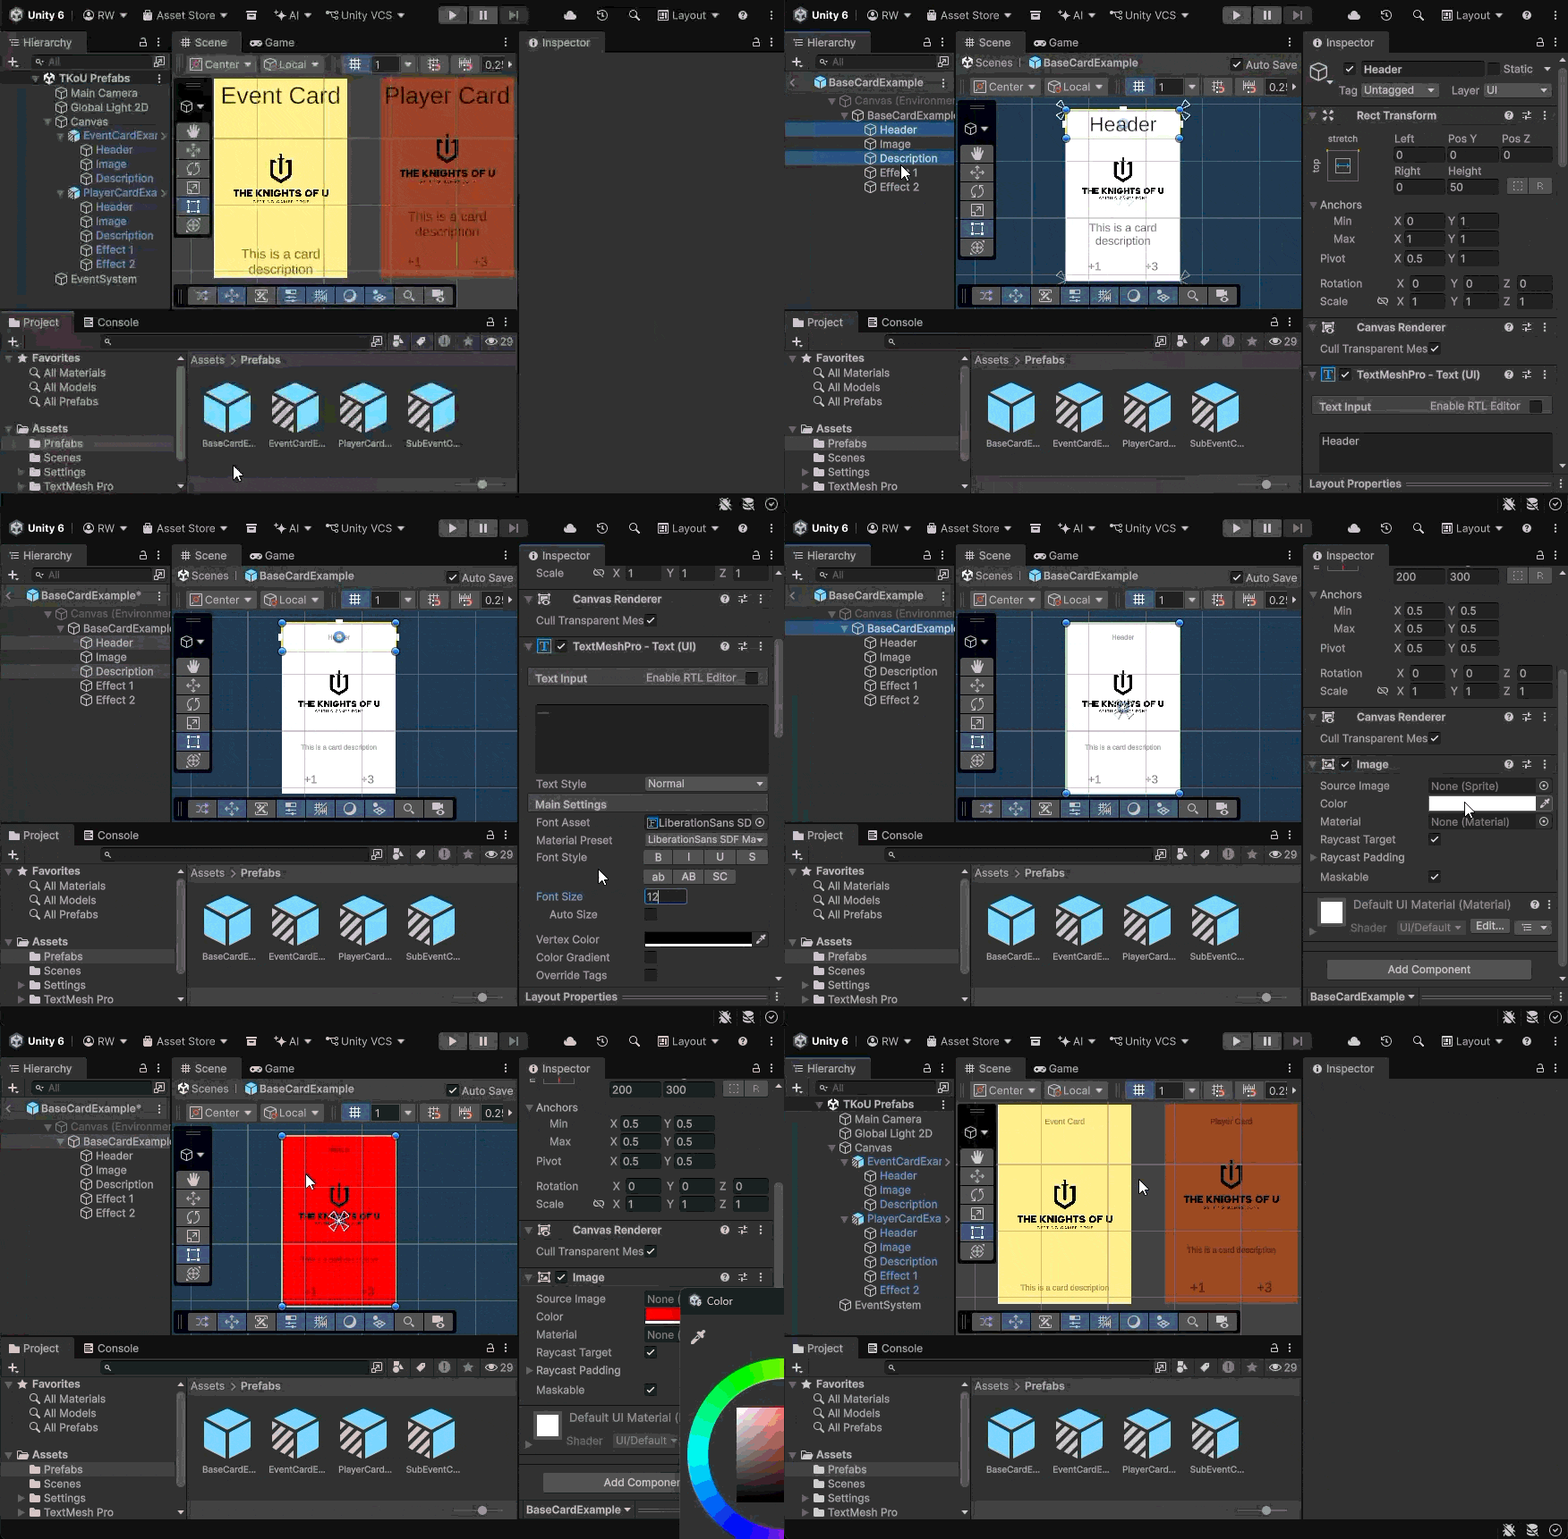
Changes applied to a base Prefab Asset propagate to all of its Variants unless an element has been overriden. Notice the text size in the example.
Variant overrides always take priority over values inherited from the base Prefab. Even if you later change the same property in the original Prefab, the Variant keeps its own overridden value. In the example, the background color change in the base Asset doesn’t affect Variants because of their overrides.
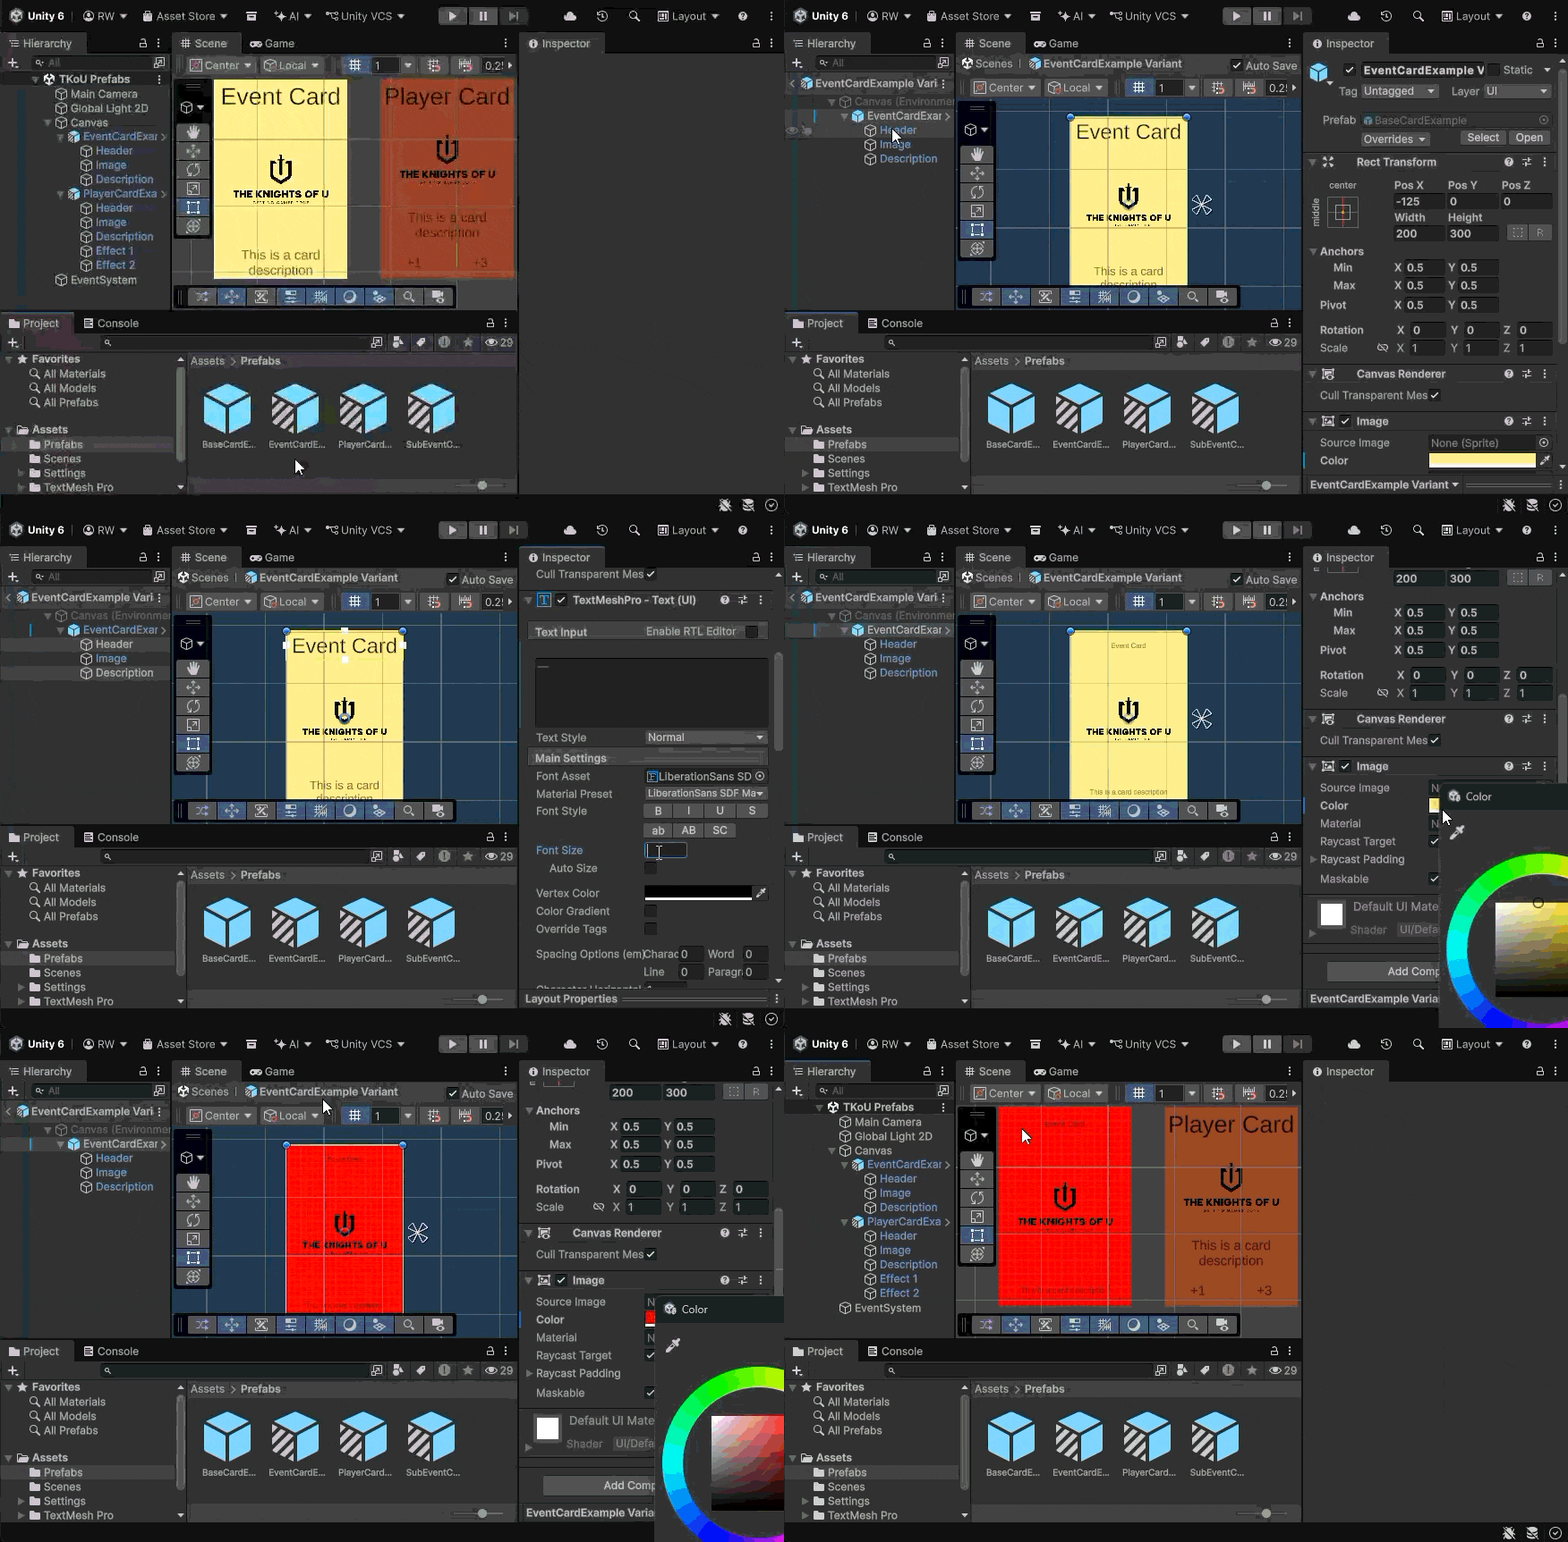
Meanwhile, changes made directly to a Prefab Variant affect only that Variant and its Instances. They don’t propagate upward to ancestors’ prefabs or sideways to sibling variants.
Nested Unity Prefabs
In addition to Variants, Unity Engine includes another feature for handling Prefab relationships: Prefab Nesting. It allows you to put Prefab Instances inside another Prefab Asset. While placed inside another Prefab, the Nested Prefab Instance behaves just like any other Prefab Instance and retains its own connection to its original Prefab Asset.
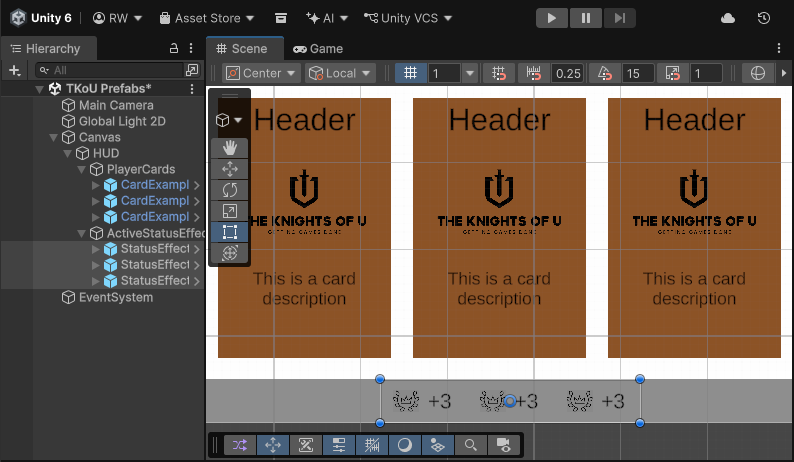
In the next example, we’ll nest status-effect indicators within card Prefabs. For this demonstration, the indicators already have their Prefabs created in the project.
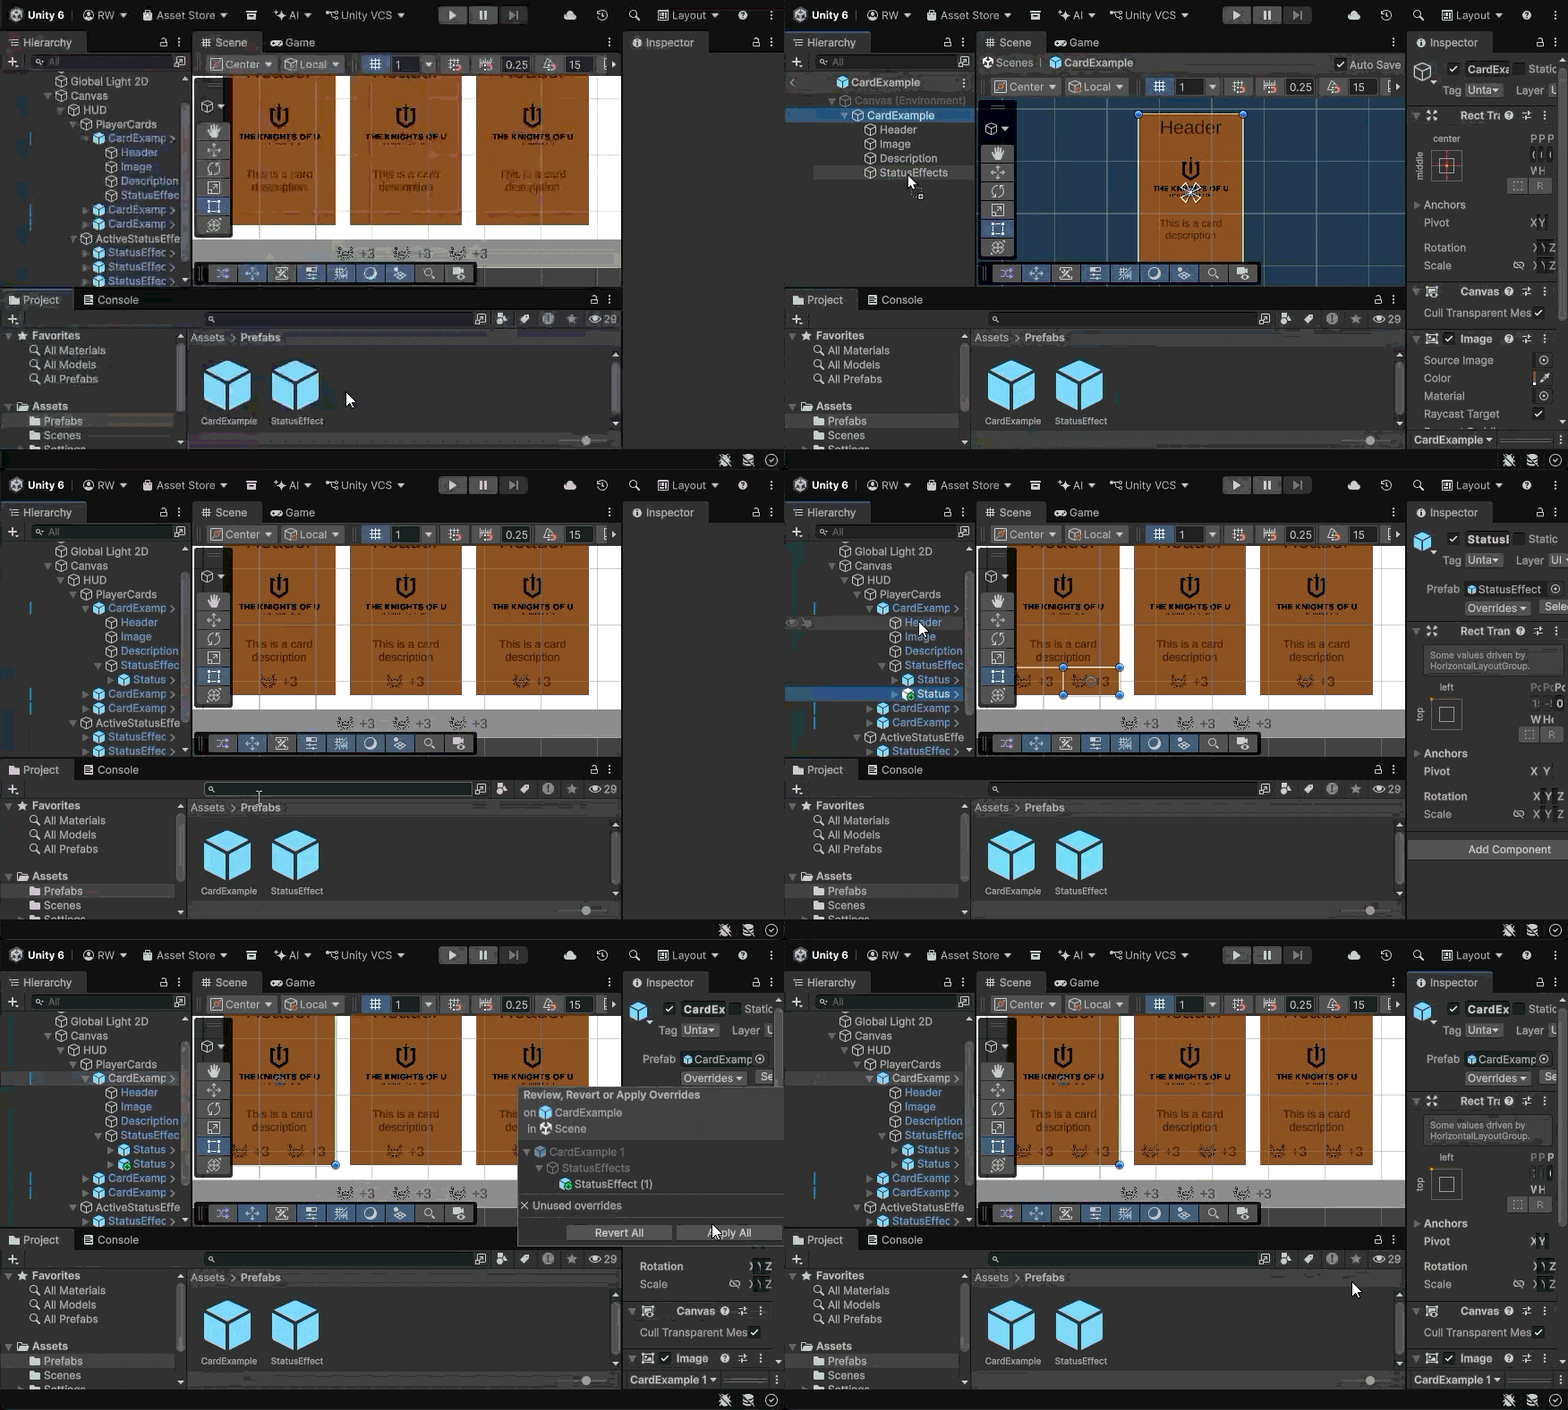
Nesting an existing Prefab is as simple as adding any other GameObject to a Prefab Asset. This can be done both in Edit Mode and by applying Overrides.
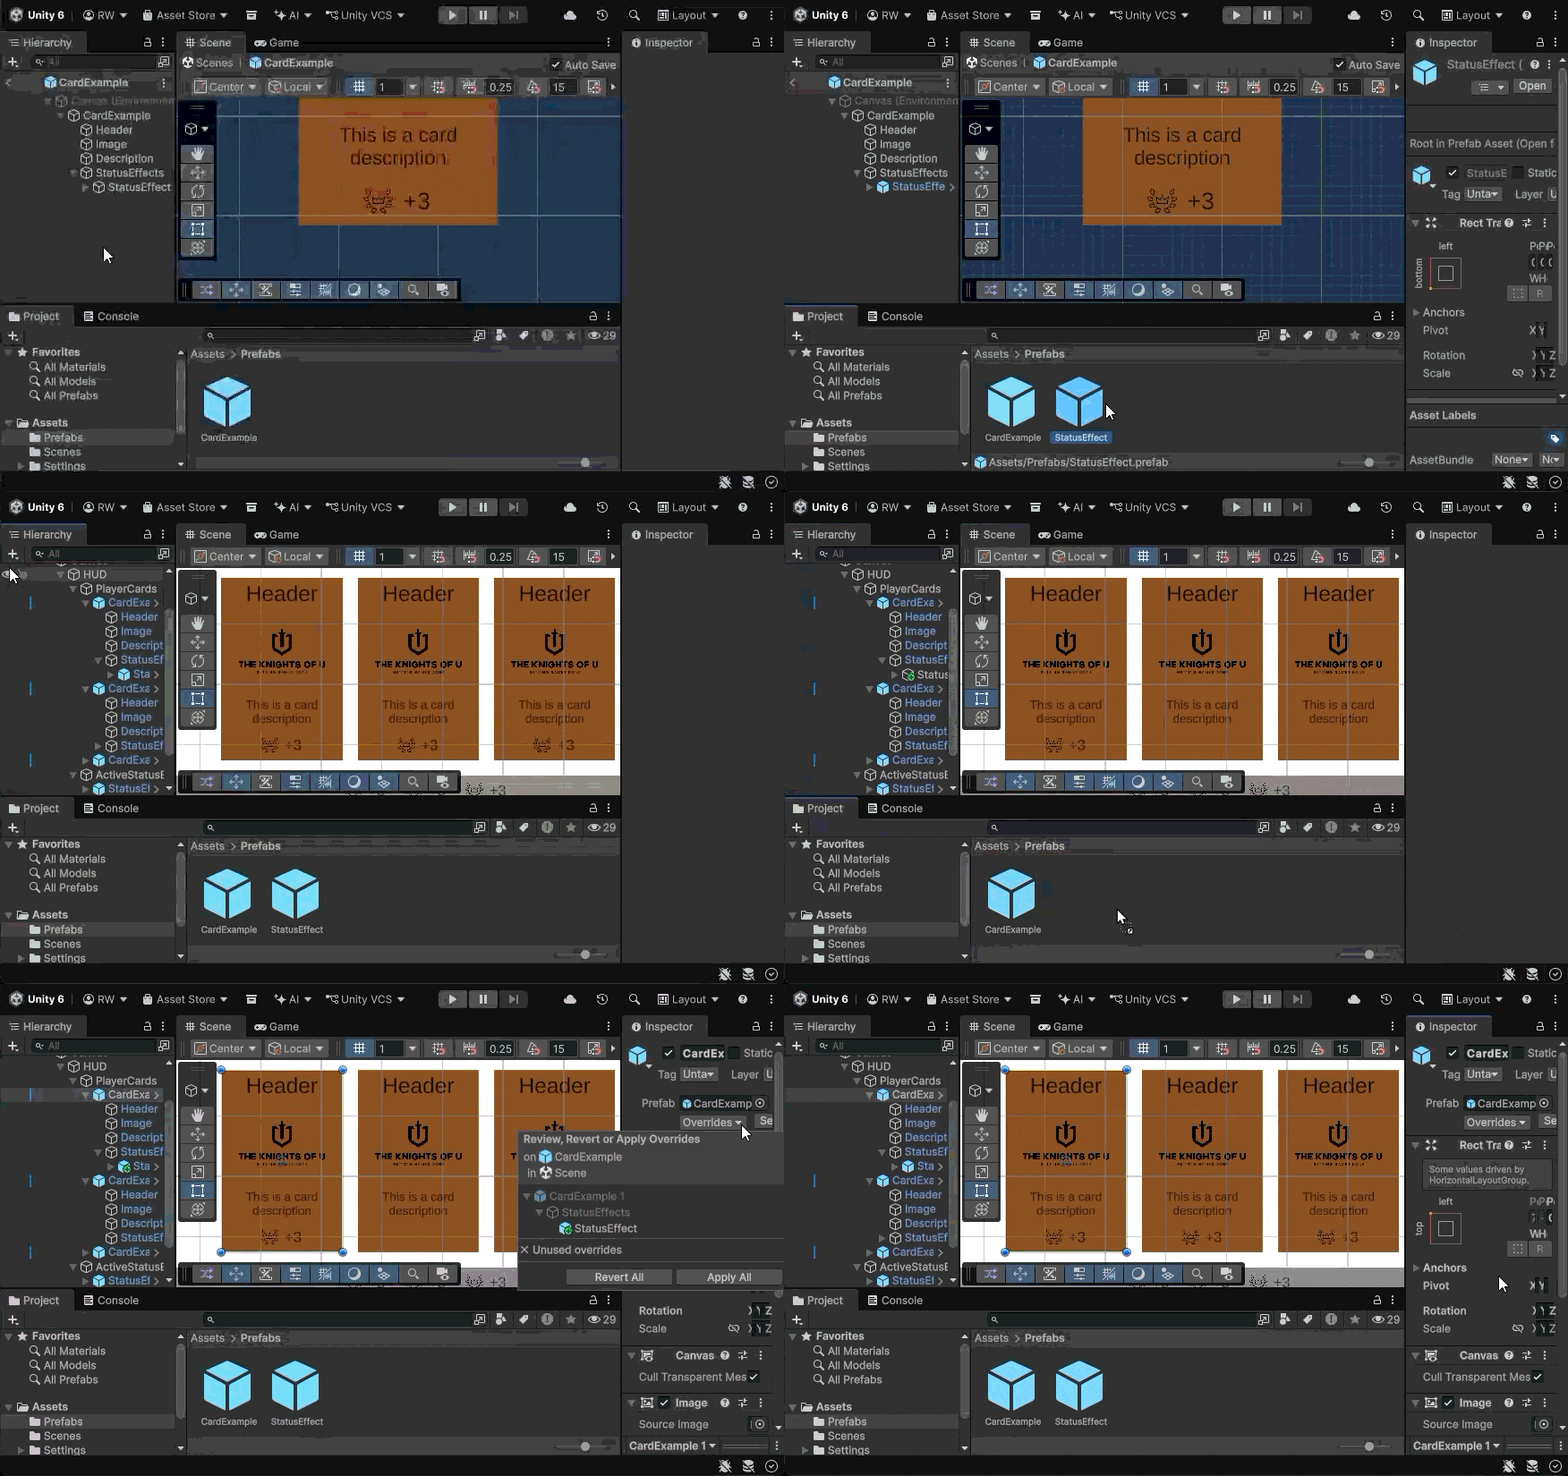
Dragging and dropping a regular GameObject from Prefab Edit Mode into the Project window creates both a Prefab Asset and a Nested Prefab Instance in the parent Prefab Asset.
Meanwhile, dragging and dropping an override GameObject from the Hierarchy window creates a new Prefab Asset and a Prefab link. To Nest it inside the parent Prefab, apply the Override.
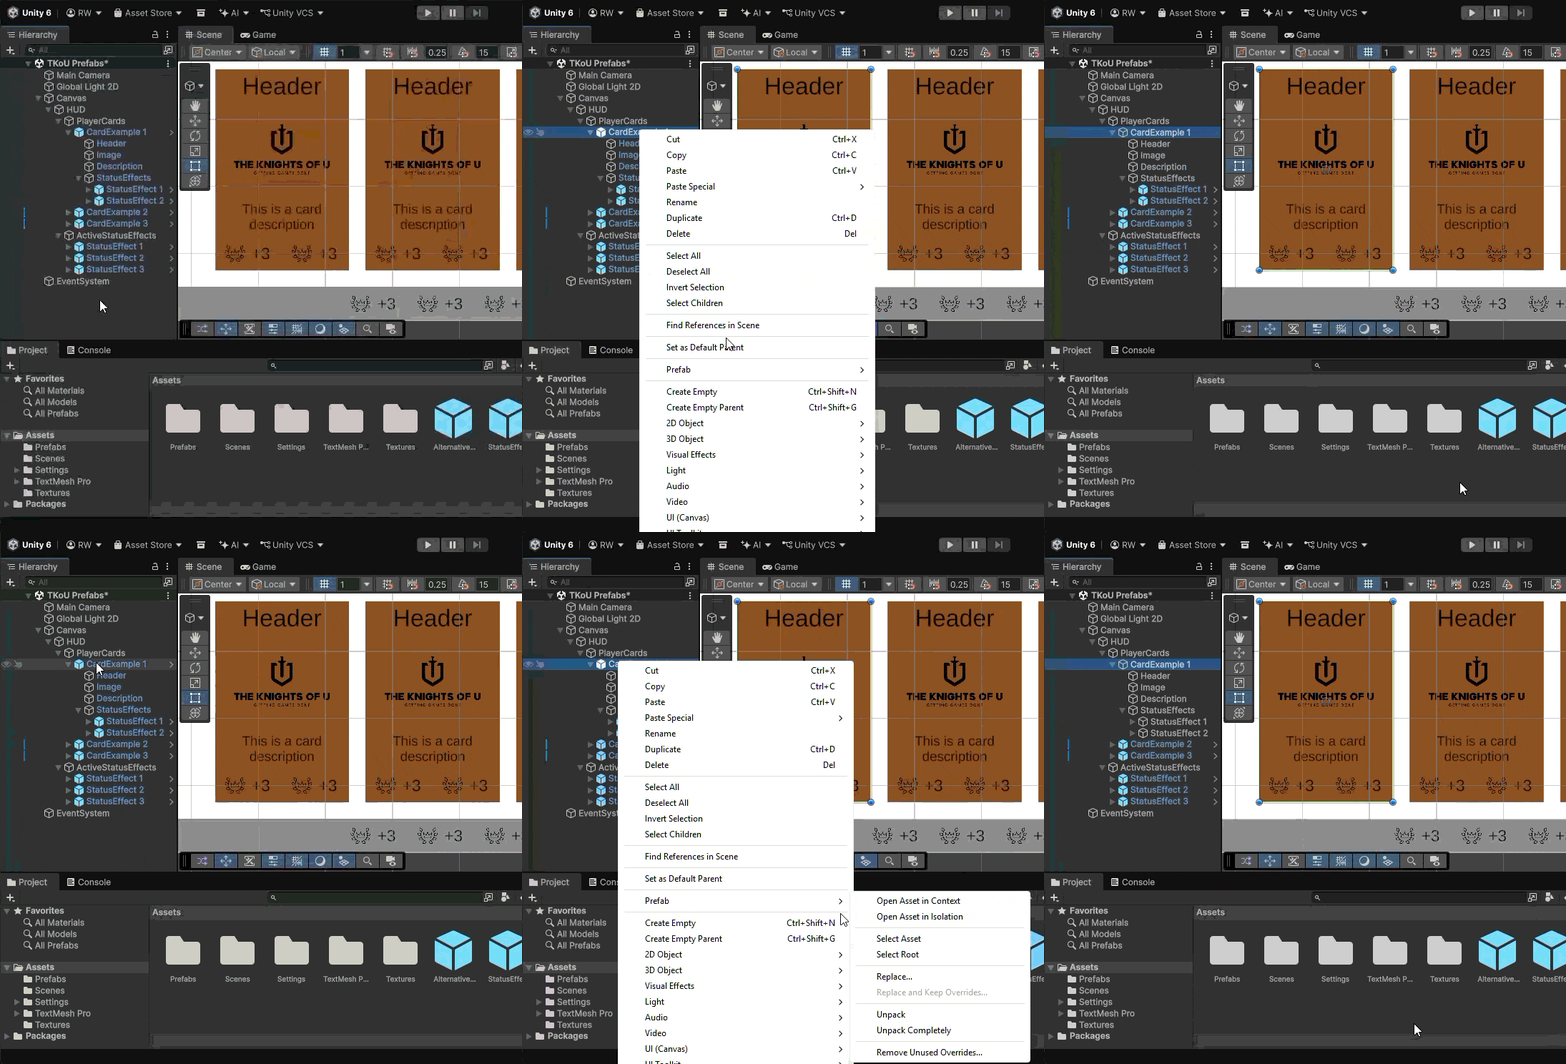
When removing a Prefab link in the Hierarchy window, you can choose between Unpack and Unpack Completely.
Choosing Unpack removes only the link to the parent Prefab while keeping any nested Prefab links intact.
On the other hand, Unpack Completely removes all Prefab links from the unpacked GameObject and its children.
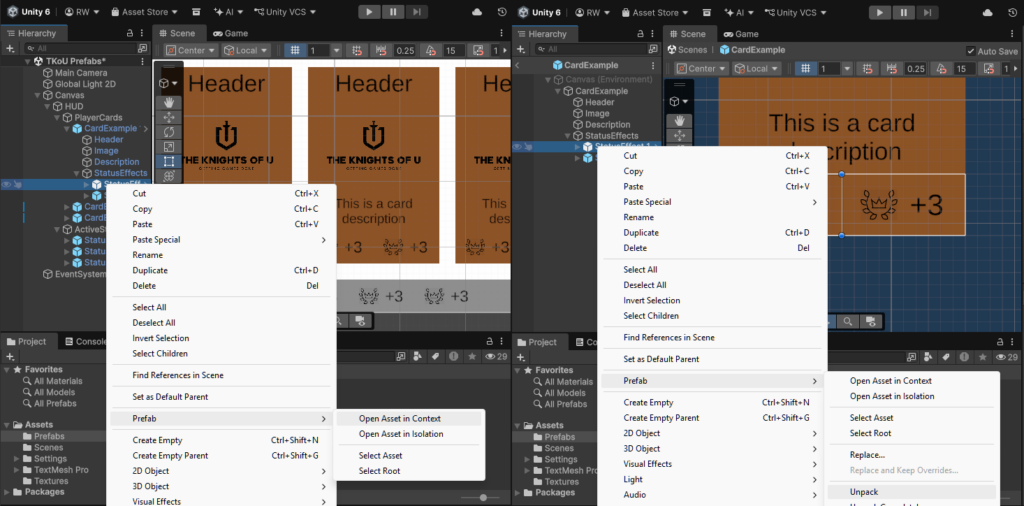
To unpack only the Nested Prefab, use Prefab Edit Mode. Unpacking nested prefabs is not possible while editing a Scene.
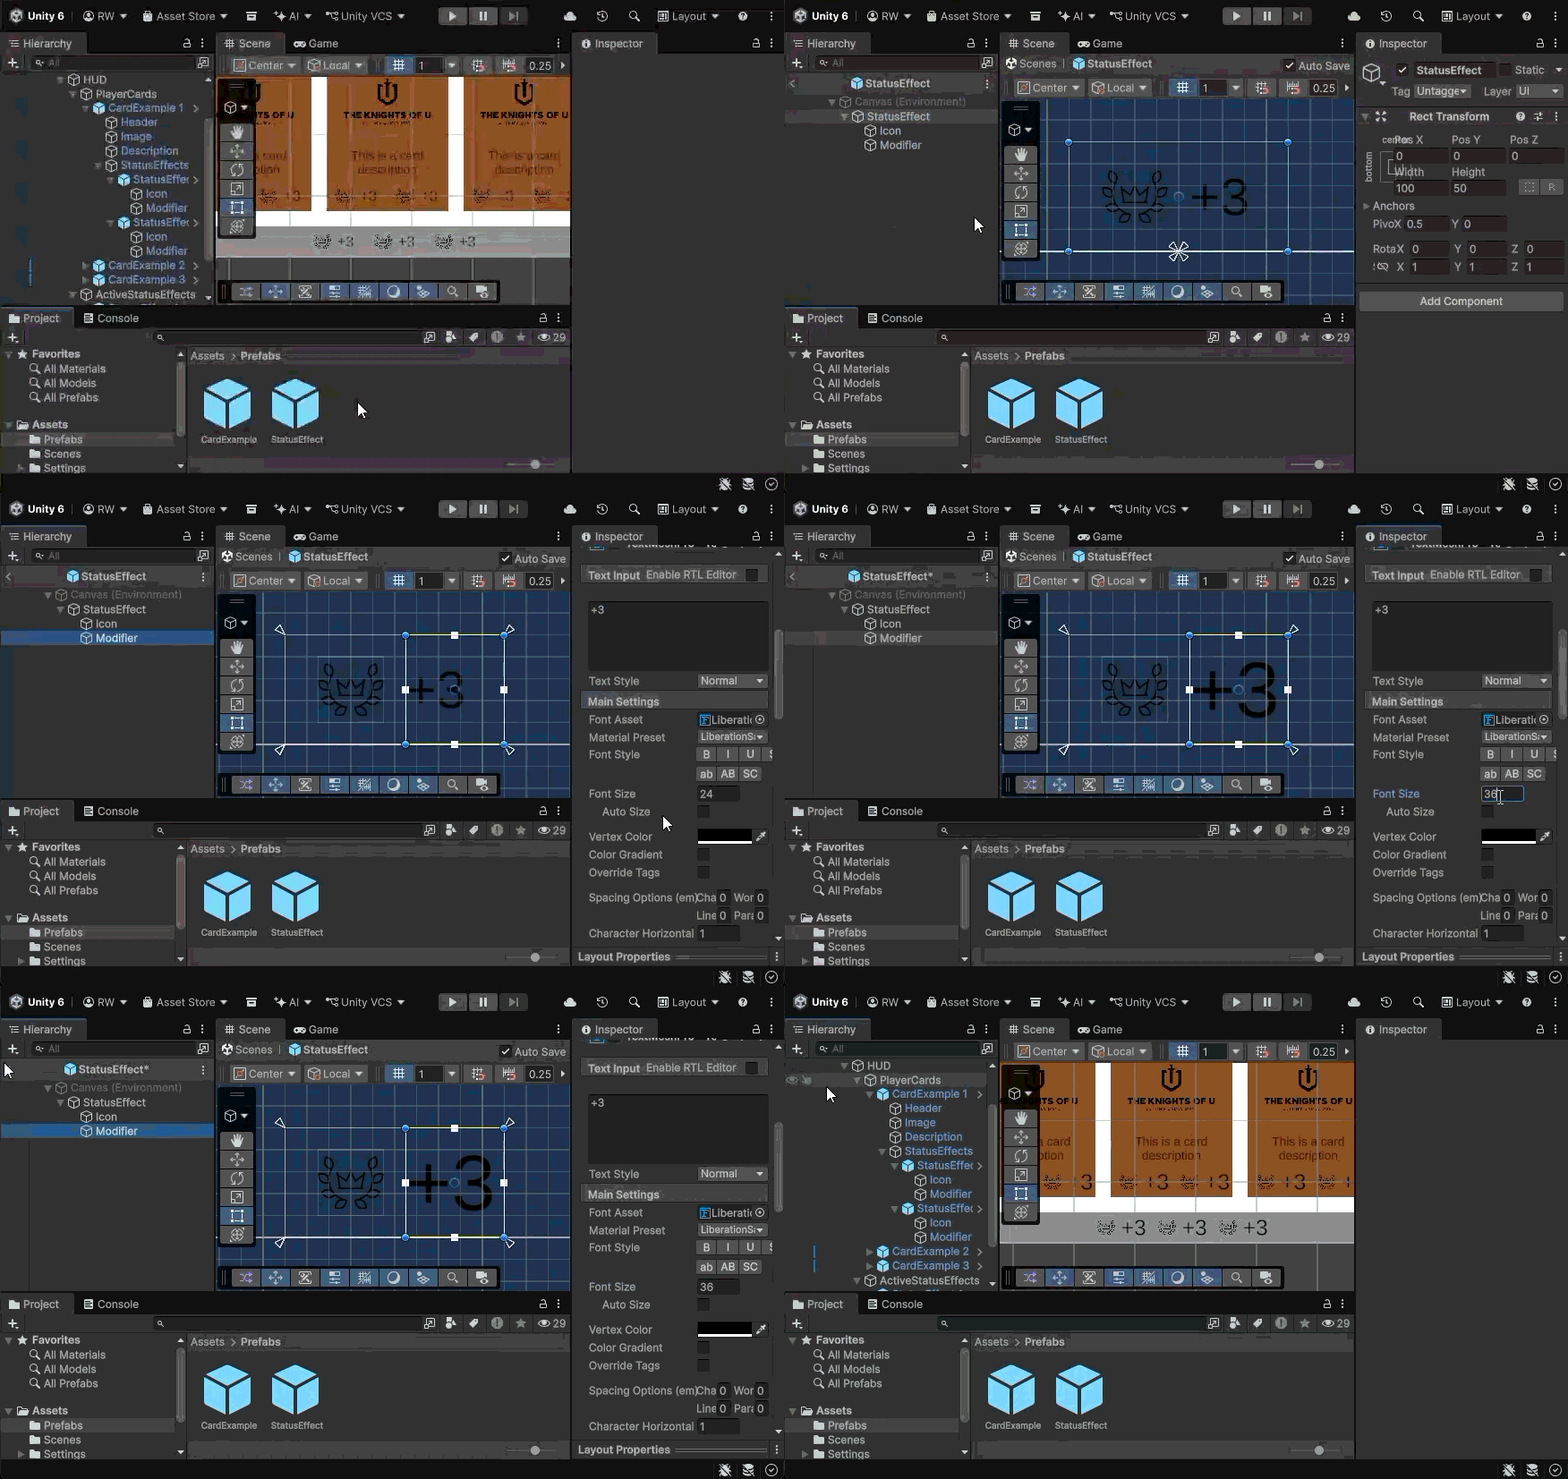
Changes made to a Prefab Asset propagate to all of its instances, whether they are nested or not.
Nesting and Overrides
In Unity, you can freely override properties, components, and GameObjects of Nested prefabs. The only additional considerations are related to applying and reverting these overrides.
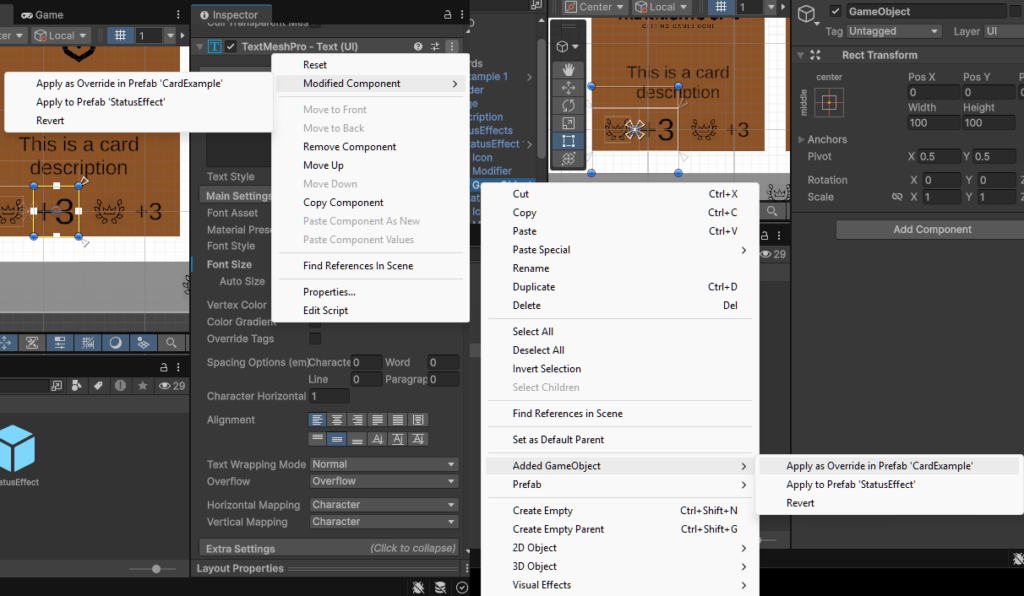
The Component menu in the Inspector window and the GameObject context menu in the Hierarchy window allow you to choose whether an override should apply to the main or the nested prefab.
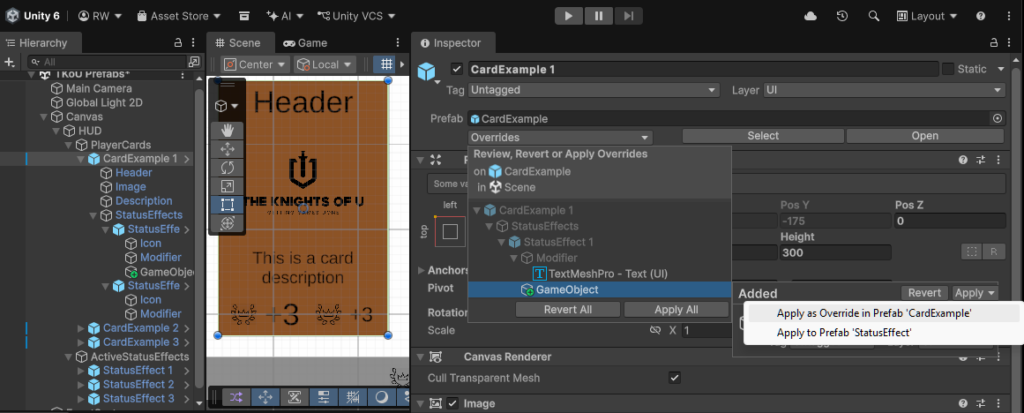
The Overrides menu on the parent Prefab Instance root provides the same options.
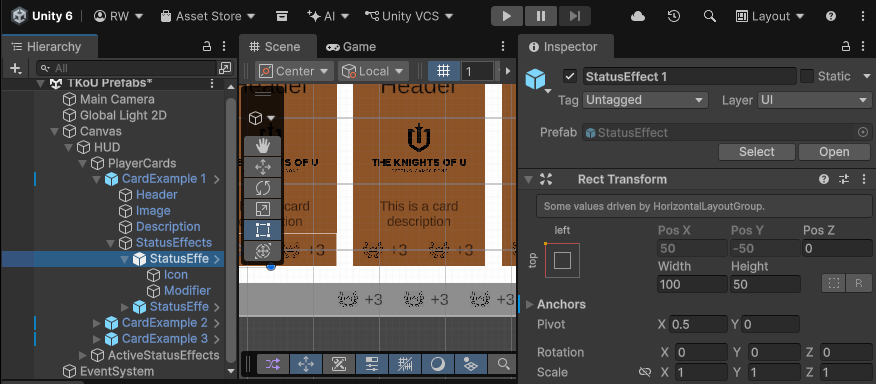
However, the Overrides menu is not available in Nested Prefab Instances.
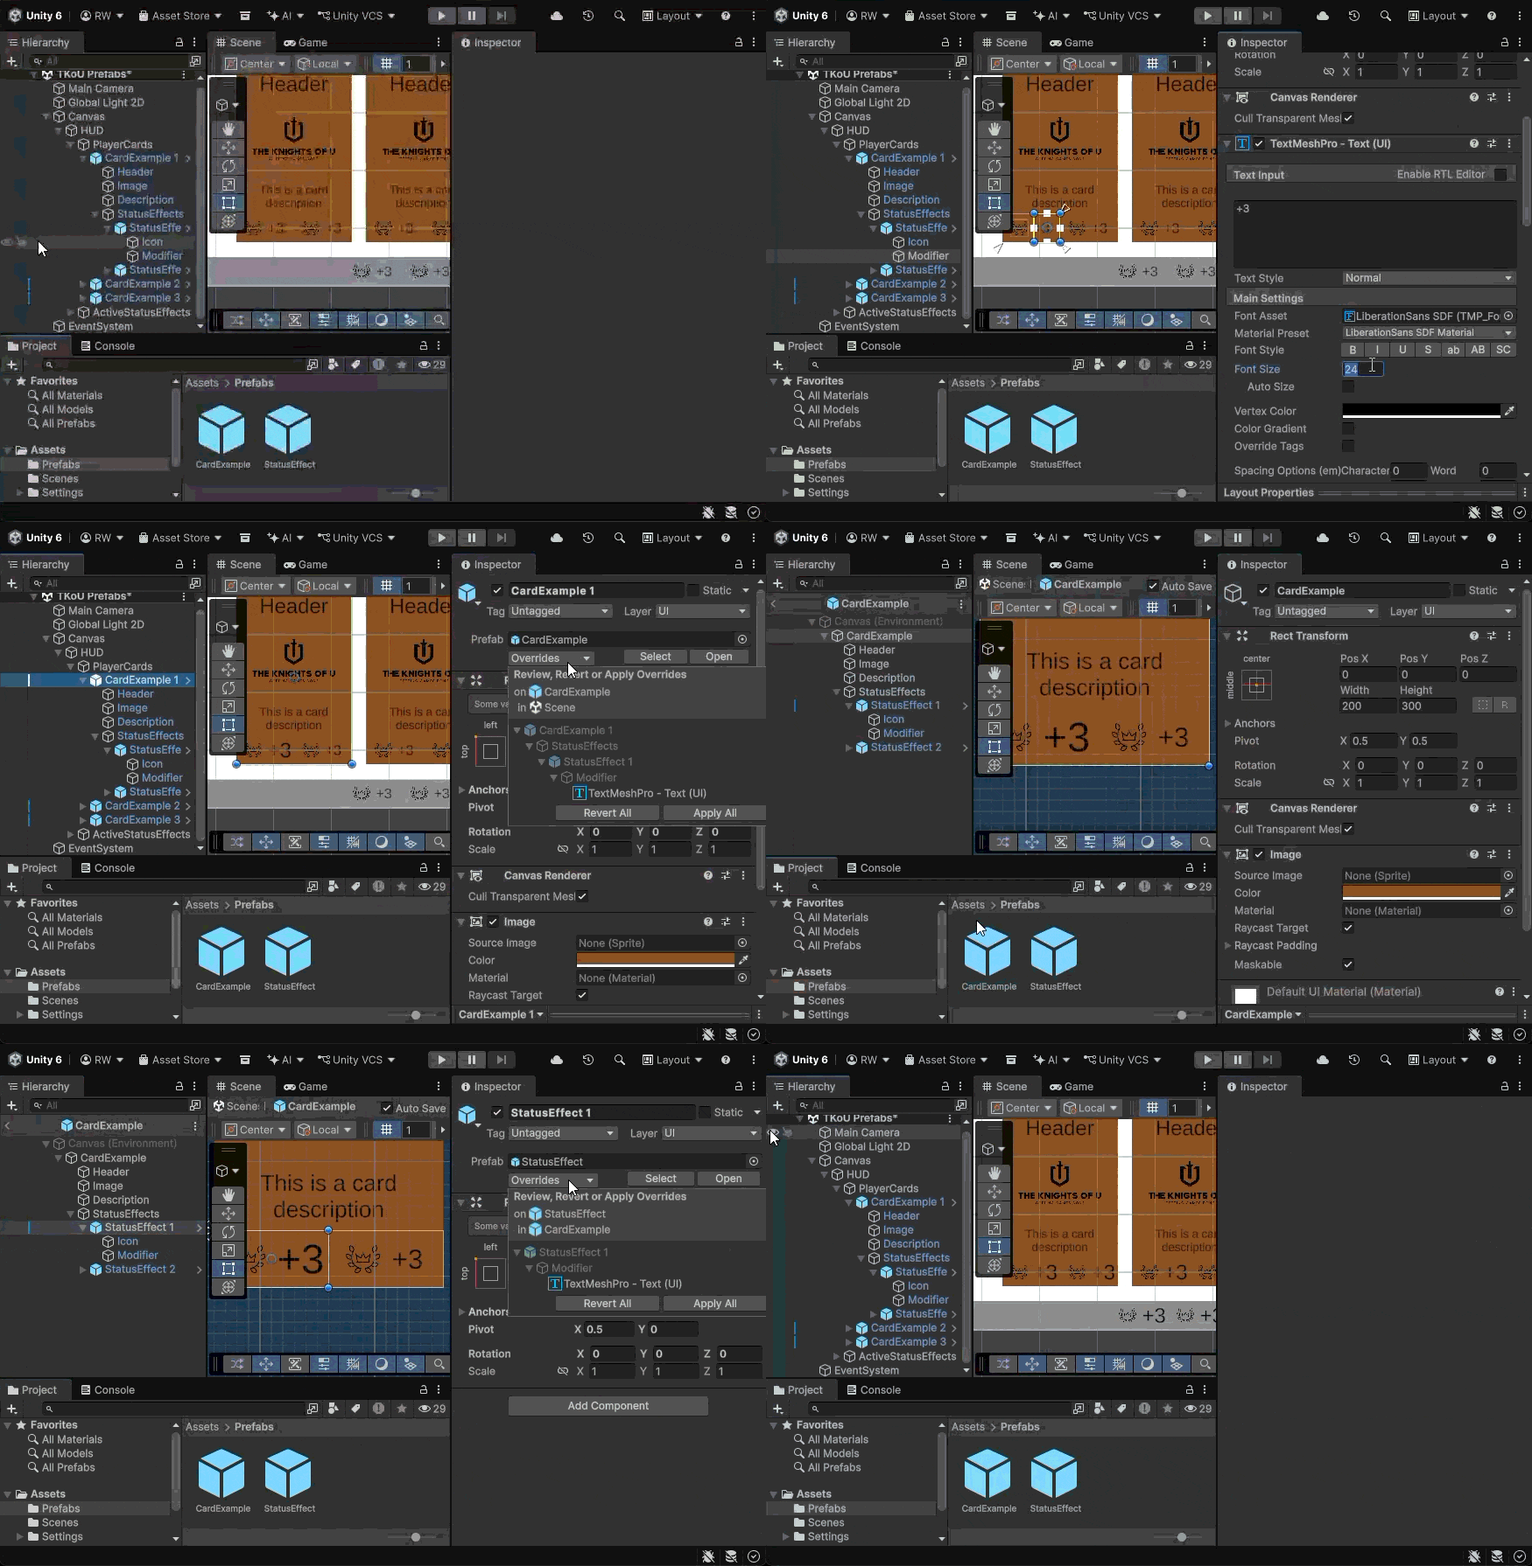
When you use Apply All to override a Prefab, Unity stores the change in that main Prefab Asset. The Nested Prefab Asset itself remains unchanged..
These modifications are stored as Overrides within the main Prefab Asset and can be applied to the Nested Prefab Asset separately from Prefab Edit Mode.
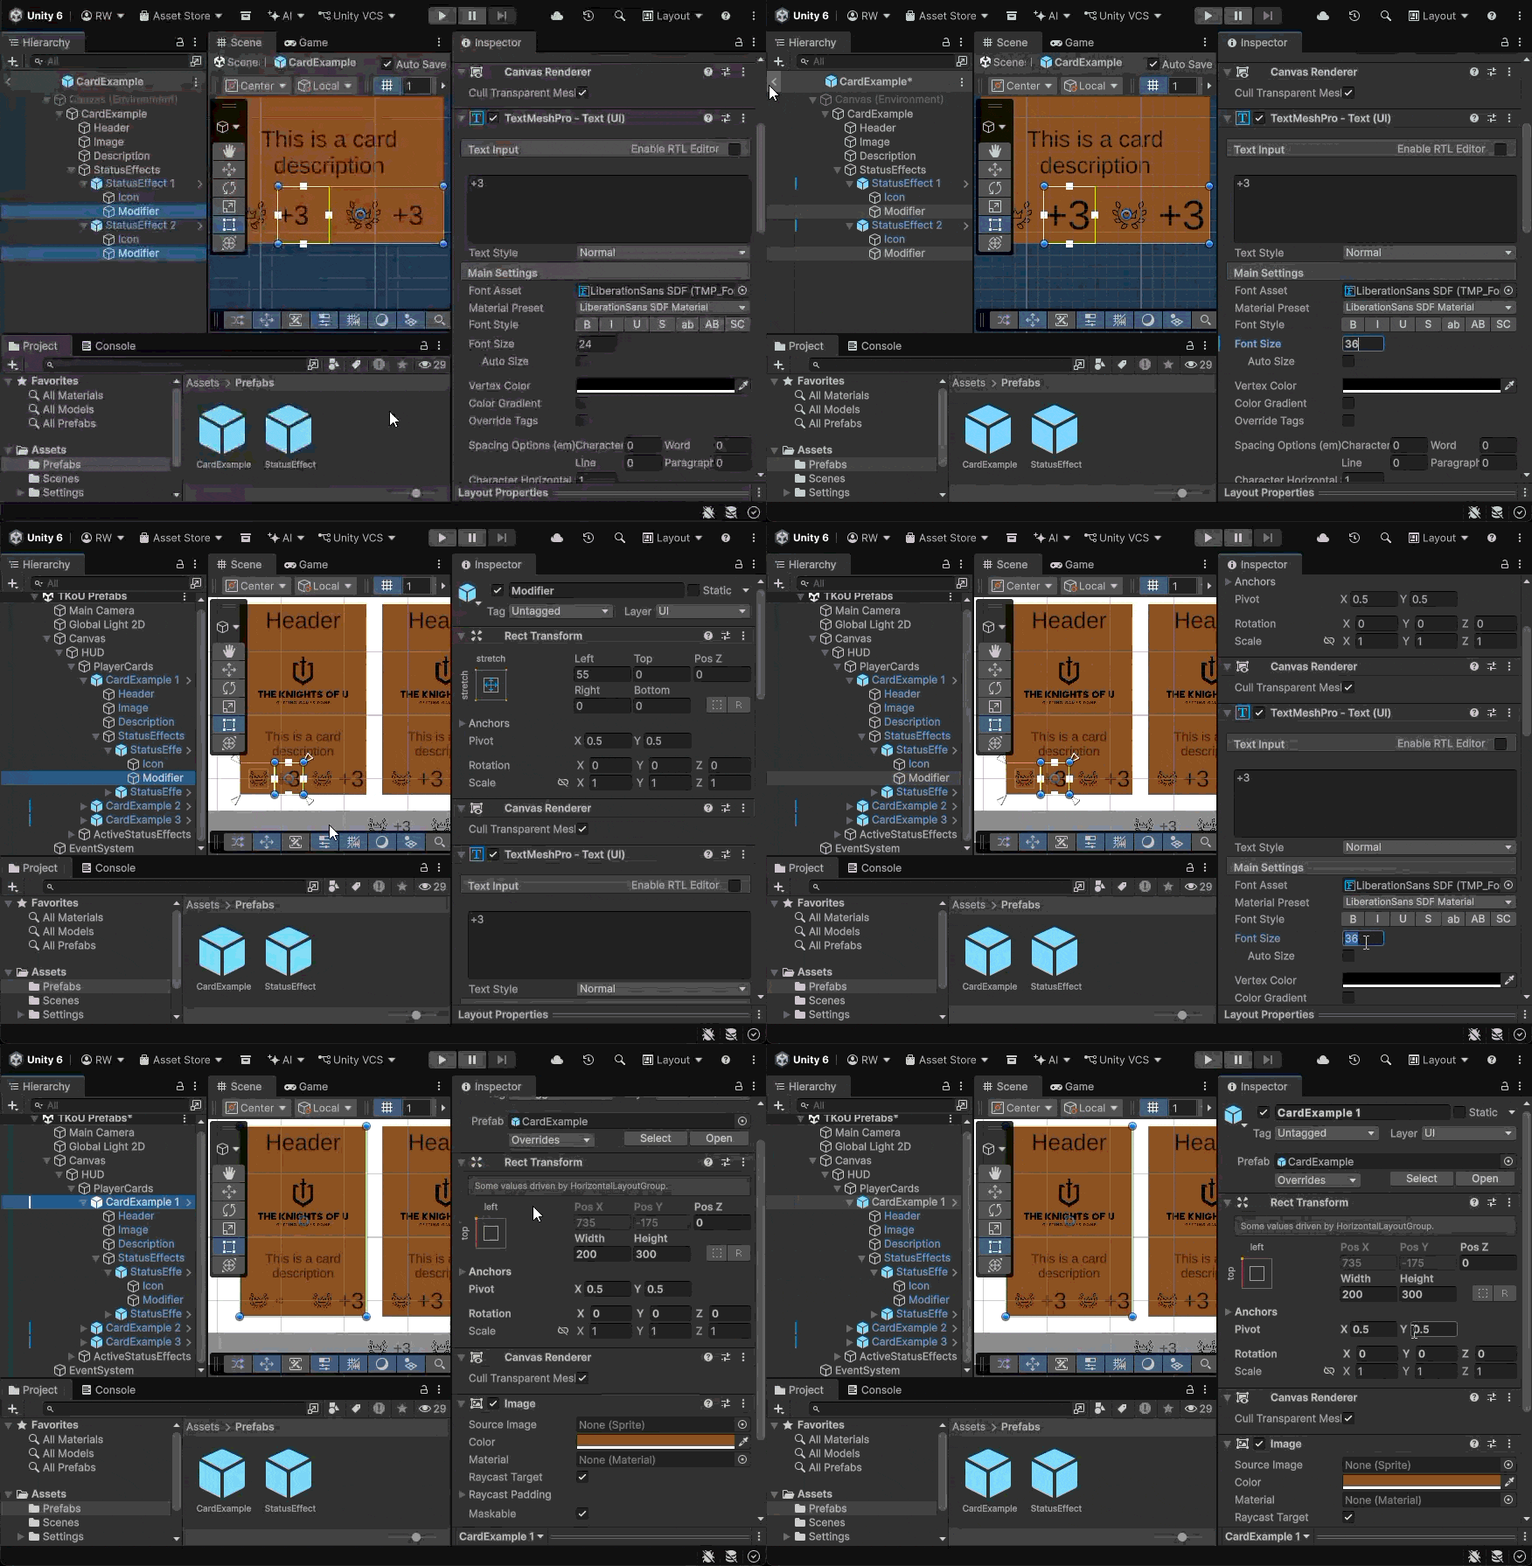
Reverting changes – whether by using Revert All or the context menus – restores the state inherited from the main Prefab Asset.
In the example, Revert All sets the text size back to the override value stored in the Card Prefab.
Instantiating Prefabs Through Code in Unity C#
Up until now, we’ve focused on modifying Prefab Assets and GameObjects in the Scene. This approach works well in static environments, but game development often requires dynamic object lifecycle management, including spawning and destroying at runtime. This section covers the basics of instantiating and destroying Prefab instances during gameplay.
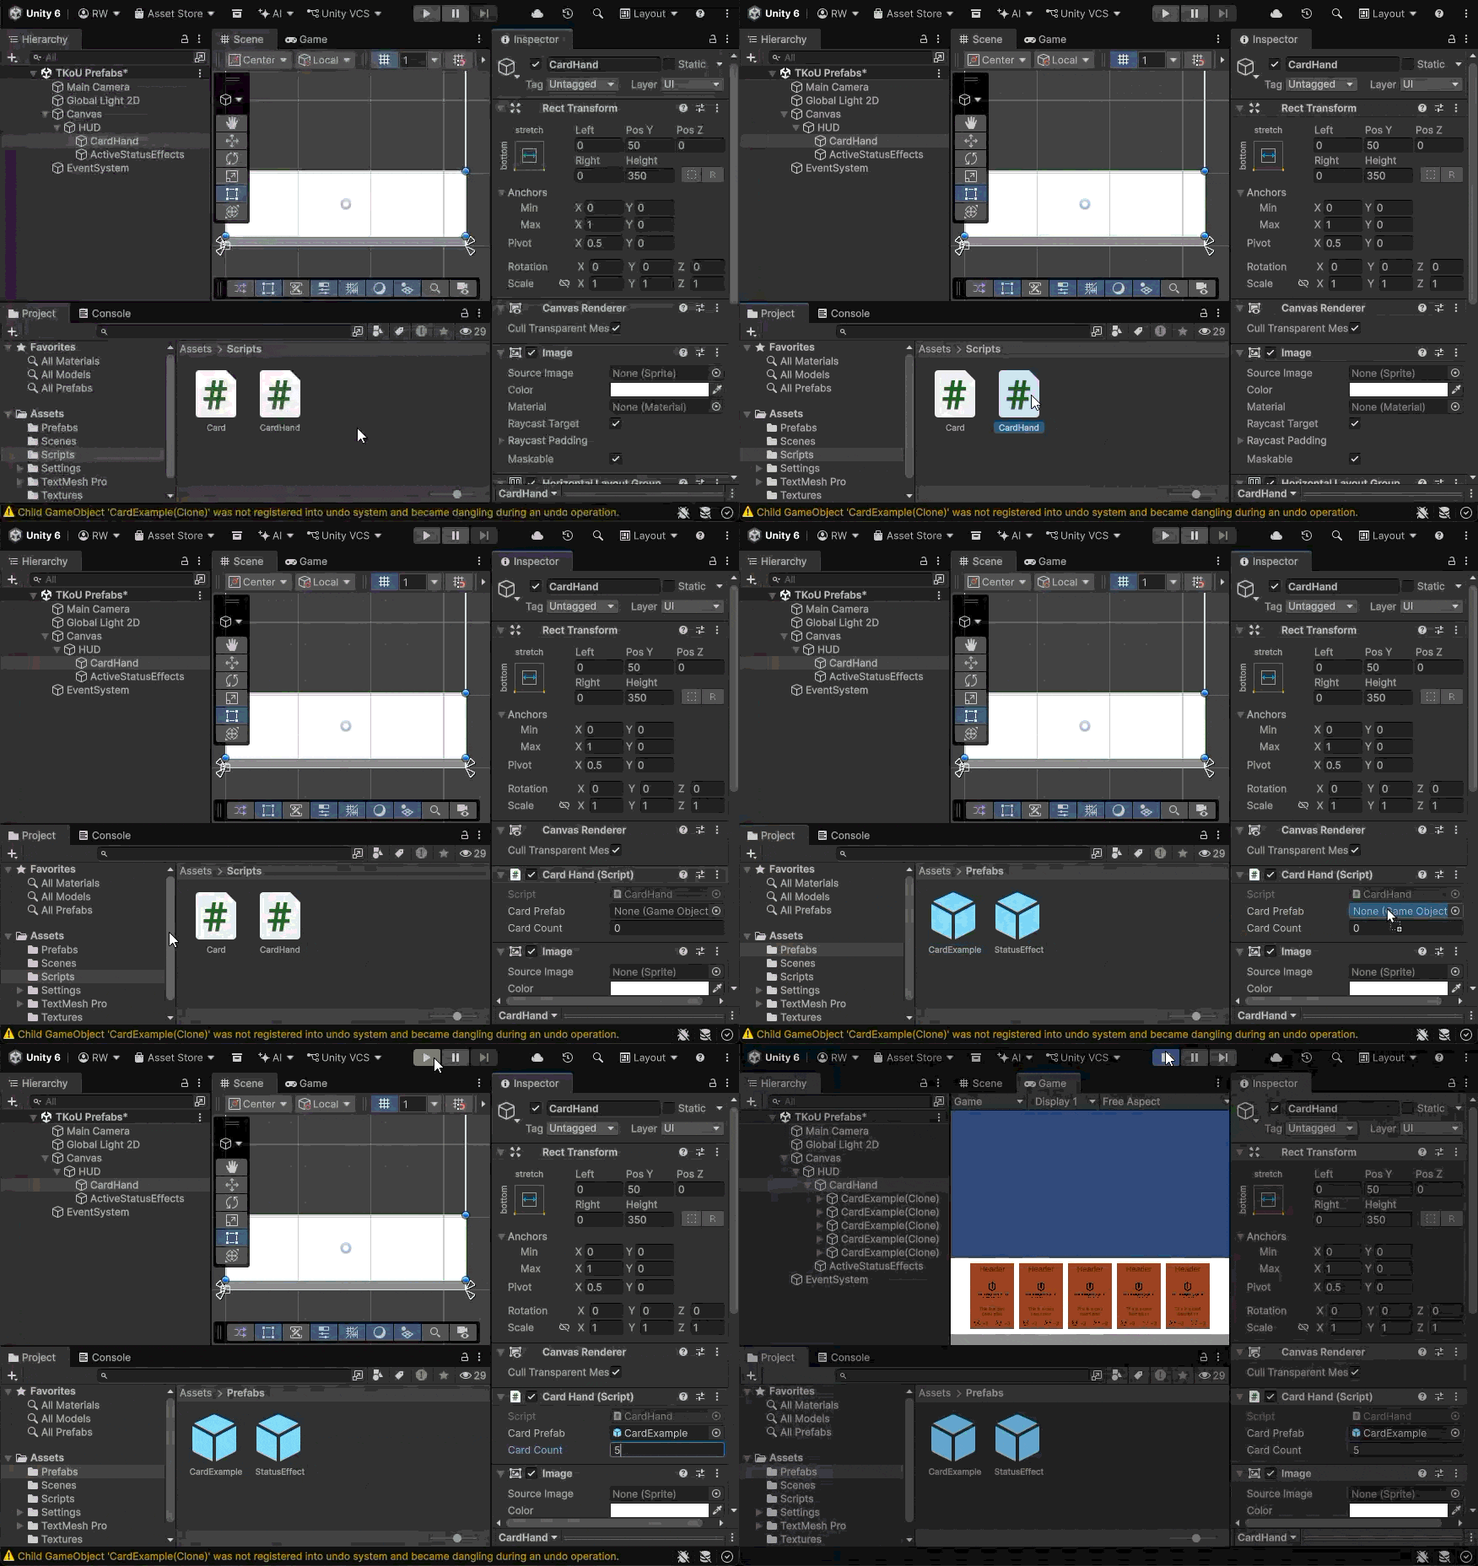
Continuing with the Cards example, we can create a simple C# script that deals a given number of cards into a player’s hand when the game starts:
public class CardHand : MonoBehaviour
{
    [SerializeField]
    private GameObject cardPrefab;

    [SerializeField]
    private int cardCount;

    private void Start()
    {
        for (int i = 0; i < cardCount; i++)
        {
            Instantiate(cardPrefab, transform);
        }
    }
}
From a scripting perspective, it doesn’t matter if the referenced GameObject comes from the Scene or from a Prefab Asset.
As a side note, this means you can also instantiate copies of GameObjects that are placed directly in a Scene.
As you can see in the example, Prefabs can be dragged and dropped into script properties just like any other object.
Another important detail is using the Hand object’s transform as the second argument to the Instantiate method. This tells Unity to automatically parent instantiated cards to the Hand object, keeping the hierarchy clean while the game is running. In our example, it also allows spawning cards inside a Layout Group.
Other overrides of the Instantiate method provide ways to spawn objects with a specific position and rotation. For example: Instantiate(cardPrefab, Vector3(-100,200,10), Quaternion.identity);
Technically, Instantiate is a static method of the UnityEngine.Object class. This is why it is available from every MonoBehaviour.
As a side note, if your game stores Prefabs as Addressable assets, you can instantiate them using Addressables.InstantiateAsync.
Specific Component Types as Object Originals
Another useful feature of the Instantiate method is that it allows you to use any Component as the original object, rather than passing a GameObject directly. We can add a simple script for changing a card’s header text:
public class Card : MonoBehaviour
{
    [SerializeField]
    private TMP_Text header;

    public void SetHeader(string header)
    {
        this.header.SetText(header);
    }
}
Now consider the following change to the CardHand script:
public class CardHand : MonoBehaviour
{
    [SerializeField]
    private Card cardPrefab;

    [SerializeField]
    private int cardCount;

    private void Start()
    {
        for (int i = 0; i < cardCount; i++)
        {
            Card cardInstance = Instantiate(cardPrefab, transform);
            cardInstance.SetHeader($"Card {i}");
        }
    }
}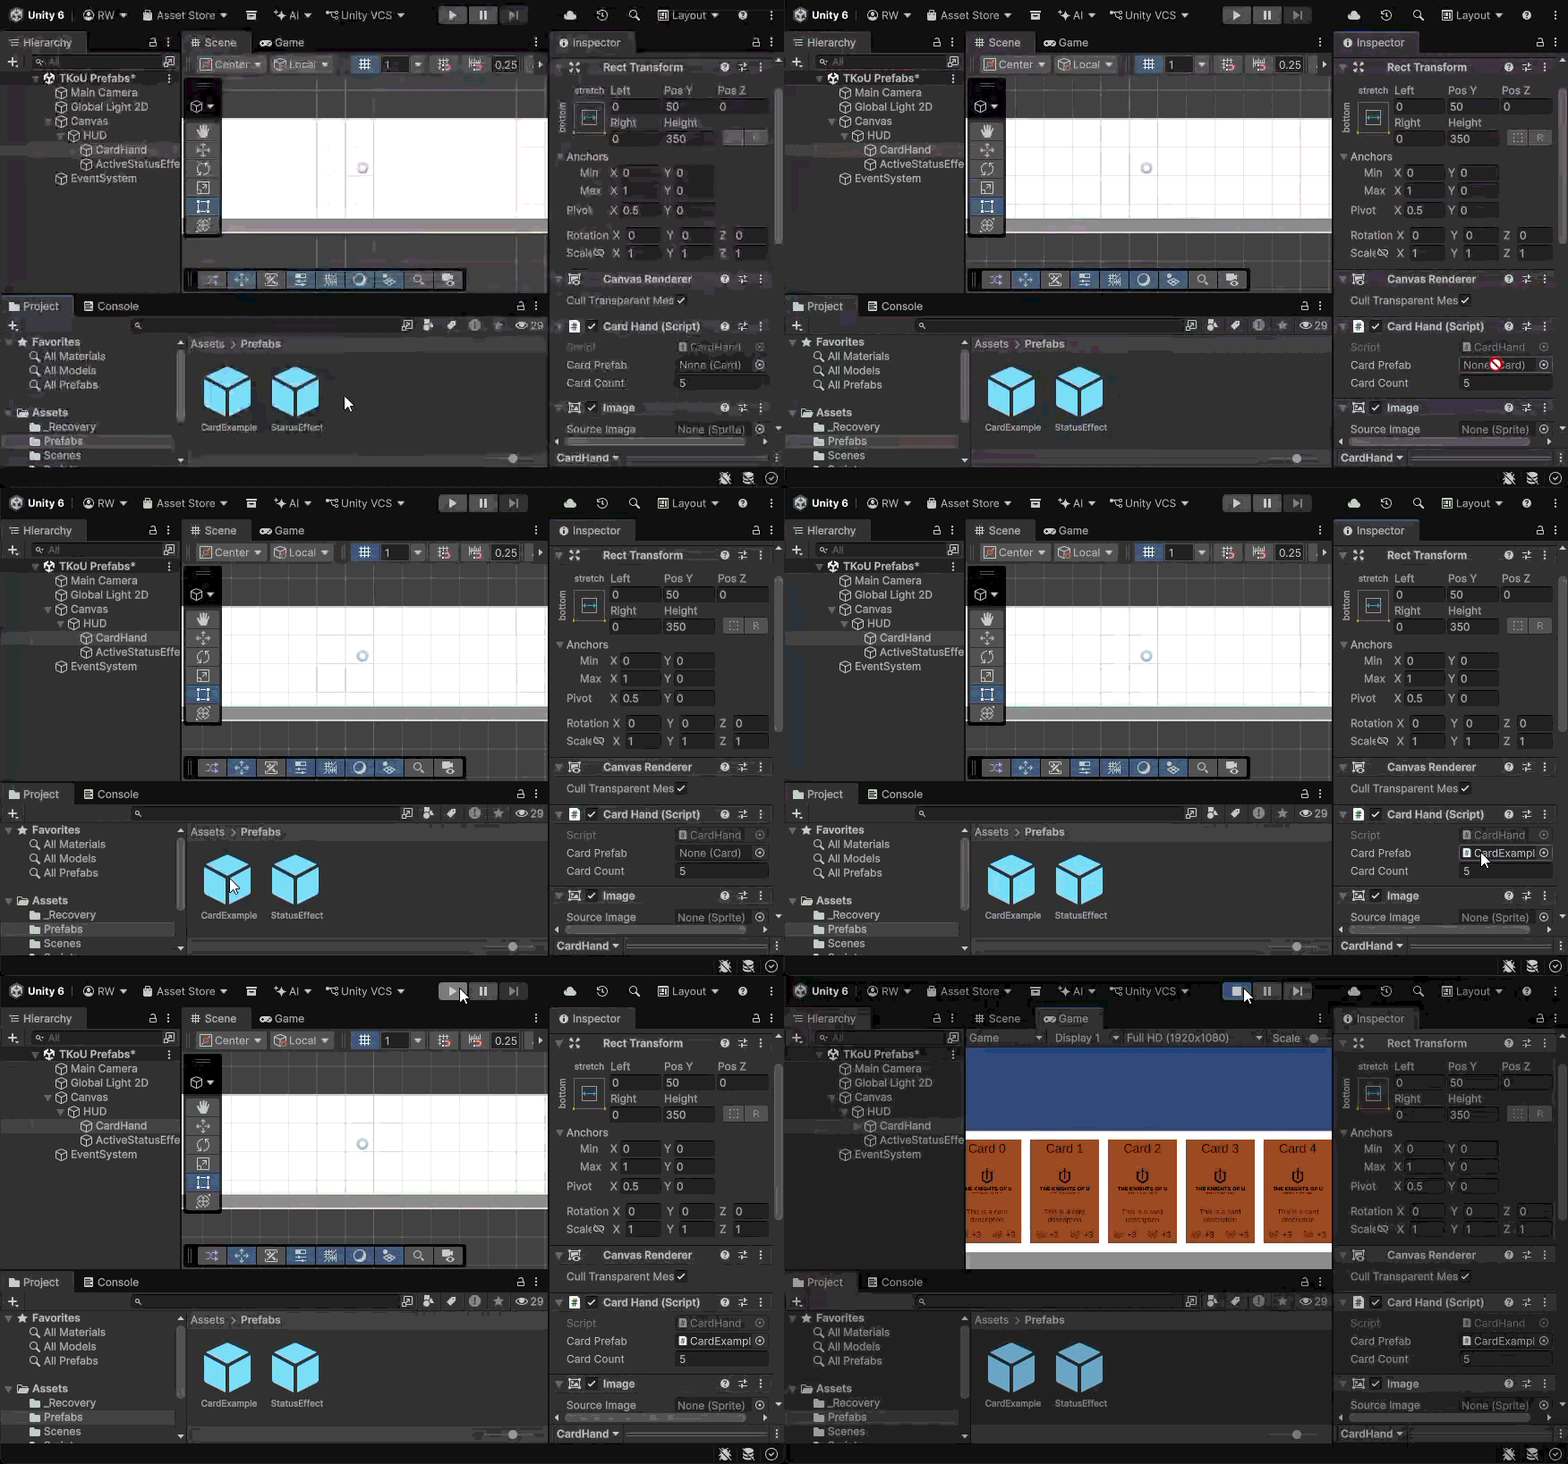
Requiring a specific component type prevents assigning a variable to a project of the incorrect type.
Instantiate method returns the newly created object using the same type as the original. Because of this, there is no need to use GetComponent after instantiating. This makes modifying and storing instantiated objects for future use much simpler.
You can see that in action in the example, where a card header text is set dynamically after a card has been instantiated.
When assigning a Component reference to a Prefab field in the Inspector, that Component must be attached to the Prefab Asset’s root GameObject. You cannot assign Components to child GameObjects this way.
Destroying Dynamic Prefab Instances
Destroying GameObjects from C# scripts requires keeping a reference to them. Let’s create a list of cards and destroy them after 30 seconds:
public class CardHand : MonoBehaviour
{
    [SerializeField]
    private Card cardPrefab;

    [SerializeField]
    private int cardCount;

    private List<Card> cards;

    private IEnumerator Start()
    {
        cards = new List<Card>();

        for (int i = 0; i < cardCount; i++)
        {
            Card cardInstance = Instantiate(cardPrefab, transform);
            cardInstance.SetHeader($"Card {i}");
            cards.Add(cardInstance);
        }

        yield return new WaitForSeconds(30);

        foreach (Card card in cards)
        {
            Destroy(card.gameObject);
        }

        cards.Clear();
    }
}
Notice that card.gameObject is passed to the Destroy method instead of card itself. While Instantiate creates a new GameObject when it is given a Component, Destroy removes exactly the object that is passed to it.
In this example:
Destroy(card)removes only the Card Component from the GameObject.Destroy(card.gameObject)removes the entire GameObject containing the Card Component.
Another important thing to remember is to keep track of references to objects you destroy. Destroyed objects are eventually removed from memory, but references to them can remain in your variables and collections. If you maintain a list of instantiated objects, remove them after destroying them to avoid unexpected null references.
Performance Considerations for Using Prefabs in Unity
While Prefabs improve Scene size, development workflow, and assets maintainability, they don’t inherently improve runtime performance. Their impact on memory usage and CPU load depends entirely on how exactly they’re used.
Memory Impact
It’s important to remember that Prefabs are not runtime objects shared by their instances. Each Prefab Instance is a separate GameObject with its own Components and child hierarchy. While Prefab Instances themselves are separate objects, Unity can still share imported assets such as meshes, textures, and materials when possible, as it does with regular GameObjects. As a result, every Instance consumes memory in the same way as any other GameObject without a Prefab link. Using Prefabs does not automatically reduce or increase your game’s memory footprint.
CPU Load
The same rule applies to CPU usage. Prefab Instances behave like regular GameObjects at runtime, so a game containing thousands of objects performing expensive calculations will get a performance impact regardless of whether those objects are Prefab Instances or manually created GameObjects.
However, spawning Prefabs at runtime requires additional consideration, as object instantiation is not free. When Instantiate is called, Unity allocates memory, creates a new GameObject hierarchy with all its components, initializes scripts and invokes lifecycle methods such as Awake() and Start(). Because of this cost, it’s often beneficial to instantiate Prefabs as part of a Scene loading process to prevent CPU spikes for objects that persist throughout the life of a Scene.
While a detailed explanation is outside the scope of this post, object pooling is a useful technique for reducing the instantiation cost of frequently spawned objects such as bullets, enemies, and particles. The basic idea is simple: create an object once, disable it when it is no longer needed, and reuse it when another object of the same type is needed. Returning to our card example, instead of destroying a card with Destroy(card.gameObject), disable the card.gameObject.SetActive(false). When you need a new card, re-enable the previously disabled one and replace its header, image, and description with new data.
Check out Unity’s official object pooling tutorial if you’d like to learn more.
Disk Usage
While Prefabs don’t directly affect memory usage or CPU performance, they can reduce the size of your Scene files. When a Prefab is placed in a Scene, the Scene only stores a reference to the Prefab Asset along with any Overrides instead of duplicating the entire GameObject hierarchy.
Projects with many repeated Prefab Instances usually have smaller Scene files. This often leads to smaller builds, although the exact impact depends on how your assets are packaged.
Best Practices
Before we wrap up, let’s look at how to integrate all of Unity Prefabs system’s features into your projects:
- Use prefabs as UI stylesheets – UI elements often share the same structure and visual design across a project. This makes Prefabs a natural way to create and manage reusable UI components, similar to how stylesheets work.
- Keep performance in mind – Keep frequently reused objects lightweight and use object pooling when appropriate. Use Prefab Variants and Nesting to remove unnecessary components if specific objects don’t need them.
- Prefer variants over duplicates and repeated overrides… – Create a Prefab Variant when you have multiple versions of the same Prefab that are used repeatedly, or when you find yourself applying the same overrides again and again.
- …and Keep prefabs modular… – Base Prefabs should focus on a single responsibility. Use Nested Prefabs to compose larger objects from smaller, reusable building blocks.
- …but don’t overuse variants and nesting – Sometimes there can be too much of a good thing. Rethink your prefabs structure if the inheritance and nesting hierarchy is difficult to understand and maintain.
And that’s it! You now have Prefabs in your Unity developer toolkit, along with an understanding of why they’re such a fundamental part of the Unity Engine and knowledge of how to use them effectively in your own projects.