Previous part: Photon Fusion 2 – Introduction – Part 1/4.
Want to learn how to create, join, and manage multiplayer sessions in Photon Fusion 2? In this article, we’ll walk you through everything you need to know about working with sessions using the Host-Client topology. You’ll discover how to set up public, private, and password-protected sessions, use matchmaking effectively, and handle key callbacks such as OnConnectedToServer, OnSessionListUpdated, and OnConnectRequest. Whether you’re just starting out or looking to improve your session flow, this guide will give you a clear, practical foundation.
Introduction
In the previous post, we explored what Photon Fusion 2 is, what network topologies it supports, and what it’s generally capable of. You’ve already created your first project, configured the plugin inside Unity, and now you’re ready to start working on your first real multiplayer logic.
In this post, you’ll learn how to create new Photon Fusion 2 sessions, find and join existing ones, and even set up a private session protected by a password. You’ll become familiar with NetworkRunner, learn about its core configuration options, and explore essential session-management callbacks. We’ll be using the Host-Client topology throughout this post to keep things simple and cost-effective during the learning process. No need to worry about dedicated server infrastructure just yet.
Network Runner
Photon Engine documentation here: Network Runner.
Before diving into multiplayer logic with Photon Fusion 2 Sessions, you should first understand what the NetworkRunner actually is. At the heart of Fusion 2 is a mission to let developers focus on building gameplay, not on rewriting the same networking logic for every project.
NetworkRunner is the central component that represents a player-controlled peer in the game. It wraps most of the core multiplayer functionality, like session connection, matchmaking, input handling or spawning and despawning of objects into one user-friendly component. Simply put, it’s the most important part of the Fusion 2 system.
Most games use a single NetworkRunner in one app, but Fusion 2 also offers a more advanced multi-peer mode where multiple NetworkRunners can coexist in one app. We’ll stick to the single runner setup in this article.
The NetworkRunner is also responsible for regularly executing the FixedUpdateNetwork() and Render() methods, as well as invoking callbacks that notify about key events during connection setup, player joining, and general network communication.
Upon creation, the NetworkRunner automatically scans its child components in the hierarchy and registers any that inherit from SimulationBehaviour or implement the INetworkRunnerCallbacks interface.
If you want to register an INetworkRunnerCallbacks component that isn’t part of the NetworkRunner’s hierarchy at the time it’s created, you’ll need to call NetworkRunner.AddCallbacks(…) manually and pass in a reference to the target callback instance.
Creating NetworkRunner
There are three ways to create a NetworkRunner instance.
- Using a prefab. This approach allows you to preconfigure the NetworkRunner, add components for callback handling, or display debug data.
- Placing it directly in the scene. If your scene structure allows it, you can place a runner directly in the Unity Editor and reference it when needed.
- Creating it dynamically in code. You can instantiate a GameObject at runtime and add the NetworkRunner component via AddComponent().
Once you’ve got your NetworkRunner reference, you’re ready to start creating or joining sessions. But before we move on to that, let’s talk about GameMode and Callbacks Fusion 2 provides. These are essential for understanding how sessions work and for monitoring key multiplayer processes.
GameMode
In this section, we’ll revisit some familiar concepts from the previous post – but this time from a new perspective. While the previous article focused on Photon Fusion 2 network topologies and their pros and cons, here we’ll examine the same topic from the perspective of a single application. Photon needs to know whether the application is supposed to run as a Dedicated Server or a Client. This is what the GameMode is used for. What is important to point out is that topology limits the GameModes you can use. Let’s take a closer look at available options for each topology.
Host-Client
GameMode.Host is used for a player acting simultaneously as both the Server and a Client. GameMode.Client is used for players joining the host. Fusion 2 also offers a hybrid mode GameMode.AutoHostOrClient. It first tries to join an existing session as a Client. If none is found, a new session is started, and the player becomes the Host. It can simplify the code and testing as you can use one method to both create a session and join it.
Dedicated Server
GameMode.Server is used for the server. GameMode.Client is used for clients. Note that there is no auto mode.
Shared
There is only one mode for all of the clients – it is GameMode.Shared.
GameMode.Single
One of Fusion 2’s most practical features is its ability to run in Singleplayer mode with almost no changes to your existing multiplayer logic. If your multiplayer game is designed in a way that can function with just one player, Fusion makes it easy to support offline play.
All you have to do is start a session using GameMode.Single. This tells Fusion that the session will run entirely offline – no clients can join, and Photon Cloud services are disabled. The key benefit is that all the multiplayer systems – object spawning, state replication, event handling, simulation ticks – still work.
The player in this mode behaves exactly like a Host. They act as both the server and the client, but in a self-contained, local-only session.
Session Callbacks
Below is a list of callbacks from the INetworkRunnerCallbacks interface relevant to session management. While not every project will need to implement all of them, it’s useful to be aware of these options to better understand what Photon Fusion 2 provides.
- OnConnectedToServer(NetworkRunner runner). This callback is triggered when a connection to the server or host is successfully established. You can use it to initialise the game state or notify the player that the connection has succeeded.
- OnConnectFailed(NetworkRunner runner, NetAddress remoteAddress, NetConnectFailedReason reason). Triggered when a connection attempt to a server or host fails. It provides details about the target address and the failure reason, allowing the application to display error messages or retry the connection.
- OnConnectRequest(NetworkRunner runner, NetworkRunnerCallbackArgs.ConnectRequest request, byte[] token). Triggered when the server receives a connection request from a remote client. This allows you to validate the request and either accept or reject it, useful for implementing custom authentication or access control systems.
- OnDisconnectedFromServer(NetworkRunner runner). Triggered when the connection to the server or host is lost. You can use this to handle disconnection logic, such as saving progress, informing the player, or initiating a reconnection attempt.
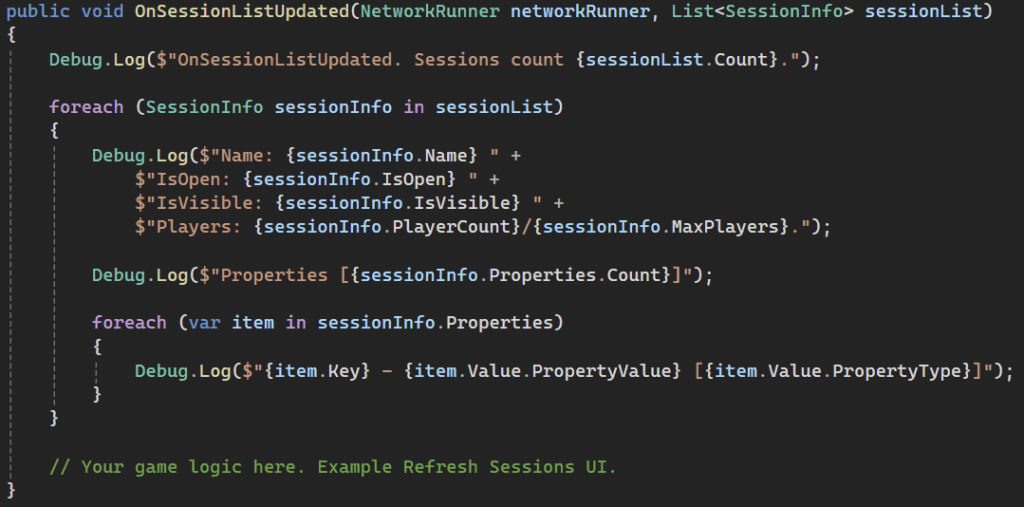
- OnSessionListUpdated(NetworkRunner runner, List<SessionInfo> sessionList). Called when the Photon Cloud returns an updated list of visible and joinable sessions in the connected lobby. You can use this data to populate a session browser UI for players.
- OnShutdown(NetworkRunner runner, ShutdownReason shutdownReason). Triggered when the NetworkRunner is shutting down. It provides the reason for the shutdown and can be used to finalise the session, save progress, or clean up resources.
- OnCustomAuthenticationResponse(NetworkRunner runner, Dictionary<string, object> data). Called after receiving a response from the authentication server. You can use the returned data to configure the session, adjust permissions, or customise gameplay based on user identity.
- OnHostMigration(NetworkRunner runner, HostMigrationToken hostMigrationToken). Triggered when host migration begins, typically in Host-Client mode. It provides a migration token containing all necessary data to resume the session on a new host after a disconnection or crash.
To register callbacks, use NetworkRunner.AddCallbacks or the NetworkEvents component.
Create and Join Session
Create session
Let’s move on to your first real implementation – creating a session so others can join!
Photon Fusion 2 uses the NetworkRunner.StartGame(…) method to either create a new session or join an existing one, based on the parameters you provide. To create a new session, set the GameMode to Host.
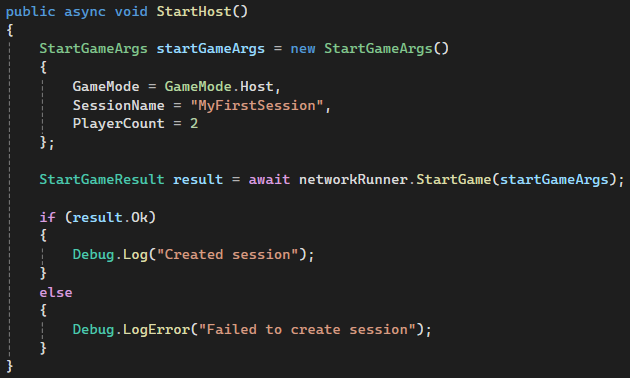
This is a simple way to start a new session without providing any extra details. If you don’t set the PlayerCount parameter, Fusion 2 will use the default value from the config file located at:
Assets/Photon/Fusion/Resources/NetworkProjectConfig.fusion.
StartGameArgs
The StartGameArgs structure is used to provide data when creating or joining a session. Here are a few important parameters you should be aware of.
- SessionName – A custom name for your session. It must be unique within the region and serve as the session’s identifier. If left empty, Fusion will generate a GUID.
- SessionProperties – A list of key-value pairs used during matchmaking as filters.
- CustomLobbyName – By default, Fusion creates a separate lobby per GameMode. You can override this behaviour and define your own lobby names to organise different types of sessions.
- IsOpen – Determines whether new players can join the session. It can be changed after the session has started.
- IsVisible – Controls whether the session is visible in matchmaking. If set to false, the Matchmaker won’t assign players to it, and it won’t appear in public session lists. This can also be changed later.
Join the Session directly
The most direct way to join sessions in Photon Fusion 2 is by using a specific SessionName. In Fusion, the session name serves as a unique ID within the region and cannot be duplicated. When creating a session, you can define its name via the SessionName property in StartGameArgs. If left empty, a GUID will be automatically generated as the SessionName.
This approach is particularly useful for direct player invites. For example, you can create a private session and hide it from public matchmaking by setting StartGameArgs.IsVisible to false. Players can still join it by providing the correct SessionName.
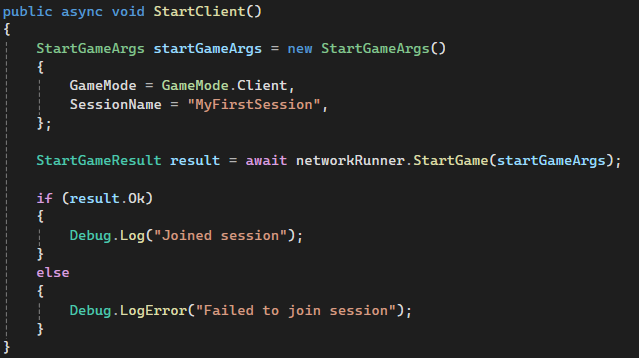
Keep in mind that when a SessionName is specified, it overrides all matchmaking filters. For instance, if you define a map type in SessionProperties, the system ignores it when you join a session by SessionName.
In the example above, you call StartGame with GameMode set to Client, which means you join a session named “MyFirstSession” as a Client. If the session doesn’t exist or a connection error occurs, the StartGameResult will indicate the failure and include relevant error details.
Matchmaking
The most commonly recommended approach to joining sessions in Photon Fusion 2 is Matchmaking, which looks for an open session that hasn’t reached its player limit. If you use GameMode.AutoHostOrClient in StartGameArgs and no matching session exists, Photon Fusion 2 automatically creates a new one and makes the first player the Host.
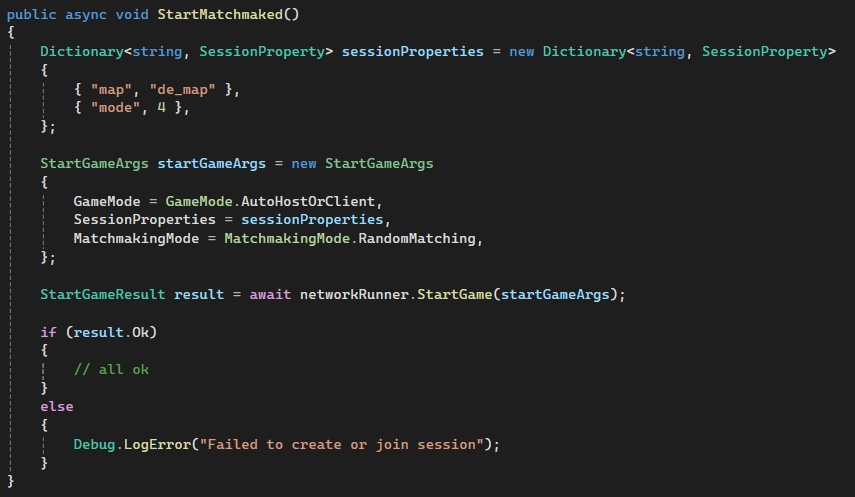
Matchmaking in Fusion 2 can operate in one of three modes, each with different matching behaviour. You can configure this using StartGameArgs:
- FillRoom – The default mode. It fills up the oldest available sessions first to average out waiting times. This mode ignores SessionProperties filters.
- SerialMatching – Distributes players more evenly between sessions and respects the SessionProperties filters.
- RandomMatching – Selects sessions at random but also respects the SessionProperties filters.
Now, let’s explain what these SessionProperties are. Fusion 2 offers a basic matchmaking system that lets you define a set of key-value pairs. A session will only be matched if all the provided properties exactly match. You can use this to filter by game mode, map name, or similar parameters. However, this approach doesn’t support more advanced scenarios like ranking-based matchmaking or skill brackets. There’s no built-in support for range comparisons in parameters.

Matchmaking abuse
Photon Fusion 2 Matchmaking is client-driven. All matchmaking decisions are based solely on the data sent by the client looking to join. So if you plan to implement features like skill-based matchmaking, you’ll need to handle this on the client side – which opens the system up to potential tampering or abuse. Players can modify their request and claim that they belong to a different skill group.
If your Matchmaking needs to be secure and cannot rely blindly on the data from the Client, you should turn to external solutions like Unity Game Services. You can integrate their Matchmaking with their Cloud Code to run sensitive logic securely on the backend. The Client never accesses this logic or data. Only the final result comes back to it.
Lobby and Sessions List
The less-recommended way to join a session is manual session browsing. Player selects a session from a full list of all available sessions in a region.
Before diving into how this works, let’s first define what a Region is. Photon Cloud sets up Regions as physical data center locations around the world to group player traffic locally and minimise latency. As of writing, Photon supports 16 regions, such as “eu” (Europe, hosted in Amsterdam) or “us” (US West, hosted in Washington).
Fusion 2 supports both automatic region selection – based on player location – and manual selection when needed.
A Lobby is a virtual container within a Region that groups active game sessions. When creating a session, you can assign it to a named Lobby. Within a Lobby, players cannot see each other, and there’s no communication or visibility of who else is present.
If you want players to manually browse and select from a list of sessions, they must first join a specific Lobby. You can join the default lobby for Client-Server mode using the following code:
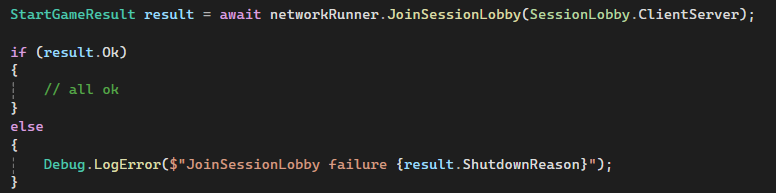
After successfully joining a Lobby, any session updates within that Lobby will trigger the OnSessionListUpdated method from INetworkRunnerCallbacks. The sessionList parameter will provide information about all visible sessions. You can use this data to display a custom session browser in your UI and allow players to join a session of their choice.
Issues when using the Sessions List
This method generates significant network traffic. Every change in a session’s parameters triggers updates to all connected clients. Photon officially discourages this pattern and considers it legacy. Still, if your game requires advanced session filtering on the client side, this remains the only viable method.
Security warning: All matchmaking and filtering logic in this model happens on the client side. Without a proper backend to validate data, you are exposed to potential manipulation, e.g. Client joining a session that should not be available to them.
Private Session or Password-Protected Session
One important and sometimes overlooked topic in Photon Fusion 2 is how to create private sessions or sessions protected by a password.
Session IsVisible
A private session is one where the IsVisible flag is set to false. This means the session will not be visible to the Matchmaker or listed in the OnSessionListUpdated callback. The only way to join it is by specifying its exact name in the SessionName field of StartGameArgs. If the name matches, the session is open (IsOpen), and there are free slots, the connection will be accepted. Otherwise, the join request will be refused.
ConnectionToken
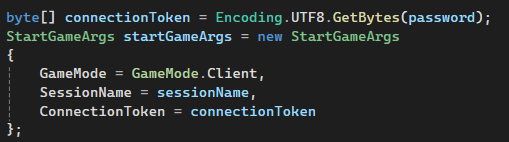
You may want to protect your session with a password. Fusion 2 does not natively support password-protected sessions, so this requires a manual approach. The only tools available for this are the SessionProperties dictionary and the ConnectionToken field. The Connection Token is a byte array in StartGameArgs. It can be set by the client and then sent to the Host/Server when a connection is attempted.
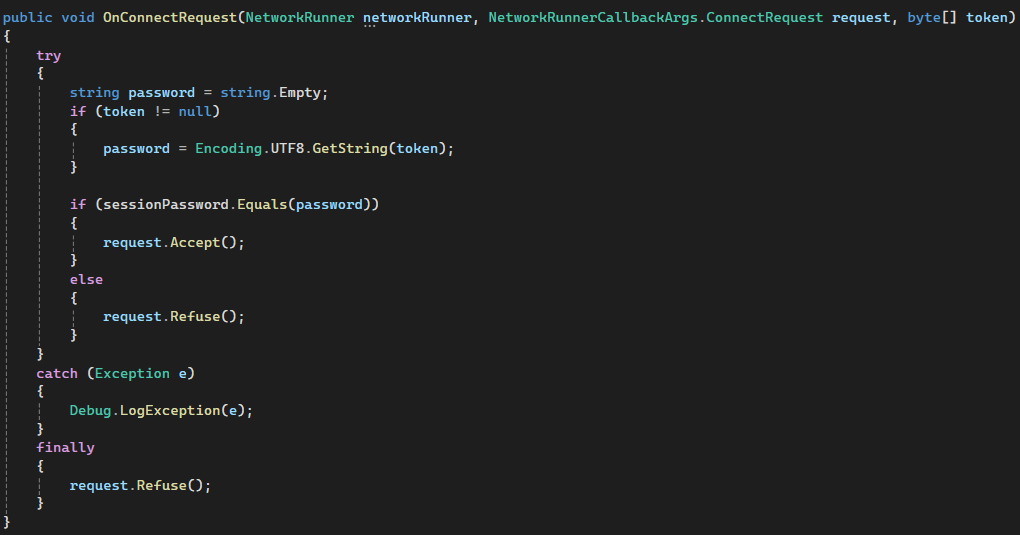
The Client can send the password to the Host using the ConnectionToken. Never store sensitive data like access passwords in SessionProperties, since all Clients can read and manipulate that data. The Host/ Server must always verify the password to ensure secure validation. If the Client handles the verification, the system loses all reliability. A malicious Client could always claim that the password is correct, completely bypassing your intended access control.
The Host triggers the OnConnectRequest callback when a player attempts to join a session. The Host can verify the password using the ConnectionToken and decide whether to accept or refuse the connection.
How can I tell if a session is password-protected?
This approach works reliably, but it only helps if the Client already knows that the session requires a password. Since there is no built-in password system, the application cannot automatically prompt for that information. The only way to communicate this is by adding a custom field like HasPassword to the SessionProperties. You can use this to display a lock icon in the session list or trigger a password prompt when the player tries to join.
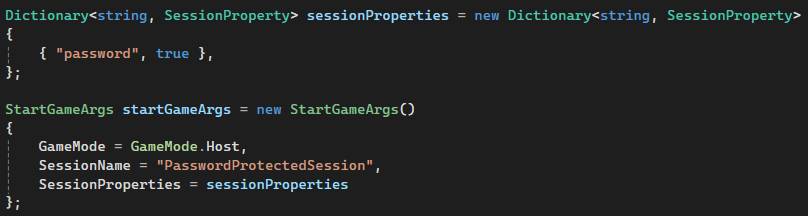
The main downside is that the Client must have access to this session metadata in advance. Even if the app doesn’t show the session list in the UI, the Client must fetch session data to check whether it should ask for a password. To enable this, the session must remain visible by setting IsVisible to true. Otherwise, the Client can only join by name and can’t detect if the session requires a password.
In such cases, your only option is to show a pop-up asking the player to enter a session name and, optionally, a password. You can include a note telling players they need a password only if the session requires one. However, this information must come from an external source. When the session is not visible, the Client app cannot detect it automatically.
Summary and What’s Next?
In the previous article of this series, we introduced Photon Fusion 2 and the network topologies it supports. Also, we discussed how to choose the right one for your game. Now you know how to set up a project ready for multiplayer development. If you missed it, you can read it here: Photon Fusion 2 – Introduction – Part 1/4.
In this post, you learned how to manage multiplayer sessions using the Host-Client model. We covered the basics of creating and joining sessions, matchmaking modes, and configuring public, private, and password-protected sessions. You also became familiar with the most important callbacks from the Fusion API that relate to the connection and session lifecycle.
Now that you know how to establish and control a multiplayer session, it’s time to move on to the next key topic: data synchronisation. In the next article, we’ll explore how Fusion 2 replicates game state between clients. You’ll learn about synchronisation components, remote procedure calls (RPCs), handling player input, and how to structure your networked properties for efficient replication.
Continue reading: Photon Fusion 2 – Data Synchronisation – Part 3/4.