Previous part: Photon Fusion 2 – Sessions Management – Part 2/4.
Data synchronisation is the most important part of every multiplayer game. In Photon Fusion 2, you have all the tools you need to keep players, objects, and game logic in perfect sync across the network. In this article, you’ll learn how authority works, how to use networked properties and RPCs, how to synchronise object transforms and physics, and how to handle player input. Whether you’re syncing basic values or building advanced mechanics, this guide gives you the essentials to make your multiplayer game feel seamless.
Introduction
You already understand the basics of Photon Fusion 2 and know how to choose the best network topology for your game. You can manage sessions, create new ones, join as a Client, and set up private or password-protected sessions.
Now you’re ready for the most exciting part – syncing game data in real time. This article teaches you the core methods of data synchronisation in Photon Fusion 2. With these skills, you can finally start building your game’s main mechanics.
You will learn how to synchronise property values, use built-in components to sync the position, rotation, and scale of objects, and manage physics across the network. You’ll handle player input, respond to parameter changes, build your first RPCs, and spawn networked objects.
Synchronization
When you play a single-player game, you can freely modify the world without any communication required, because you are the only entity that is affected by it. With multiplayer games, when you want to modify the world, you have to notify other players so they can also modify their world accordingly. Otherwise, the changes would be local only, and other players wouldn’t know about it. There are even cases when your attempt at modification is straight-up denied because of a conflict with other changes you haven’t registered yet. This is a very complex process called data synchronisation, and getting it right is the key to a good player experience.
Not everything needs to be synchronised. For instance, in a game that allows you to customise the HUD, there is no point in synchronising it. There is also no point in synchronising static level elements. The GameObjects that are synchronised are called Networked Objects.
Authority
In multiplayer games – especially those built with the Host-Client topology – it’s crucial to define which peer can modify the in-game object. Photon Fusion 2 handles this with a clear authority system. Understanding how authority works helps you prevent conflicting updates, cheating, and synchronisation errors.
Authority determines which player or device controls a specific object or game system. In Photon Fusion 2, there are two types of authority: State Authority and Input Authority.
State Authority
State Authority gives a peer the right to update and synchronise the state of a networked object. In the Host-Client model, the Host always has State Authority over all networked objects. Only the Host can make decisions that affect the state of the game world – such as player positions, health values, spawning objects, and resolving gameplay actions.
Other clients receive updates from the Host about the state of every networked object, but they cannot change the state themselves. If a client tries to update a networked property of an object without State Authority, Fusion ignores the change or overwrites it with the Host’s data on the next tick.
State Authority is critical for:
- Preventing cheating by ensuring only the trusted Host can modify critical data.
- Providing a single source of truth for the game world, thus eliminating the risk of conflicting changes.
- Ensuring all clients see the same state as determined by the Host.
Input Authority
Input Authority controls which Client can provide input – usually the player’s own character. In the Host-Client topology, each Client holds Input Authority over its own player object. This allows the client to send movement, action, or control inputs to the Host for their character, and for the Host to react to the Client’s input.
The Host reads received input from the clients, processes the data, and updates the authoritative game state. Fusion then replicates the updated state to all clients.
Input Authority is important for:
- Letting each player control their character.
- Keeping input collection (client-side) separate from state validation (host-side).
- Supporting client-side prediction, so Clients can simulate their actions instantly.
Replication
Photon Fusion 2 synchronises game state between Clients through the Networked Simulation Loop. The engine splits gameplay into simulation ticks. A simulation tick is a fixed, regular step in the simulation. Every action, update, and network event occurs on these ticks, ensuring all Clients process the same events in the same order. This approach helps to keep every Client in sync, regardless of frame rate or hardware differences. You can set the tick rate in your project settings and adjust it for your game’s needs.
Replication Mechanisms in Photon Fusion 2
Networked Properties – You synchronise object properties, like health or gold, by using the [Networked] attribute. The client or server with State Authority sends property changes to other clients. When a client changes a property without authority, the update is local. On the next tick, Fusion overwrites it with the value from the State Authority.
Remote Procedure Calls (RPCs) – You mark methods with the [Rpc] attribute to call functions on other clients or the server. You call the method like any other local method, but behind the scenes, Photon synchronises the call to the method according to the attribute parameters.
NetworkTransform – this component synchronises the position, rotation, scale, and parent object of a game object. Fusion uses this component to deliver smooth and efficient synchronisation across all clients.
Player Input – In Host-Client Mode, the player with Input Authority collects input every tick. The Host synchronises and buffers this data, then uses it in each simulation step to simulate movement and actions.
Replication Control Mechanisms in Photon Fusion 2
Interest Management (Area of Interest, AoI) – Fusion decides which objects to synchronise for each player. It only sends relevant data to each client, reducing network load and improving performance.
FixedUpdateNetwork method – Fusion calls this method every simulation tick, so you can update object states. The system then synchronises these changes to all clients.
Render method – Fusion calls the Render method after each simulation step to interpolate and display the current game state on the player’s screen.
Change Detection – Fusion tracks property changes in game objects. You can react to these changes by updating the visuals or other aspects of your game.
These tools give you full control over replication and help you keep your multiplayer game synchronised.
Networked Properties (NP)
The first mechanism for state synchronisation in Photon Fusion 2 is Networked Properties. The peer with State Authority sets the values, and Fusion replicates them to all other peers in the session. This approach lets you continuously synchronise changes to the game state.
To start replicating a property in Photon Fusion 2, follow these three steps. For more details, see the official documentation here.
- Declare the property in a class that inherits from NetworkBehaviour.
- Use an auto-property because Fusion 2 supports only auto-properties. Fusion’s IL-Weaver injects code for serialisation, compression, validation, and network transport.
- Add the [Networked] attribute to your property.
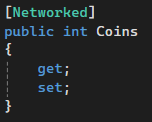
Photon Fusion 2 can replicate some types directly, such as byte, int, and float. For others, you must use special network types, like NetworkBool instead of the standard bool. Always keep your networked properties as auto-properties and don’t implement custom logic inside them. If you need additional logic, wrap the auto-property in another property or use Change Detection.
Networked Properties run inside the Fusion 2 simulation loop, which works on fixed ticks. On every tick, Fusion calls the FixedUpdateNetwork method, just like Unity’s FixedUpdate. Fusion collects the values of all properties with the [Networked] attribute and creates a snapshot on the side with State Authority. Fusion then synchronises this snapshot with other peers.
Keep in mind that Networked Properties synchronisation also connects with the Area of Interest (AoI) system, although this article does not cover AoI in detail. With AoI, you can reduce network traffic and focus on syncing only the data your players really need – for example, objects within their view or interaction range. With AoI enabled, objects outside a client’s area of interest are simulated only on the authoritative side and their state is not sent to clients unless they become relevant. AoI is disabled by default.
Change Detection
You need to detect changes in Networked Properties in almost every game. For example, when the HP value changes, you might want to update the UI or destroy the object if HP reaches zero.
The OnChangedRender attribute provides the easiest and most popular way to respond to property changes. You use this attribute to specify the name of the method that Photon Fusion 2 should call when the property changes. Fusion automatically generates code to call your chosen method whenever the value updates.
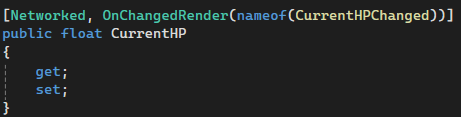
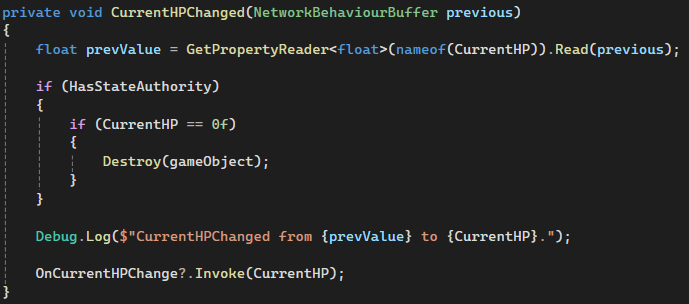
Fusion always calls your method after updating the property value. In the example, you can also read the previous value from the buffer.
Remote Procedure Call (RPC)
Almost every game needs systems for triggering single or complex actions on demand. For example, players may set a nickname, pick up an item, or open a door. These one-time events do not need constant synchronisation, so you can reduce network traffic. By default, Photon Fusion delivers RPC calls reliably, but you can also use unreliable mode. Photon ensures the packets arrive and runs the procedure on the receiver.
Here’s how to declare a custom RPC to set the player’s ready status. The Host can only start the match when all players are ready.
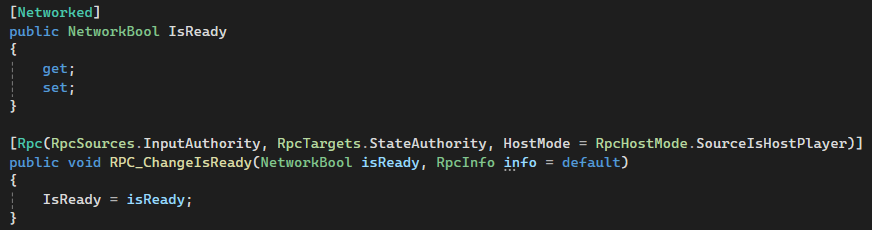
How to define an RPC?
- Declare the RPC in a class that inherits from NetworkBehaviour.
- Use a ‘rpc’ prefix or postfix.
- Add the [Rpc] attribute.
- Set RpcSources to control who can call the RPC. For example, every player with InputAuthority.
- Set RpcTargets to control who receives the RPC. In most cases, only the Host, since only the Host with StateAuthority can update the networked state.
- Optionally, set HostMode to control how Photon treats the Host. By default, Photon treats the Host as a server, so RpcInfo.Source will be None. To treat the Host like any other client, set SourceIsHostPlayer.
How does this work in practice?
- Player B (Client) calls RPC_ChangeIsReady(true) to confirm readiness.
- Photon checks if Player B can receive the RPC. Since B lacks StateAuthority, Photon only sends the call to valid targets (the Host, Player A). The method is not called on the Client.
- Player A receives the RPC and runs the method RPC_ChangeIsReady(true). Player A as a Host updates the IsReady property.
- The IsReady property synchronises to all clients using the [Networked] attribute.
- Both players react to the property change and update the status on screen.
Important note
RPCs are one-time events. They only reach players at the moment of execution. If your game logic depends on RPCs, remember to handle new players joining or reconnecting. For example, if you open a door via an RPC and don’t continuously synchronise its state, send the door’s status to new clients when they join. Otherwise, the door state will be out of sync.
Data Streaming
Sometimes you need to transfer much more data than a simple variable or an RPC parameter. Some games allow players to create custom maps, share images and videos, or exchange configuration and save data.
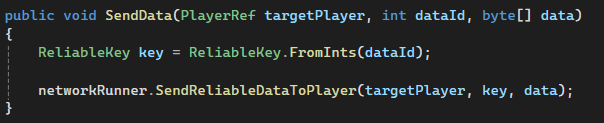
Photon Fusion 2 offers an easy-to-use data streaming system. You can send large byte arrays from the client to the server or host, and in the other direction as well. The high-level API lets you send and receive data without managing packet fragmentation or order. As the sender, you call a method to reliably send data. The receiver listens for events that report transfer progress and confirms when the whole package arrives. Fusion 2 does not inform the sender about delivery status or completion. If you need this feedback, use RPCs to notify the sender.
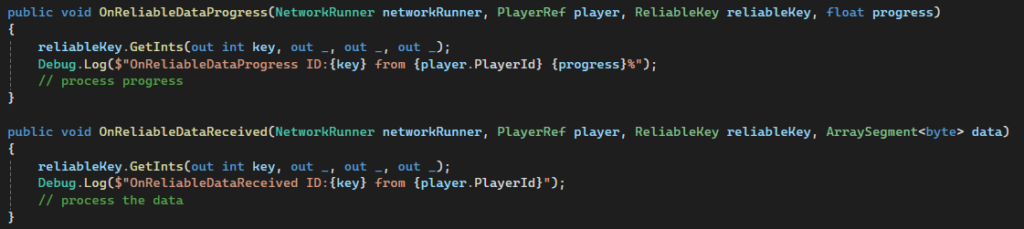
Data streaming does not depend on State Authority or Input Authority. To send data to a player, use a NetworkRunner in Host or Server mode. When you want to send data to the server, use the NetworkRunner in Client mode. To receive data or progress info, implement the methods OnReliableDataProgress and OnReliableDataReceived from the INetworkRunnerCallbacks interface.
Sending
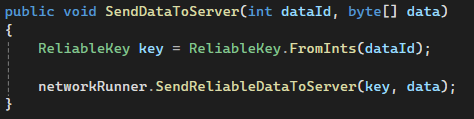
Receiving
Sync Components
Now you’ll learn about the main components that let you easily synchronise basic properties of scene objects – such as position, rotation, scale, and even object hierarchy, meaning parent-child relationships. I’ll also introduce you to the component for syncing Rigidbodies, so you can use physics in your multiplayer game.
NetworkTransform
The NetworkTransform component allows you to synchronise an object’s position and rotation by default. You can place it either at the root of your object hierarchy, next to the NetworkObject component, or on any nested child object. You don’t need to do anything else to start using this basic functionality.
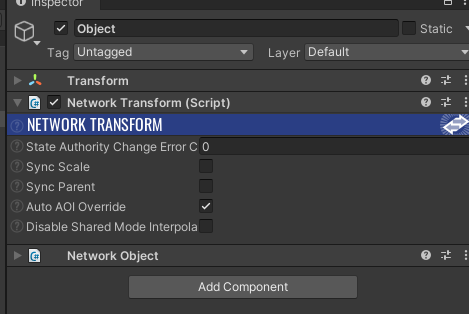
For objects with a hierarchy, add a NetworkTransform to every object whose position and rotation relative to its parent should be synchronised. If your game requires it, you can also enable localScale synchronisation by checking the Sync Scale option.
A very important aspect of synchronising objects and their hierarchies in games is managing parenting and changing the parent of an object. Some of the most common examples include a player character picking up an item and holding it in their hand, or a character entering a vehicle and moving with it. Usually, you handle such operations by changing the object hierarchy – nesting one object inside another. For instance, a seat in a vehicle becomes the parent of a player character’s object when you call playerTransform.SetParent(vehicleSeatTransform) and set the appropriate local position and rotation. Photon Fusion 2 also needs to correctly handle changes to the hierarchy so that the scene state on the Client matches that on the Host.
To explain how this works, let’s look at an example where you mount a weapon on a vehicle in a sample game. Below, you can see the hierarchy of a vehicle controlled by the player. The vehicle contains a nested structure of objects, and one of them is called Weapon Slot, marking the place on the roof where you can attach a weapon.
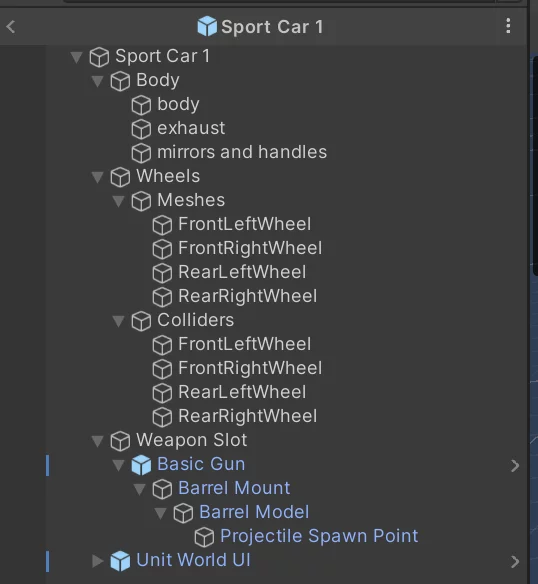
The weapon object is defined as a prefab consisting of a gun base and a barrel. Once mounted on the vehicle, the gun base can rotate relative to the vehicle, and the barrel can move up and down relative to the base.
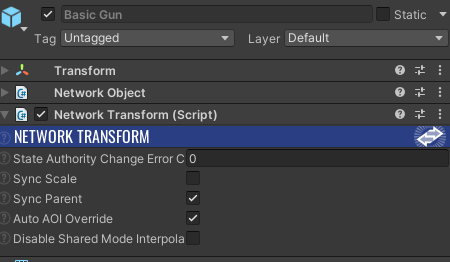
How do you set up the hierarchy so that a call to basicGunTransform.SetParent(sportCar1Transform) works and replicates across all peers while still allowing the weapon to perform the movements described above? The key is the Sync Parent option, which you enable on the NetworkTransform component. Sync Parent works upwards – the component with this option enabled will synchronise the identifier of its parent object.
- Basic Gun: Add NetworkObject (as the root) and NetworkTransform with Sync Parent enabled. This object will be nested inside the Weapon Slot.
- Barrel Mount: Add NetworkTransform, but don’t enable Sync Parent. The hierarchy doesn’t change here, but the barrel still moves relative to the base.
- Sport Car 1: Add NetworkObject (root) and NetworkRigidbody3D (explained in the next section).
- Weapon Slot: Add NetworkTransform (without Sync Parent), even if its position and rotation won’t change relative to the vehicle. Each NetworkTransform has a unique NetworkTransformId, which Fusion 2 uses to identify the parent during synchronisation.
After this simple setup, with no code required, your objects are ready for logic like mounting weapons on vehicles. You can now focus on your game mechanics and let Fusion 2 handle the network replication.
NetworkRigidbody3D
NetworkRigidbody3D is part of the Physics add-on for Photon Fusion 2. You need to download and import this package separately (see the link). This component lets you synchronise Unity’s Rigidbody over the network. To control networked physics, you also need to add the RunnerSimulatePhysics3D component to the object with NetworkRunner. If you need a reminder, check the earlier article in this series – especially the part about the NetworkRunner component. RunnerSimulatePhysics3D lets you decide how Fusion 2 should work with Unity’s physics engine. Fusion takes Physics Authority, managing all calls to Physics.SyncTransforms() and Physics.Simulate(). The Physics Timing setting lets you choose if these calls run inside Fusion’s FixedUpdateNetwork loop or in Unity’s own Update or FixedUpdate methods.
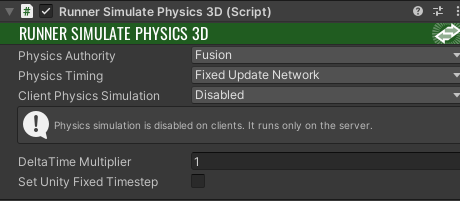
You can configure exactly how the physics simulation runs on each client.
Key Client Physics Simulation Settings
- Disabled – By default, client-side simulation is turned off. Only the Host or Server simulates physics. Clients simply replicate object positions and rotations after the simulation. In this mode, Fusion does not call SyncTransforms(), so any interaction with physics objects won’t work on the client.
- Sync Transforms – In this mode, clients do not run a full physics simulation. However, Fusion calls SyncTransforms() every tick. This allows physics interactions to work as expected, because the physics engine always has the correct object positions, rotations and proper Rigidbody configurations.
- Simulate Forward – The client runs Simulate() for each forward tick. Players immediately see feedback from their actions, without waiting for the server. When the server’s authoritative state arrives, Fusion 2 corrects the local predicted state to match the server. If the difference is minor, you can interpolate smoothly to prevent sudden jumps.
- Simulate Always – This is the most accurate, but also the most performance-intensive mode. Fusion runs a local physics simulation for every forward tick and every resimulation. The Client’s state always stays as close as possible to the server.
Player Input
Players interact with the game by sending input. They move characters, drive vehicles, shoot, and use items. Each action generates input data, which players use to affect the game world. In a Host-Client topology, the Client cannot modify the game state directly. Clients only have InputAuthority; only Host holds StateAuthority. You need a system where Clients collect their input, send it to the Host, and the Host updates the game world. Then Photon Fusion 2 replicates these changes to all Clients.
Fusion 2 collects player input every simulation tick and sends it to the Host. Fusion supports client-side prediction. This feature lets the client instantly simulate the results of its own inputs, without waiting for the authoritative Host’s response. If the local prediction does not match the authoritative state from the Host, Fusion automatically rewinds the simulation and replays it with the correct data – a process called rollback and reconciliation. As a result, players experience smooth and responsive controls, even if there is a network delay.
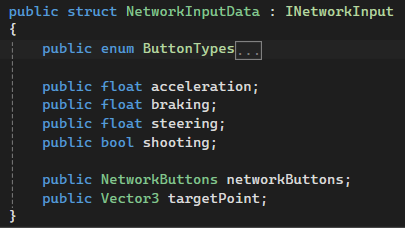
NetworkInputData structure
Define a structure to store player input by implementing the INetworkInput interface. In the example shown below, the code uses the NetworkButtons structure to track which buttons the player presses. NetworkButtons makes it easy to check if a button is currently pressed, but it does not store previous states. If you need to compare the current and previous input values – such as detecting when a button is pressed, released, or held – you should store the previous state yourself.
How to read and use Input?
Use the OnInput method, part of the INetworkRunnerCallbacks interface, to collect input each simulation tick. Fusion calls this method on every tick. Avoid spreading input collection across many components. If you do, multiple OnInput calls can overwrite data. The best practice is to use a single component to aggregate all player input, so only one OnInput call runs per tick.
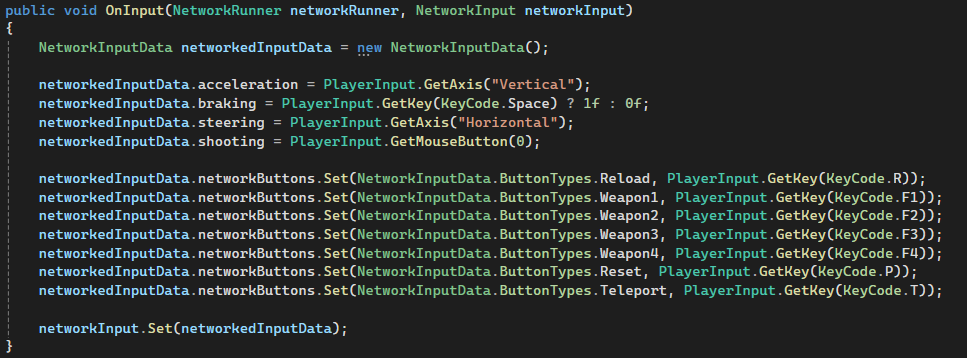
In the example above, OnInput collects vehicle controls, key presses, and mouse position for aiming. Store all collected input in NetworkInput with the Set method. If you call Set from multiple places without aggregating, input can be overwritten.
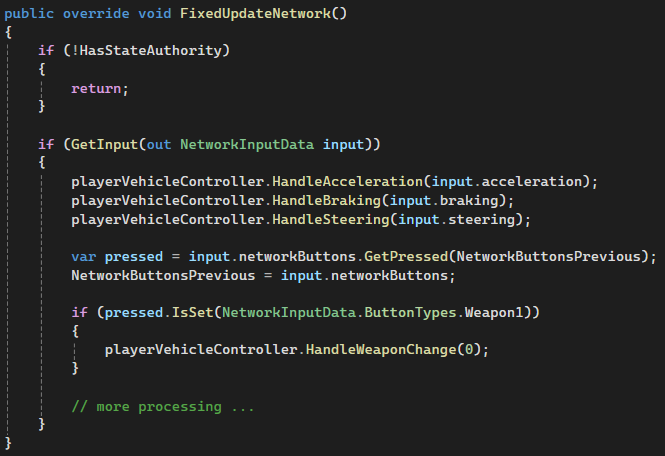
After Fusion 2 collects and synchronises player input, the Host uses it to update the game world. Unlike input collection, which should happen in only one place, you can process player input in as many systems as your game requires. For example, different gameplay systems – such as character control, weapon handling, or UI – can all read and use the same input data. You typically retrieve player input using the GetInput(…) method, which you call inside FixedUpdateNetwork().
For local co-op games, Photon Fusion 2 treats multiple local players as one peer. If two players share a device in split-screen, handle their inputs in your own structure. Design your input structure to separate each player’s data.
Object Spawning
Let’s look at a key multiplayer feature: spawning new networked objects. You’ll almost always need to create objects dynamically during gameplay. For example, when a character drops an item, throws a grenade, or crafts a potion and sets the flask on a table. All these objects need to be replicated across all clients in a multiplayer environment.
To make an object networked, you must register it with Photon Fusion 2. Never create these objects using GameObject.Instantiate(). That method only creates a local instance without a network connection. Always use NetworkRunner.Spawn(). This method creates a networked instance, assigns a unique ID, and ensures Fusion 2 replicates the object correctly for all Clients, even those that join the session after the creation.
When you call NetworkRunner.Spawn(), you must provide a prefab of type NetworkObject. You can also specify a position, rotation, or a PlayerRef to decide which player gets InputAuthority over the object.
Remember: the position and rotation you set affect only the local state on the side responsible for spawning the object – usually the Host or Server. To synchronise positions across all clients, use data synchronisation mechanisms such as NetworkTransform, as covered in the previous sections. The same principle applies if you want to parent the new object under another object.
NetworkRunner.Spawn() also accepts an OnBeforeSpawned callback, which runs just before the object is replicated. Use this callback to handle custom configuration.


Every NetworkBehaviour implements the ISpawned and IDespawned interfaces, which provide Spawned and Despawned methods. Override these methods to handle initialisation and cleanup, just like Unity’s Awake, Start, or Destroy.
If you need extra control, you can implement the IAfterSpawned interface. This gives you an AfterSpawned method, called immediately after the networked object is created. Fusion 2 calls these interface methods both for objects created at runtime and for any objects that already exist in the scene and have a networked representation.
Fusion calls the Spawned and Despawned methods on both the Host and Client. Both sides can execute logic as needed for your game. To find out if code is running on the Host or Client, check NetworkRunner.IsServer or NetworkRunner.IsClient, or use Object.HasStateAuthority and Object.HasInputAuthority to verify the object’s authority.
Keep in mind that Fusion calls OnBeforeSpawned exclusively on the Host. On the Client, Fusion only executes the Spawned and AfterSpawned methods. This distinction is important when you need to run pre-spawn configuration or custom logic. Make sure to implement it on the Host side.
Host
- OnBeforeSpawned callback from NetworkManager.Spawn(…).
- Spawned.
- AfterSpawned.
Client
- Spawned.
- AfterSpawned.
Summary and what’s next?
In previous articles, you created accounts, discovered the basics of networking topologies, the main use cases for Photon Fusion 2, and learned how to manage user sessions. If you missed any of these topics, be sure to check out the earlier posts in this series – they provide the foundation for everything covered here:
Photon Fusion 2 – Introduction – Part 1/4
Photon Fusion 2 – Sessions Management – Part 2/4
You’ve just learned the core techniques for data synchronisation in Photon Fusion 2: how authority works, how to use networked properties and RPCs, how to sync object transforms and physics, and how to handle player input for smooth gameplay. With these skills, you can now build reliable multiplayer features and keep your game state consistent for all players.
Next, you’ll take your project further by exploring advanced synchronisation strategies, optimising network performance, and managing session state and players. Stay tuned to unlock the full potential of Photon Fusion 2 and create seamless multiplayer experiences.